
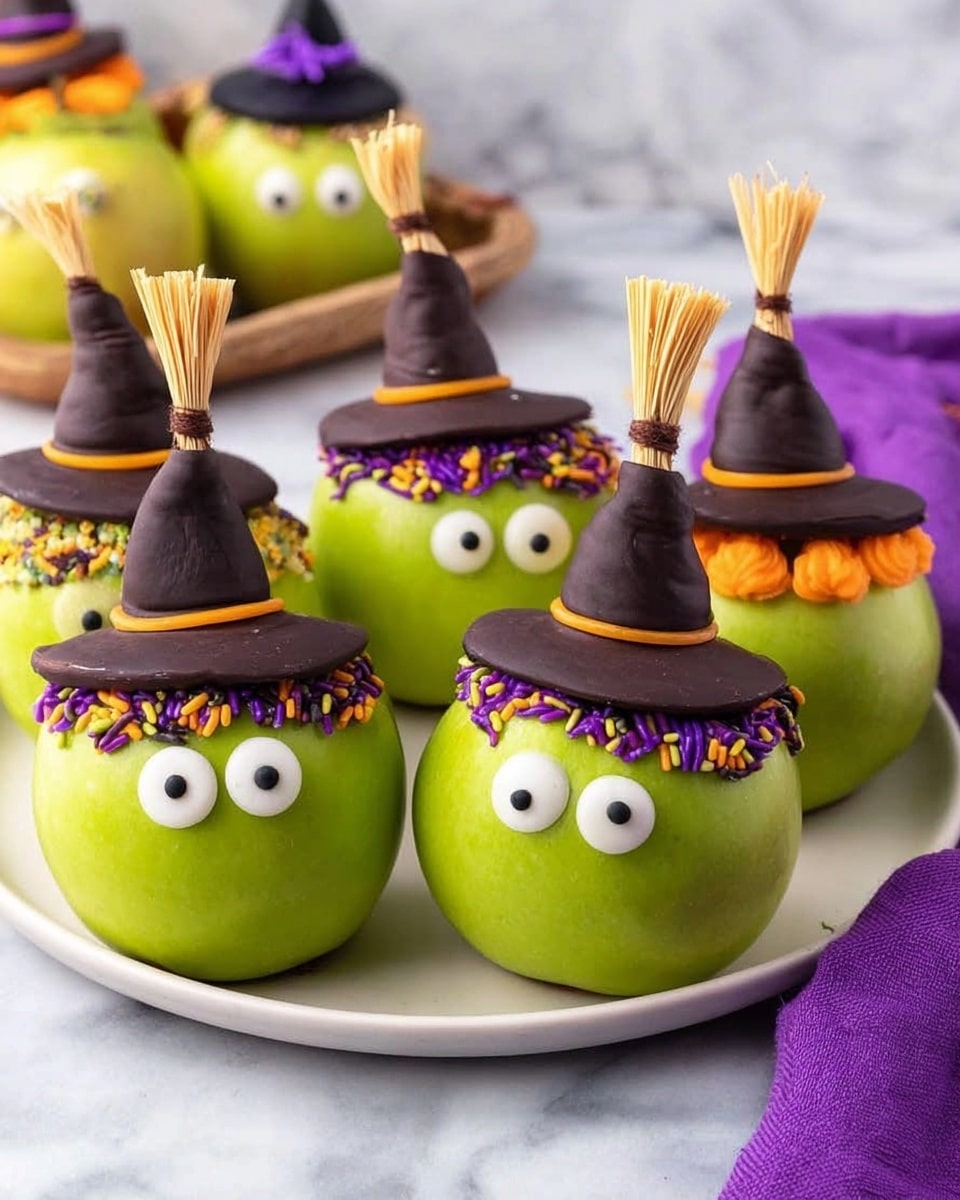
Halloween Witch Apples Recipe
If you’re on the hunt for a fun, festive treat that will wow your friends and family this season, you absolutely must try this Halloween Witch Apples Recipe. These spooky little apple witches are not just adorable—they’re also surprisingly easy to make and packed with flavors and textures kids and adults will love. I remember making them one Halloween afternoon while blasting my favorite spooky playlist, and trust me, the smile on my niece’s face when she saw these was priceless. Keep reading, because I’m going to walk you through every step, share tips from my kitchen, and help you nail this recipe with ease!
Why This Recipe Works
- Simple Ingredients: Uses easy-to-find ingredients that come together quickly for a fuss-free treat.
- Fun and Interactive: The assembly lets you get creative with decorating and customizing your witches.
- Perfect Balance of Flavors: Crunchy apples, sweet chocolate, and creamy icing make every bite delightful.
- Kid-Approved: Great for Halloween parties, family gatherings, or just spicing up an ordinary afternoon snack.

Ingredients & Why They Work
All of the ingredients in this Halloween Witch Apples Recipe are carefully chosen to create the perfect balance of spooky and delicious. Plus, each one adds a unique texture or flavor that plays well together. When shopping, look for fresh, firm apples and vibrant, evenly-sized strawberries to make your witch hats look their best!
- Strawberries: These form the witch hats and need to be ripe but firm so they hold their shape.
- Sugar Cookies: Provide a sturdy base for the hats and a sweet, buttery contrast.
- Dark Melting Chocolate: Melts smoothly to coat the strawberry hats, giving a witchy dark touch.
- Candy Eyes: Essential for giving your witches their spooky personalities!
- Green Apples: Firm apples are best—they hold up as the witch’s “head” without getting mushy.
- Mini Yellow M&Ms: Perfect for decorating the hats with a pop of yellow “buckles.”
- Halloween Colored Sprinkles: Adds fun and festive color bursts to the hats.
- String Cheese: Makes the broomsticks’ “bristles,” and is easy for kids to peel and nibble.
- Chocolate Twizzlers: Used as broom handles; the chocolate flavor pairs beautifully with apples and cheese.
- Chocolate Pocky Sticks: Another fun broomstick alternative with a crisp texture and chocolate coating.
- Colored Icing (white, orange, purple, green): For decorating and securing parts together; using multiple colors makes it even more festive.
Tweak to Your Taste
I love how this Halloween Witch Apples Recipe invites creativity. I always swap out colors or candy types depending on the crowd or season. The best part? You can easily make it your own, so don’t be afraid to experiment!
- Variation: One of my favorite tweaks is using red licorice twisties instead of chocolate Twizzlers for a classic candy flavor that kids adore.
- Dietary Swap: If you’re avoiding dairy, try vegan sugar cookies and dairy-free chocolate melts—they work just as well.
- Seasonal Touch: Around winter holidays, swap the colored icing for reds and greens to create festive holiday witch apples.
Step-by-Step: How I Make Halloween Witch Apples Recipe
Step 1: Crafting The Witch Hats
Start by trimming the tops off your strawberries so they’re flat and can sit nicely on the sugar cookies. Then, put a small dot of white icing on each cookie—it’s like edible glue to secure the strawberry “hat”. Once they’re assembled, melt your chocolate according to the package directions and spoon it over the strawberry hats for a smooth, shiny finish. For me, popping them in the fridge for about 10 minutes helps set the chocolate quickly without making the strawberries soggy.
Step 2: Preparing the Apple Witches’ Faces
Cut a small slice off the bottom of each apple so it stands upright firmly—no one likes a witch that falls over! Use white icing to dot where you want the candy eyes and carefully place each eye on top. I find using a small toothpick to help position them can be handy if your fingers are a bit clumsy that day.
Step 3: Assembling Your Witches
Spread a very thin layer of white icing around the top of each apple, then gently place a chocolate-coated strawberry hat on top. Don’t use too much icing here, or the hat might slip off—it’s a delicate balance that makes or breaks the look. Next, decorate the hats by outlining where the strawberry meets the cookie with colored icing, placing a mini yellow M&M “buckle,” and sprinkling Halloween sprinkles for that extra pop of festivity. Let everything chill in the fridge for at least 30 minutes so the icing can harden and hold your witch hats firmly in place.
Step 4: Creating the Brooms
Cut each string cheese stick in half and score or peel the cheese about three quarters of the way up to mimic broom bristles. Slide a Pocky stick into the uncut end to form the broomstick. For the finishing touch, split the Twizzler in half lengthwise and tie each half around the top of the broom, securing it with a loose knot so it doesn’t snap. Trim off any excess twizzler for a neat look. These are fun to make—you’ll find the kids love helping peel the cheese and tie the twizzlers!
Pro Tips for Making Halloween Witch Apples Recipe
- Chill, Don’t Rush: Let the chocolate hats fully harden in the fridge to prevent smudging your decorations.
- Steady Hands for Eyes: Use a toothpick to place candy eyes precisely and avoid icing smears.
- Thin Icing Layers: A thin icing layer holds better and prevents your hats from sliding off the apples.
- Keep Kids Engaged: Let them help peel cheese for brooms—makes the process fun and faster!
How to Serve Halloween Witch Apples Recipe
Garnishes
I usually keep it simple and let the witches shine on their own, but if you want to up the fun factor, sprinkle a little edible glitter or add a few extra colored sprinkles around the serving plate. Sometimes I tuck a few small plastic spiders (clean and safe) around for a full Halloween vibe—kids love the little surprise!
Side Dishes
These apples pair wonderfully with a cup of warm cider or a spooky punch. For a party, serve alongside popcorn balls or mini pumpkin muffins to keep the Halloween spirit alive across snack options.
Creative Ways to Present
One year, I arranged my witch apples around a cauldron filled with dry ice (safely placed underneath) for a foggy, magical effect that wowed guests. You can also display them on a tiered cake stand or place them standing in little “witchy” nests made from black licorice curls. The key is to have fun and make them the centerpiece of your Halloween spread!
Make Ahead and Storage
Storing Leftovers
I store leftover witch apples in an airtight container in the fridge. They stay fresh and delicious for up to 3 days, but honestly, they rarely last that long in my house! To keep the hats from shifting, I arrange them carefully so they don’t bump into each other.
Freezing
While you can freeze the components separately—like strawberries or homemade cookies—I don’t recommend freezing the fully assembled witches. The icing and eyes don’t tend to survive freezing well, and apples get mushy after thawing. Trust me, fresh is best here!
Reheating
This is one snack you don’t need to reheat! Serve them chilled or at room temperature. If your chocolate hats soften, just pop them back in the fridge for a few minutes before serving again to firm back up.
FAQs
-
Can I substitute the sugar cookies with another base?
Absolutely! Graham crackers or homemade shortbread cookies can also work well as a base for the witch hats. Just make sure they’re sturdy enough to hold the strawberries without breaking.
-
What if I can’t find candy eyes?
You can make your own using small dots of white icing with tiny chocolate chips or black edible markers to create eyes. It’s a fun DIY alternative and looks cute too!
-
Is there a way to make the brooms without string cheese?
Yes! Use thin strips of fruit leather or cut thinly sliced vegetables like cucumber or carrots for a fresh twist. Just tie them to the Twizzler or pretzel sticks to mimic the broom’s bristles.
-
How far in advance can I prepare these witch apples?
You can prepare the hats and the apples a day in advance separately, but I recommend assembling the entire witch apples no more than 24 hours before serving to keep everything fresh and crisp.
Final Thoughts
This Halloween Witch Apples Recipe has become one of my favorite go-to treats for fall gatherings and kids’ parties. I love how it brings just the right amount of whimsy and sweetness without being overly complicated. Plus, it’s a chance to get creative in the kitchen and share some laughs while assembling your witches. I truly hope you enjoy making (and eating!) these magical little snacks as much as I do. So grab your ingredients, put on your favorite Halloween tunes, and let’s make some witchy magic!
Print
Halloween Witch Apples Recipe
- Prep Time: 15 minutes
- Cook Time: 0 minutes
- Total Time: 45 minutes
- Yield: 6 servings
- Category: Snack
- Method: No-Cook
- Cuisine: American
- Diet: Vegetarian
Description
Halloween Witch Apples are a fun and festive treat perfect for Halloween parties. These adorable apple witches feature green apples adorned with candy eyes, topped with strawberry and cookie witch hats covered in dark chocolate and decorated with colorful icing and sprinkles. Accompanied by string cheese broomsticks tied with chocolate Twizzlers and pocky sticks, these snacks are both visually charming and delicious.
Ingredients
Witch Hats
- 6 strawberries, washed
- 6 sugar cookies
- 1 cup dark melting chocolate
- 6 mini yellow M&Ms
- Halloween colored sprinkles
- ¼ cup white icing
- ¼ cup orange icing
- ¼ cup purple icing
- ¼ cup green icing
Apple Witches
- 6 green apples, stems removed, washed
- 12 large candy eyes
String Cheese Brooms
- 3 sticks string cheese
- 6 chocolate Twizzlers
- 6 chocolate Pocky sticks
Instructions
- Prepare Strawberry Hats: Using a small knife, cut the tops off each strawberry to create a flat, even surface. Place a dot of white icing on each sugar cookie, then position each strawberry cut side down onto the icing, forming the witch hat base.
- Melt and Coat Chocolate: In a small bowl, melt the dark chocolate according to package instructions. Use a spoon to cover the strawberry hats with melted chocolate evenly. Place the coated hats on a non-stick surface and refrigerate for a few minutes until the chocolate hardens.
- Prepare Apples: Slice a small portion off the bottom of each apple to create a flat base so the apples stand steady without rolling.
- Attach Candy Eyes: Use white icing to place small dots on the apples where you want the candy eyes. Gently press the large candy eyes onto the icing dots to secure them.
- Assemble Witches: Spread a very thin layer of white icing around the top of each apple. Place one chocolate-covered strawberry witch hat on top of each apple. Ensure the icing layer is thin to prevent hats from sliding off.
- Decorate Hats: Pipe a ring of colored icing where the strawberry meets the cookie on each hat. Press one mini yellow M&M into the icing at the front of the hat, then sprinkle Halloween colored sprinkles around the band for a festive touch.
- Chill Witches: Refrigerate the assembled apple witches for at least 30 minutes to allow icing and chocolate to set firmly.
- Make String Cheese Brooms: Cut each string cheese stick in half. Using a knife or fingers, make small cuts or peel the string cheese about three-quarters up to create broom broom bristles. Insert one chocolate Pocky stick about half an inch into the uncut end.
- Finish Brooms: Cut each chocolate Twizzler in half lengthwise. Tie each Twizzler half around the top of each cheese broomstick loosely to avoid breaking. Trim any excess Twizzler to complete the brooms.
- Serve: Enjoy the Halloween Witch Apples and string cheese brooms chilled or at room temperature as a festive snack.
Notes
- Store the witch apple snacks in an airtight container in the refrigerator for up to 3 days to maintain freshness.
- You can customize icing colors to fit your Halloween theme, such as using black, brown, or red instead of the suggested colors.
- Chocolate Twizzlers can be substituted with regular licorice Twizzlers if preferred.
- Chocolate Pocky sticks may be swapped with chocolate-covered pretzel sticks for a different texture and flavor.
Nutrition
- Serving Size: 1 apple witch with broom
- Calories: 250 kcal
- Sugar: 22 g
- Sodium: 90 mg
- Fat: 10 g
- Saturated Fat: 5 g
- Unsaturated Fat: 4 g
- Trans Fat: 0 g
- Carbohydrates: 35 g
- Fiber: 3 g
- Protein: 3 g
- Cholesterol: 10 mg


