
Halloween Cake Pops Recipe
Ready to wow your Halloween guests with a treat that’s spooktacular, fun, and absolutely delicious? This Halloween Cake Pops Recipe is my go-to for parties and cozy fall gatherings. They’re cute, creepy, and surprisingly easy to make—trust me, even if you’ve never done cake pops before, you’ll be thrilled with how these turn out. Stick around because I’m sharing all my tips and tricks to help you nail these festive bites!
Why This Recipe Works
- Perfect Texture: The combination of crumbed red velvet cake with cream cheese frosting creates soft, moist cake balls that hold shape without drying out.
- Easy Decorating: Using white candy wafers and colored icing makes decorating fun and accessible, even for beginners.
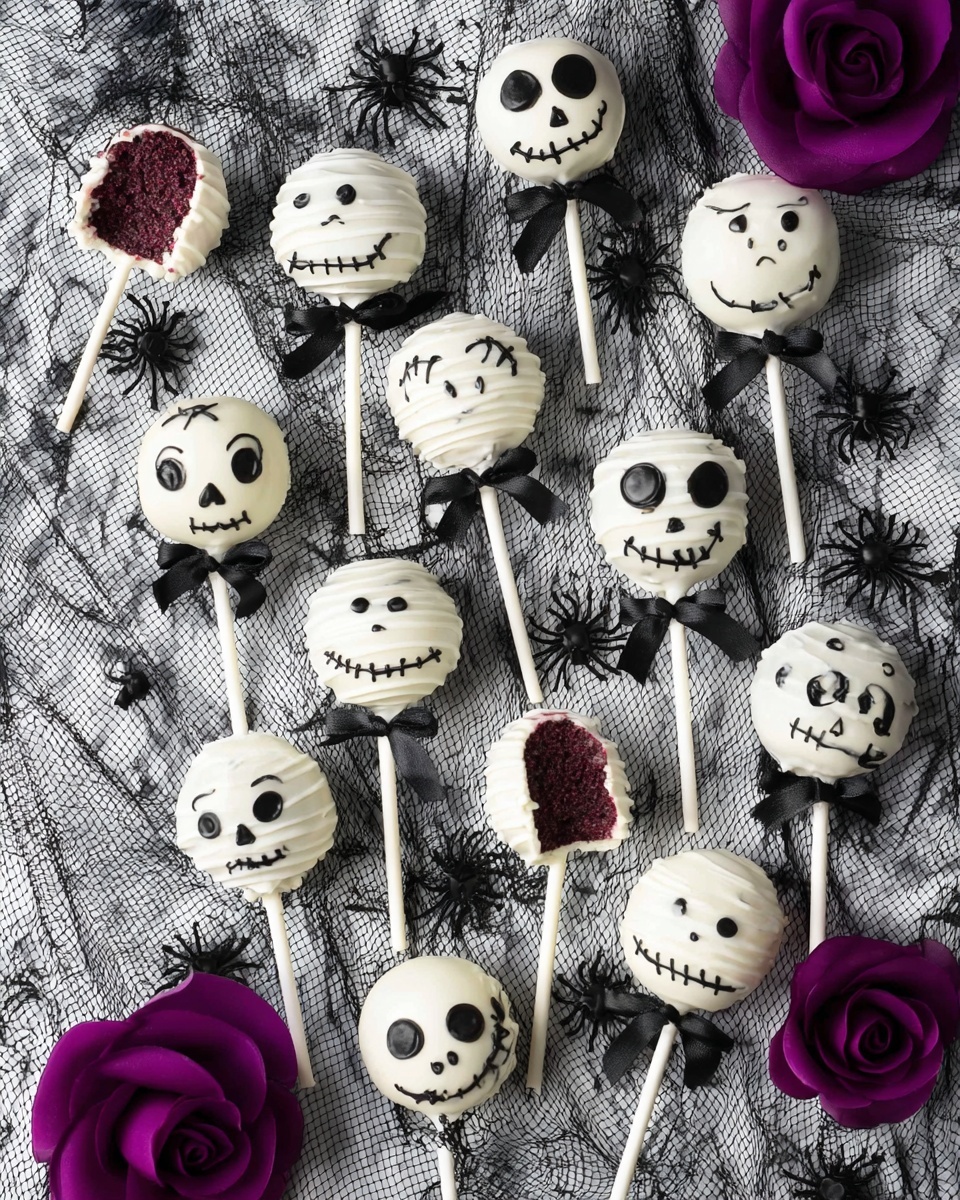
- Festive Variety: From spooky ghosts to mummy designs and Jack Skellington faces, this recipe lets you customize your cake pops with personality.
- Kid-Friendly Hands-On: Kids (and adults) can get involved decorating, making this a crowd-pleaser in more ways than one.

Ingredients & Why They Work
The ingredients in this Halloween Cake Pops Recipe come together to create a balance of rich flavor and smooth texture. The red velvet cake offers deep cocoa and tangy notes, while cream cheese frosting holds everything together luxuriously. The white chocolate candy melts make dipping and decorating a snap. Here’s why each one matters:
- Red Velvet Cake Mix: A convenient base with that iconic red tint and mild cocoa flavor—perfect for crush-and-mix cake pops.
- Eggs: These help bind the cake together during baking, giving it structure and moisture.
- Oil: Adds tenderness and keeps the cake moist—don’t swap for butter here unless you want a denser crumb.
- Water: Needed for the cake mix to come together properly.
- Cream Cheese Frosting: The secret ingredient that binds the crumbled cake into moldable balls while adding delicious tang.
- White Chocolate Candy Melting Wafers: Ideal for smooth dipping and creating a crisp shell after they harden.
- Black Gel Food Color: Provides vivid, true black color to decorate spooky faces and details.
- Vegetable Shortening: Helps thin the melted candy coating for perfect dipping without cracking.
- Candy Eyeballs: Adds a playful, creepy touch to your decor.
- Cake Pop Sticks: Essential for handling and displaying your pops; sturdy ones make all the difference.
- Black/White Ribbon: Adds a charming finishing touch—tie bows for an extra festive flair.
Tweak to Your Taste
I love customizing these cake pops depending on the crowd or theme. You can swap out the red velvet mix for chocolate or spice cake, or even make mini pumpkin cake pops for a seasonal twist. Don’t be scared to adjust the decorations too—you can create bats, witches, or black cats just by changing the icing colors and designs!
- Chocolate Cake Variation: I swapped in chocolate cake mix once and everyone thought it was even more indulgent—just as easy to work with.
- Dietary Mods: For gluten-free, I’ve tried using a gluten-free cake mix and it turned out wonderfully, just be sure to check your candy melts are gluten-free too.
- Easier Decorations: If you’re in a pinch, simple sprinkles, colored sugar, or pre-made candy decorations save time while still looking festive.
Step-by-Step: How I Make Halloween Cake Pops Recipe
Step 1: Bake Your Cake Base
Start by preheating your oven to 350°F. In a large bowl, combine the red velvet cake mix with eggs, oil, and water. I use a hand mixer on medium speed for about two minutes to get a smooth batter. Pour this into a greased 9×13 pan and bake for 25-30 minutes or until a toothpick comes out clean. Let it cool in the pan for 10 minutes, then flip it out onto a wire rack to cool completely—cooling is key here so your cake pops won’t crumble or be too sticky!
Step 2: Crumble and Mix with Frosting
Once your cake is completely cooled, break it up into chunks and pulse in a food processor until fine crumbs form. Don’t skip the processor step—it really makes shaping easier. Transfer the crumbs to a large bowl, add the cream cheese frosting, and mix until the texture resembles dough. At this stage, tasting a bit isn’t a bad idea!
Step 3: Shape Your Pops
Roll the mix into roughly 2-inch balls. For the ghosts, reshape four of these balls into a cylinder then gently fan out one end for that classic ghost shape—I love this step because it makes the pops so cute and unique! Pro tip: Chill these shapes before dipping—they hold better and stick less.
Step 4: Secure the Sticks
Melt about 15 white chocolate wafers and dip 1-inch of each cake pop stick into the melted candy. Immediately insert into each cake ball about two-thirds of the way, then wipe any excess candy off with your finger to tidy the look. Chill the pops in the fridge for 15 minutes to set this anchor—it literally keeps your pops from falling apart later.
Step 5: Dip and Coat
In a narrow jar (just wide enough to dip but not waste coating), melt half your candy wafers with half the shortening. Stir between microwaving in 30-second bursts until smooth and perfect for dipping. Dip each cake pop straight down without swirling (to avoid stick loosening), let excess drip off, then place upright in a holder—mine’s typically a cake pop stand or foam block. Let these set for about 15 minutes before moving on.
Step 6: Decorate Your Halloween Cake Pops Recipe
Use the remaining coating (warmed and thinned with a bit of shortening if needed) in a piping bag fitted with a #3 tip for details. For mummy pops, pipe overlapping horizontal lines on four pops, then add tiny dots of coating as glue for candy eyeballs. For ghosts, pipette small dots for eyes and a big round mouth with black colored icing. Tie bows onto some pops using your black/white ribbon and decorate Jack Skellington faces with fine black icing details. This is a fun part where you can get creative or keep it simple!
Pro Tips for Making Halloween Cake Pops Recipe
- Use a Food Processor: It’s a game changer—fine crumbs mix better and shape more easily than hand-crumbling.
- Chill Between Steps: Refrigerate cake balls after inserting sticks and after dipping to avoid breakage while decorating.
- Thin Your Candy Coating: Adding a bit of shortening makes the melts smooth and perfect for dipping without cracking later.
- Avoid Overhandling: Don’t swirl the pops while dipping; just dip straight and let excess drip to keep sticks secure.
How to Serve Halloween Cake Pops Recipe
Garnishes
I always go for candy eyeballs—they add instant personality and are a super easy way to amp up the cuteness or creepiness depending on your theme. Sometimes I toss in rainbow sprinkles or edible glitter if I’m feeling fancy. Black or orange sugar crystals add great texture and color contrast too.
Side Dishes
These cake pops pair wonderfully with a big bowl of caramel popcorn or a plate of mini pumpkin muffins if you’re throwing a Halloween brunch. Hot apple cider or a rich, spiced hot chocolate rounds out the spread perfectly. I like keeping it fun and casual—after all, cake pops are already a party on a stick!
Creative Ways to Present
For my Halloween parties, I set up a spooky dessert display with faux cobwebs, mini pumpkins, and a cake pop stand front and center. You can also use mason jars filled with colored sugar or rice to hold the pops upright if you don’t have a holder. Adding themed cupcake liners at the base is another cute trick to tie the look together. Kids (and adults!) love picking their favorites right off the “graveyard” display.
Make Ahead and Storage
Storing Leftovers
Once fully decorated, I keep my Halloween cake pops in an airtight container at room temperature for up to 3-4 days. If I’m prepping early or want them to last longer, the fridge works great—just bring them back to room temp before serving so the coating isn’t too hard and the cake is soft.
Freezing
Freezing cake pops works surprisingly well! I place them in a container lined with wax paper, layering them carefully so they don’t stick together or break. Freeze for up to 6-8 weeks. When you’re ready, thaw in the fridge overnight and then let them warm up a bit on the counter before serving.
Reheating
Since these aren’t really “reheated,” it’s more about bringing them back to the perfect texture. After chilling or freezing, I place them out for 30 minutes at room temp—this softens the cake inside and ensures the candy coating tastes just right, not hard or chewy.
FAQs
-
Can I make Halloween Cake Pops Recipe without a food processor?
Yes! While a food processor makes the crumb texture perfect and easier to mix, you can crumble the cake by hand using your fingers or a fork. Just take your time to break the cake into very fine crumbs for the best results.
-
What can I substitute for cream cheese frosting?
If you don’t have cream cheese frosting, a thick buttercream or even a store-bought frosting will work. Just make sure it’s firm enough to bind your cake crumbs without making the mixture too wet.
-
How do I prevent cake pops from falling off the sticks?
The key is dipping the stick into melted candy coating before inserting it into the cake ball—this acts like glue once set. Also, chilling the cake pops after inserting sticks helps them firm up and stay secure during dipping.
-
Can I use dark chocolate or colored candy melts for coating?
Absolutely! Colored candy melts are great for different effects and flavors. Just keep in mind different chocolates melt differently, so you may need to experiment with thinning agents like vegetable shortening to get the right consistency.
-
How far ahead can I make my Halloween Cake Pops?
You can make and decorate these cake pops up to 3 days ahead if stored properly at room temperature or refrigerated. For longer storage, freezing is best, just be sure to thaw properly before serving.
Final Thoughts
This Halloween Cake Pops Recipe truly feels like magic in the kitchen. I love how it brings together simple ingredients with festive flair, turning a regular day into a celebration. If you’re looking for a sweet treat that’s as fun to make as it is to eat, you’re going to adore this one. So gather your ingredients, invite some friends or family to join in, and create some Halloween memories—you won’t regret it!
Print
Halloween Cake Pops Recipe
- Prep Time: 50 minutes
- Cook Time: 30 minutes
- Total Time: 1 hour 20 minutes
- Yield: 14 servings
- Category: Dessert
- Method: Baking
- Cuisine: American
Description
Celebrate Halloween with these festive Halloween Cake Pops made from red velvet cake and cream cheese frosting, coated in white chocolate and decorated as spooky ghosts, mummies, and Jack Skellington faces. Perfect for parties and easy to customize with candy eyes and ribbons.
Ingredients
Cake
- 1 box Red Velvet Cake Mix
- 3 large eggs
- ½ cup oil
- 1¼ cup water
- 5 tbsp cream cheese frosting
Coating and Decoration
- 20 oz white chocolate candy melting wafers
- 1½ tbsp black gel food color
- ⅓ cup vegetable shortening
- Candy eyeballs for decorating
- 50 inch black/white ribbon for decorating
- Cake pop sticks
Instructions
- Preheat the oven: Preheat your oven to 350°F to prepare for baking the cake.
- Mix the batter: In a large mixing bowl, beat the red velvet cake mix, eggs, oil, and water at medium speed for two minutes until well combined.
- Bake the cake: Pour the batter into a greased 9×13 inch baking dish and bake for 30 minutes or until a toothpick inserted in the center comes out clean.
- Cool the cake: Allow the cake to cool in the dish for 10 minutes, then turn it out onto a cooling rack to cool completely.
- Prepare cake crumbs: Break the cooled cake into pieces and process in a food processor until fine crumbs form. Transfer crumbs to a large mixing bowl.
- Combine with frosting: Add the cream cheese frosting to the crumbs and mix well to form a dough-like consistency.
- Shape cake pops: Roll the mixture into 2-inch balls. Shape four of these balls into a slightly more cylindrical, fanned-out shape to resemble ghosts.
- Insert sticks: Melt about 15 wafer discs and dip one end of each cake pop stick about 1 inch deep into the melted candy, then insert into the shaped cake pops about 2/3 of the way in. Wipe excess candy with your finger and refrigerate for 15 minutes to set.
- Melt coating: In a narrow jar or cup, melt half of the white chocolate wafers with half of the vegetable shortening in the microwave, stirring every 30 seconds until smooth.
- Dip cake pops: Dip each cake pop into the coating by pushing down once, then lift and allow excess to drip off while holding still. Place the dipped pops upright in a holder and let set for 15 minutes.
- Decorate mummies: Warm remaining coating and add a little more shortening if needed. Transfer to a piping bag with a #3 tip and pipe straight lines back and forth over four cake pops to look like mummy bandages. Pipe small dots for eyes and place candy eyeballs on top. Let set.
- Make black icing: Melt the remaining wafers and shortening, then mix in black gel food color. Transfer to a piping bag or dispensing bottle.
- Decorate Jack Skellington: Tie ribbons into bows and attach to five round cake pops. Use black icing to pipe Jack Skellington’s face on these pops.
- Decorate ghosts: Using black icing, dot where the eyes will be on the ghost-shaped pops, attach candy eyeballs with a small dot of icing, and pipe a big round mouth. Allow to dry.
- Display: Arrange cake pops in the holder and display as the centerpiece for your Halloween party.
Notes
- Store cake pops in an airtight container at room temperature for 3-4 days or refrigerate for 5-7 days.
- Freeze cake pops for 6-8 weeks in an appropriate container with wax paper separating layers.
- Use a narrow jar or cup to dip the cake pops to minimize waste of coating wafers.
- If coating begins to thicken, reheat gently and add a little vegetable shortening to achieve a smooth consistency.
- Use a cake pop stand, foam block, or a container filled with beans or rice to hold the cake pops upright while drying.
Nutrition
- Serving Size: 1 cake pop
- Calories: 250 kcal
- Sugar: 22 g
- Sodium: 150 mg
- Fat: 15 g
- Saturated Fat: 8 g
- Unsaturated Fat: 5 g
- Trans Fat: 0 g
- Carbohydrates: 28 g
- Fiber: 1 g
- Protein: 2 g
- Cholesterol: 40 mg
