
Halloween Peanut Butter Cookie Cups with Mummy, Spider, and Spooky Eyeball Decor Recipe
If you’re looking to wow your friends and family this spooky season, I’ve got just the treat for you: the Halloween Peanut Butter Cookie Cups with Mummy, Spider, and Spooky Eyeball Decor Recipe. These little bites are not only adorable but packed with that classic peanut butter goodness. Trust me, once you try these, they’ll be your go-to for Halloween parties or just because you need a festive pick-me-up!
Why This Recipe Works
- Simplicity Meets Spookiness: With just a handful of ingredients, you get these super festive cookie cups that look like they took hours to make.
- Delicious Peanut Butter Base: The creamy peanut butter combined with sugar creates a rich and chewy cookie that’s perfect for holding all that cute Halloween decor.
- Versatile Decorating Options: Whether you want to make mummies, spiders, or spooky eyeballs, the recipe gives you a lot of room to get creative.
- Kid-Friendly Fun: Decorating these cookies is a blast for kids and adults alike, making it an ideal activity for a Halloween gathering.

Ingredients & Why They Work
The ingredients for this Halloween Peanut Butter Cookie Cups with Mummy, Spider, and Spooky Eyeball Decor Recipe are straightforward, and each one plays a key role in both flavor and texture. I always make sure to use quality peanut butter and candy for the decorations to get those perfect pops of taste and spooky looks!
- Creamy Peanut Butter: This gives the cookies that rich, smooth texture and classic flavor—skip chunky here unless you want a crunchier bite.
- Granulated Sugar: Adds sweetness and helps the cookie cups crisp slightly on the outside while staying tender inside.
- Large Egg: Acts as a binder so your cookie cups hold their shape perfectly in the mini muffin pan.
- White Chocolate Reese’s Cups or Marshmallows: Perfect for making mummy cookie bases—white chocolate offers sweetness, marshmallows add fluffy fun.
- Candy Eyes: These instantly transform your treats from ordinary to spooky and make decorating really easy.
- Ghiradelli White & Dark Chocolate Melting Wafers: Melt smoothly so you can drizzle or paint on details like mummy wraps and spider legs with ease.
- Reese’s Peanut Butter Cup Miniatures: These are the star for spider and eyeball designs, giving you bite-sized peanut buttery goodness right on top.
- Sparkly Red Gel: Adds that gruesome bloodshot effect on your spooky eyeball cookies, making them seriously fun and a bit creepy!
Tweak to Your Taste
I love how flexible this Halloween Peanut Butter Cookie Cups with Mummy, Spider, and Spooky Eyeball Decor Recipe is—feel free to play around with the decorations or adjust the cookies based on what you and your crew prefer.
- Variation: One year, I swapped out peanut butter cups for mini Rolos for the spiders, and the caramel added such a fun twist that everyone asked for seconds!
- Dietary Swap: You can try using natural peanut butter and a sugar substitute if you want a healthier take without sacrificing too much flavor.
- Colorful Fun: Use colored melting wafers to spice up the mummy wraps or spider legs—purple and green really pop for Halloween!
Step-by-Step: How I Make Halloween Peanut Butter Cookie Cups with Mummy, Spider, and Spooky Eyeball Decor Recipe
Step 1: Preheat, Prep & Mix
Start by preheating your oven to 350°F. While it warms up, spray a mini muffin tin with baking spray so your cookie cups pop out easily later. In a bowl, mix the creamy peanut butter, granulated sugar, and one large egg until the mixture is smooth and blended—easy peasy! I use a wooden spoon first and then switch to my hand mixer for a couple of seconds to make sure everything’s combined perfectly.
Step 2: Scoop & Bake
Using a tablespoon-sized cookie scoop (my favorite little gadget!), drop spoonfuls of the dough into each mini muffin cup. Bake for 12-14 minutes, or until the cookies are set but still soft in the center. A little tip: don’t overbake here because you want them chewy enough to hold the candy decorations without cracking.
Step 3: Press in Candy & Decorate
Right after you pull your pan from the oven, press your candy pieces—whether it’s Reese’s cups or marshmallow halves—into the top of each warm cookie. This allows them to meld together beautifully. Then jump into decorating: drizzle melted white chocolate for mummy wraps and stick on candy eyes, or use dark chocolate to create spider legs and attach eyes. For the spooky eyeballs, red gel adds that perfect bloodshot effect. Make sure all your candies are unwrapped and ready before baking to make this step seamless.
Step 4: Cool & Pop Out
After decorating, let the cookie cups sit in the pan for about 10 minutes to firm up. Then, run a butter knife around each cup if needed, and they should slide out easily. I’ve found that working quickly while the chocolate is warm ensures the designs set perfectly without cracking or sliding off.
Pro Tips for Making Halloween Peanut Butter Cookie Cups with Mummy, Spider, and Spooky Eyeball Decor Recipe
- Prep Decorations Ahead: I always unwrap and line up my candy eyes and cups before baking to save time and stay organized during assembly.
- Don’t Overbake Cookies: Slightly underbaking keeps the centers chewy and soft which helps the chocolate candies stick better without cracking.
- Use a Piping Bag for Chocolate Details: A small piping bag or even a zip-top bag with a tiny corner snipped makes it super easy to draw spider legs and mummy wraps with melted chocolate.
- Cool Completely Before Storing: Let the cookie cups fully cool and the chocolate harden before stacking or storing to prevent smudging and melting.
How to Serve Halloween Peanut Butter Cookie Cups with Mummy, Spider, and Spooky Eyeball Decor Recipe
Garnishes
For garnishes, I like to sprinkle a little edible glitter or Halloween-themed sprinkles around the platter to make the cookie cups really pop. Sometimes I add tiny candy pumpkins or ghost-shaped candies for extra charm.
Side Dishes
Since these cookie cups are quite rich, I love pairing them with a simple but fun side like a bowl of spiced apple cider or a frothy cup of hot chocolate with a hint of cinnamon. It balances out the sweetness and fits the cozy Halloween vibe perfectly.
Creative Ways to Present
One Halloween, I arranged these cookie cups on a tiered cake stand decorated with cobwebs and tiny faux spiders. It made such a showstopper at the party! Another time, placing them individually in mini clear cellophane bags tied with orange and black ribbons made them great party favors.
Make Ahead and Storage
Storing Leftovers
Leftover Halloween Peanut Butter Cookie Cups store really well in an airtight container at room temperature. I usually keep them on the counter for up to 3 days and they stay soft and delicious. Just make sure they’re completely cooled before you store to avoid condensation.
Freezing
These cookie cups freeze beautifully! I pop them in a freezer-safe container with parchment layers between each cookie to keep them from sticking. When I thaw them in the fridge overnight, they keep their texture and flavor perfectly.
Reheating
If you want to gently warm them, I’ll pop the cookie cups in a low oven (around 275°F) for 5 minutes or so, just to soften the peanut butter cookie base nicely without melting the chocolate decor. Microwave reheating can sometimes make the candy eyes a little sticky, so I prefer the oven method.
FAQs
-
Can I use chunky peanut butter for this recipe?
While crunchy peanut butter adds texture, I recommend creamy peanut butter for these cookie cups to ensure a smooth, cohesive dough and easier pressing of the candy toppings.
-
How long do these cookies stay fresh?
Stored in an airtight container at room temperature, these cookie cups stay fresh for about 3 days. For longer storage, freezing is your best bet.
-
Can I make the decorations ahead of time?
Yes! You can prep your melted chocolate and candy eyes ahead to speed up decorating once the cookies are baked. Just keep melted chocolate covered and at room temp for quick drizzling.
-
What if I don’t have mini muffin tins?
A mini muffin pan is ideal because it shapes these cookies into perfect cups, but if you don’t have one, you can try shaping the dough by hand on a baking sheet and pressing candy on top—just expect a different texture and look.
Final Thoughts
This Halloween Peanut Butter Cookie Cups with Mummy, Spider, and Spooky Eyeball Decor Recipe is truly one of my favorites to make every year. It’s simple enough to whip up quickly but looks so creative that your guests will be impressed without you spending hours in the kitchen. Plus, the fun decorating almost feels like a Halloween craft session—especially if you have little helpers around. I can’t wait for you to try it and hear how your spooky cookie cups turn out!
Print
Halloween Peanut Butter Cookie Cups with Mummy, Spider, and Spooky Eyeball Decor Recipe
- Prep Time: 15 minutes
- Cook Time: 14 minutes
- Total Time: 49 minutes
- Yield: 24 cookie cups
- Category: Dessert
- Method: Baking
- Cuisine: American
- Diet: Vegetarian
Description
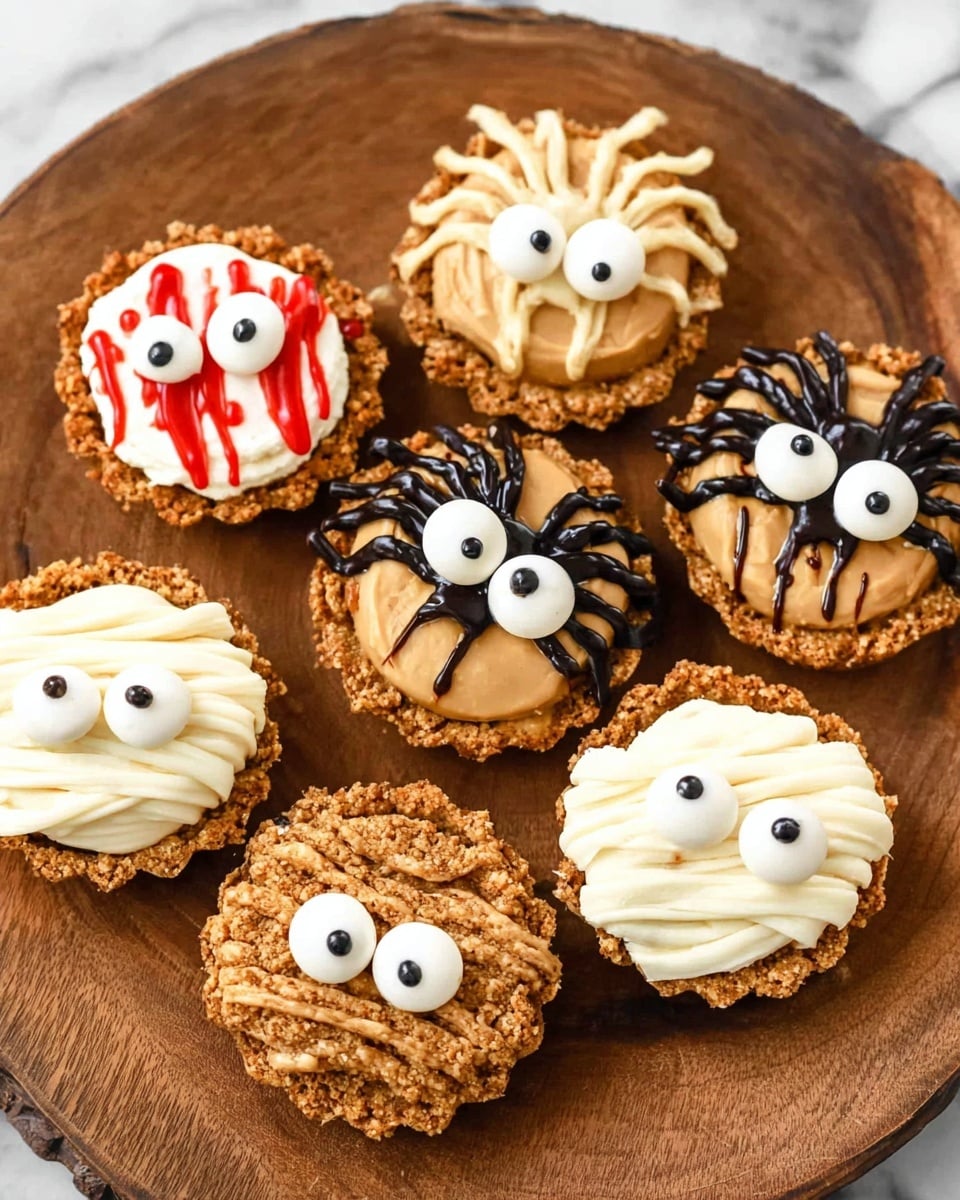
These Halloween Peanut Butter Cookie Cups are festive and fun treats perfect for the spooky season. Made with creamy peanut butter cookies and decorated with candy eyes, white and dark chocolate, and marshmallows, they come in three themed designs: mummies, spiders, and spooky eyeballs. Easy to make and delightfully delicious, these cookie cups are a hit at Halloween parties and a great way to celebrate with seasonal creativity.
Ingredients
For the Cookies:
- 1 cup creamy peanut butter
- 1 cup granulated sugar
- 1 large egg
For the Mummy Cookies:
- 24 white chocolate Reese’s cups or 12 regular sized marshmallows, cut in half
- 48 candy eyes
- ½ cup Ghiradelli White Chocolate Melting Wafers, melted
For the Spider Cookies:
- 24 Reese’s Peanut Butter Cup miniatures, unwrapped
- 48 candy eyes
- ½ cup Ghiradelli Dark Chocolate Melting Wafers, melted
For the Spooky Eyeballs:
- 24 Reese’s White Chocolate Peanut Butter Cup miniatures, unwrapped (or 12 regular marshmallows, cut in half)
- Sparkly red gel
- 24 spooky eyeballs
Instructions
- Preheat and Prepare: Preheat your oven to 350°F. Spray a mini muffin tin with baking spray to prevent sticking, then set it aside.
- Mix Dough: In a mixing bowl, combine the creamy peanut butter, granulated sugar, and one large egg. Mix thoroughly until the batter is smooth and well blended.
- Scoop and Bake: Using a 1 tablespoon cookie scoop, drop spoonfuls of the dough into the prepared mini muffin tin cups. Bake the cookies for 14 minutes until set and lightly golden.
- Decorate Immediately: Remove the pan from the oven and, while cookies are still hot, press a Reese’s cup or marshmallow half into each cookie cup according to the chosen design (mummy, spider, or eyeball). Decorate with candy eyes and drizzle melted chocolate as needed.
- Cool and Serve: Allow the cookie cups to cool in the pan for about 10 minutes. Then carefully use a butter knife to gently lift each cookie cup from the tin. Serve and enjoy your spooky Halloween treats!
Notes
- Unwrap all candy ahead of time so you can quickly press them into the cookies right out of the oven.
- Allow cookie cups to cool in the pan for about 10 minutes to firm up before removing to avoid breakage.
- For mummy designs, use either white chocolate peanut butter cups or marshmallows and drizzle melted white chocolate to create cloth-like scraps; add candy eyes on top.
- For spider designs, use peanut butter cups or rolos, press candy eyes on top, and drizzle melted dark chocolate to create spider legs.
- For spooky eyeballs, use white chocolate peanut butter cups or marshmallows and decorate with sparkly red gel for bloodshot effect and big candy eyes.
Nutrition
- Serving Size: 1 cookie cup
- Calories: 150 kcal
- Sugar: 12 g
- Sodium: 90 mg
- Fat: 9 g
- Saturated Fat: 3 g
- Unsaturated Fat: 5 g
- Trans Fat: 0 g
- Carbohydrates: 15 g
- Fiber: 1 g
- Protein: 4 g
- Cholesterol: 20 mg


