
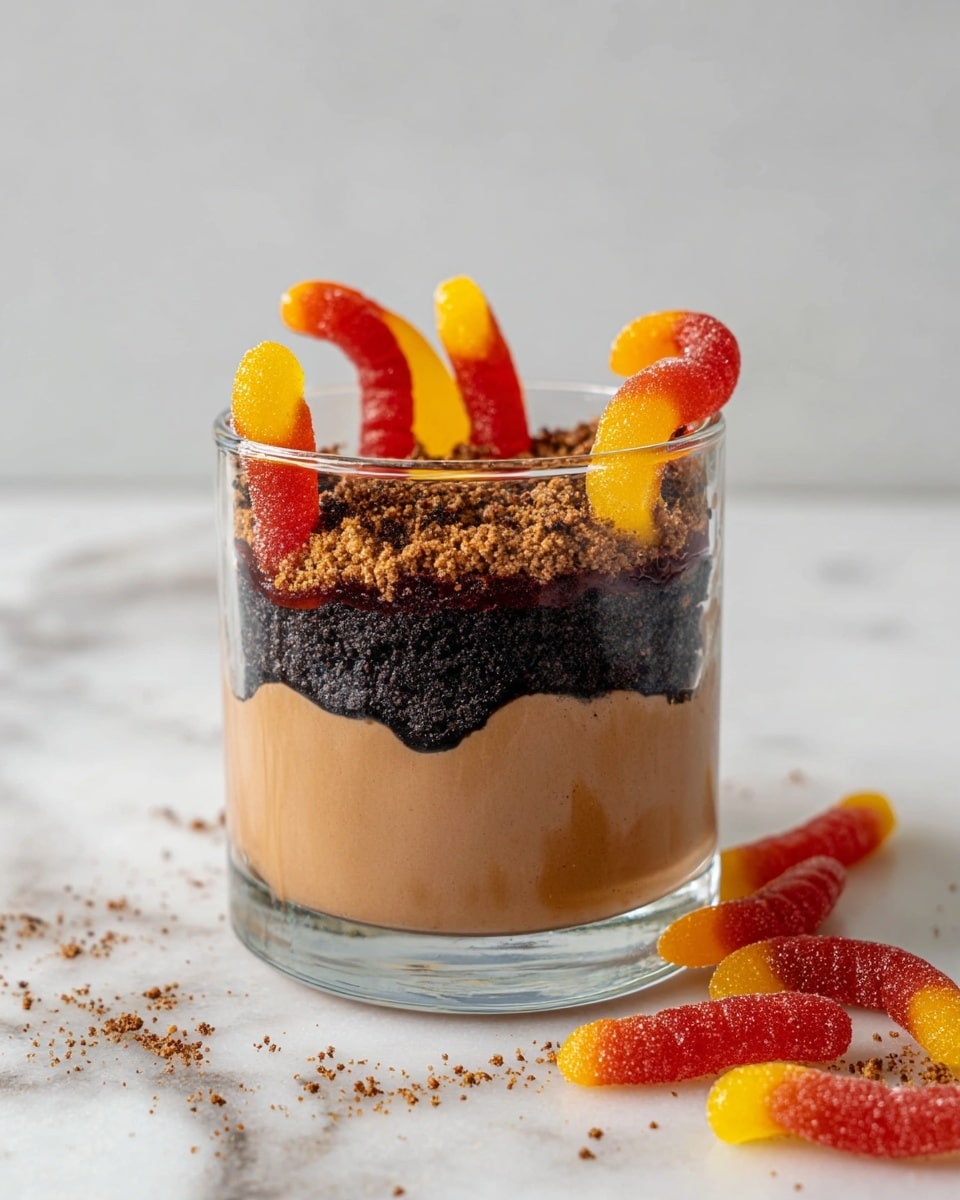
Dairy-Free Dirt Worm Pudding Recipe
If you’re craving a nostalgic, playful dessert that’s also totally allergy-friendly, I’ve got you covered with my Dairy-Free Dirt Worm Pudding Recipe. This treat is not only fun for the kids but super simple to whip up—and it’s completely dairy-free! Think of it as a creamy, chocolatey delight layered with the classic “dirt” (crushed cookies) and gummy worms that bring that childhood magic back. Stick around, and I’ll walk you through every step so you can nail it the first time.
Why This Recipe Works
- Simple Ingredients: Uses everyday pantry staples like coconut milk and cocoa powder for an easy prep.
- Dairy-Free & Allergy-Friendly: Perfect for those avoiding dairy without sacrificing creaminess or flavor.
- Fun Presentation: The crushed cookies and gummy worms bring an irresistible “dirt and worms” theme that kids adore.
- Make-Ahead Friendly: Prepares in under 10 minutes with just chilling time, great for busy days or parties.

Ingredients & Why They Work
Every ingredient here plays a part in making the perfect Dairy-Free Dirt Worm Pudding Recipe. The rich coconut milk replaces traditional dairy, gelatin firms it up without any compromise, and the maple syrup brings a natural sweetness without refined sugar. You’ll want to grab gluten-free chocolate sandwich cookies and gummy worms that fit your dietary preferences to keep things inclusive.
- Full-fat coconut milk: This gives the pudding that creamy texture and subtle tropical flavor—it’s my go-to for dairy-free desserts.
- Unsweetened cocoa powder: Adds depth of rich chocolate flavor without extra sugar.
- Maple syrup: Natural sweetener that blends beautifully and gives a nice smooth sweetness.
- Unflavored gelatin: For that perfect pudding set—without gelatin, it’d be too runny.
- Vanilla extract: A splash lifts all those flavors wonderfully.
- Gluten-free chocolate sandwich cookies: Crushed up, they mimic chocolatey “dirt” while keeping it safe for gluten sensitivities.
- Gummy worms: The (non-scary) “creepy crawlies” that make this dish total fun to eat.
Tweak to Your Taste
I love how customizable this Dairy-Free Dirt Worm Pudding Recipe is—it’s honestly one of the things that keeps me coming back to it. You can easily adjust the sweetness or swap in your favorite cookie or gummy worms depending on what you like or have on hand.
- Less Gelatin, More Creamy: I sometimes reduce the gelatin a bit to get a creamier texture that’s more spoonable, like soft mousse—give it a try if you prefer that.
- Use Vegan Gelatin: For a vegetarian or vegan twist, agar powder works too, though you’ll need to tweak the setting time.
- Seasonal Cookies: Swap out cookies for holiday-themed gluten-free varieties to give it a festive spin.
- Fruit Twist: Adding fresh berries or a spoonful of fruit puree on top is my go-to for a little fresh contrast.
Step-by-Step: How I Make Dairy-Free Dirt Worm Pudding Recipe
Step 1: Warm the Coconut Milk Gently
Start by pouring your cans of full-fat coconut milk into a heavy-bottomed saucepan. Warm it over medium heat just until it starts to simmer. This step is crucial because the warmth helps the gelatin dissolve completely, ensuring your pudding sets up perfectly without clumps. Don’t let it boil—that can change the texture and flavor.
Step 2: Blend to a Smooth Chocolate Pudding Base
Next, carefully pour the warmed coconut milk into a blender. Add in your unsweetened cocoa powder, maple syrup, gelatin, and vanilla extract. Blend everything until it’s completely smooth and well combined. This is the moment the magic happens—you want no lumps or gritty bits, just silky chocolate goodness.
Step 3: Cool & Set in Jars
Pour the blended pudding mixture into small jars or disposable plastic cups—five 4-ounce containers work perfectly. Pop them into the fridge and chill for 3-4 hours until the pudding sets fully. Patience here is key—it’s tempting to dig in early, but letting it set completely makes all the difference in texture.
Step 4: Add “Dirt” and Worms Just Before Serving
Right before serving, sprinkle a generous layer of crushed gluten-free chocolate sandwich cookies on top of each pudding. Then, place your gummy worms on the surface to make it look delightfully creepy-crawly. This final flourish turns simple pudding into a showstopper that kids and adults will love.
Pro Tips for Making Dairy-Free Dirt Worm Pudding Recipe
- Warm but Don’t Boil: Overheating the coconut milk can cause separation; warm gently just to a simmer.
- Blend Smoothly: Use a high-speed blender if possible to get a silky-smooth pudding—nobody likes clumps!
- Chill Enough: Don’t rush the chilling—waiting the full 3-4 hours ensures the pudding sets perfectly for clean spoonfuls.
- Gummy Worm Placement: Add gummy worms just before serving so they don’t melt or get sticky in the fridge.
How to Serve Dairy-Free Dirt Worm Pudding Recipe
Garnishes
I usually keep the garnishes simple and classic: crushed cookies for that dirt look, and gummy worms for the playful factor. Sometimes, I toss in a few fresh mint leaves or a sprinkle of sea salt on top to balance the sweetness and add a hint of freshness. It’s a small detail but really elevates the flavor.
Side Dishes
This dessert is rich and satisfying, so I like to pair it with lighter sides if I’m serving it after a meal—things like fresh fruit salad, simple roasted nuts, or even a refreshing cucumber-mint cooler to cleanse the palate.
Creative Ways to Present
For birthday parties or Halloween gatherings, I like to serve the pudding in clear plastic cups layered with cookie crumbs between pudding layers to amp up the dirt effect. You can even add edible “spider” decorations or plastic bugs (just make sure kiddos know they’re not edible!) for that extra spooky touch. It’s always a hit and gets everyone talking.
Make Ahead and Storage
Storing Leftovers
I keep leftovers tightly covered in the refrigerator—either with lids or plastic wrap over the serving containers. The pudding holds up super well for up to 3 days. Just keep the gummy worms separate to prevent them from melting into the pudding.
Freezing
Freezing this pudding isn’t my favorite because the texture can change—coconut milk-based desserts sometimes become grainy after freezing. That said, if you freeze it, let it thaw fully in the fridge overnight and give it a quick stir before serving to bring back some creaminess.
Reheating
This pudding is best served chilled so I don’t recommend reheating. However, if you want to soften it a bit, you can let it sit at room temperature for 10-15 minutes before serving to take the chill off without compromising texture.
FAQs
-
Can I make the Dairy-Free Dirt Worm Pudding Recipe vegan?
You can swap unflavored gelatin for vegan-friendly agar agar powder, but keep in mind agar sets differently and may require different chilling times. Experiment a bit with quantities to get the right pudding consistency.
-
What kind of gummy worms are safe for a dairy-free diet?
Look for gummy worms labeled vegan or dairy-free, as some gummy candies contain gelatin or dairy derivatives. Many brands now offer allergy-friendly options, and I linked some of my favorites in the intro.
-
Can I use another type of milk instead of coconut milk?
Coconut milk brings a creamy body and subtle sweetness essential to the pudding’s texture. You could use other dairy-free milks, but they often lack the same richness, which may result in a thinner pudding.
-
How long does this pudding last in the fridge?
Stored properly, the Dairy-Free Dirt Worm Pudding will stay fresh for about 3 days. Make sure the containers are sealed tight to avoid absorbing fridge odors.
Final Thoughts
This Dairy-Free Dirt Worm Pudding Recipe holds a special place in my heart because it brings out that childhood joy in a health-conscious way. It’s easy to make, fun to eat, and satisfies chocolate cravings without dairy drama. Whether you’re making it for a kid’s party or a cheeky adult dessert, I promise you’ll love watching the smiles and hearing the “wow” when they dig in. Give it a try—you’re going to want to make it again and again!
Print
Dairy-Free Dirt Worm Pudding Recipe
- Prep Time: 5 minutes
- Cook Time: 5 minutes
- Total Time: 4 hours 10 minutes
- Yield: 5 servings
- Category: Dessert
- Method: Blending
- Cuisine: American
- Diet: Gluten Free
Description
This Dairy-Free Dirt Worm Pudding is a fun and delicious dessert made with creamy coconut milk, rich cocoa, and sweet maple syrup. Featuring a gluten-free cookie crumble topping and gummy worms for a playful touch, it’s perfect for kids and adults alike. The pudding is set with gelatin and chilled until firm, making it a delightful treat that’s both dairy-free and gluten-free.
Ingredients
Pudding Base
- 2 cans 13.5-ounce full-fat coconut milk
- ¼ cup unsweetened cocoa powder
- ¼ cup maple syrup
- 4 teaspoons unflavored gelatin
- 2 teaspoons vanilla extract
Toppings
- 1 cup gluten-free chocolate sandwich cookies, crushed
- 1 cup gummy worms
Instructions
- Heat the Coconut Milk: In a heavy-bottomed saucepan, warm the coconut milk over medium heat until it reaches a simmer, ensuring it does not boil over.
- Blend Ingredients: Pour the warm coconut milk into a blender and add the cocoa powder, maple syrup, unflavored gelatin, and vanilla extract. Blend the mixture until smooth and fully combined.
- Transfer and Chill: Pour the blended pudding into five 4-ounce jars or disposable plastic cups. Refrigerate for 3 to 4 hours until the pudding is set and firm.
- Add Toppings: Just before serving, sprinkle the crushed gluten-free chocolate sandwich cookies on top of each pudding cup and decorate with the gummy worms.
- Serve and Enjoy: Present your Dairy-Free Dirt Worm Pudding chilled, and enjoy this fun, creamy dessert.
Notes
- For a creamier pudding texture, you can decrease the amount of gelatin used.
- If you prefer a vegetarian version, substitute gelatin with agar-agar powder according to package instructions.
- Ensure the gummy worms used are free from gelatin if looking for a completely gelatin-free dessert.
- Use full-fat coconut milk for the best creamy texture and flavor.
- The pudding can be prepared up to a day in advance and stored covered in the refrigerator.
Nutrition
- Serving Size: 1 serving
- Calories: 320 kcal
- Sugar: 20 g
- Sodium: 60 mg
- Fat: 25 g
- Saturated Fat: 22 g
- Unsaturated Fat: 3 g
- Trans Fat: 0 g
- Carbohydrates: 20 g
- Fiber: 3 g
- Protein: 3 g
- Cholesterol: 0 mg

