
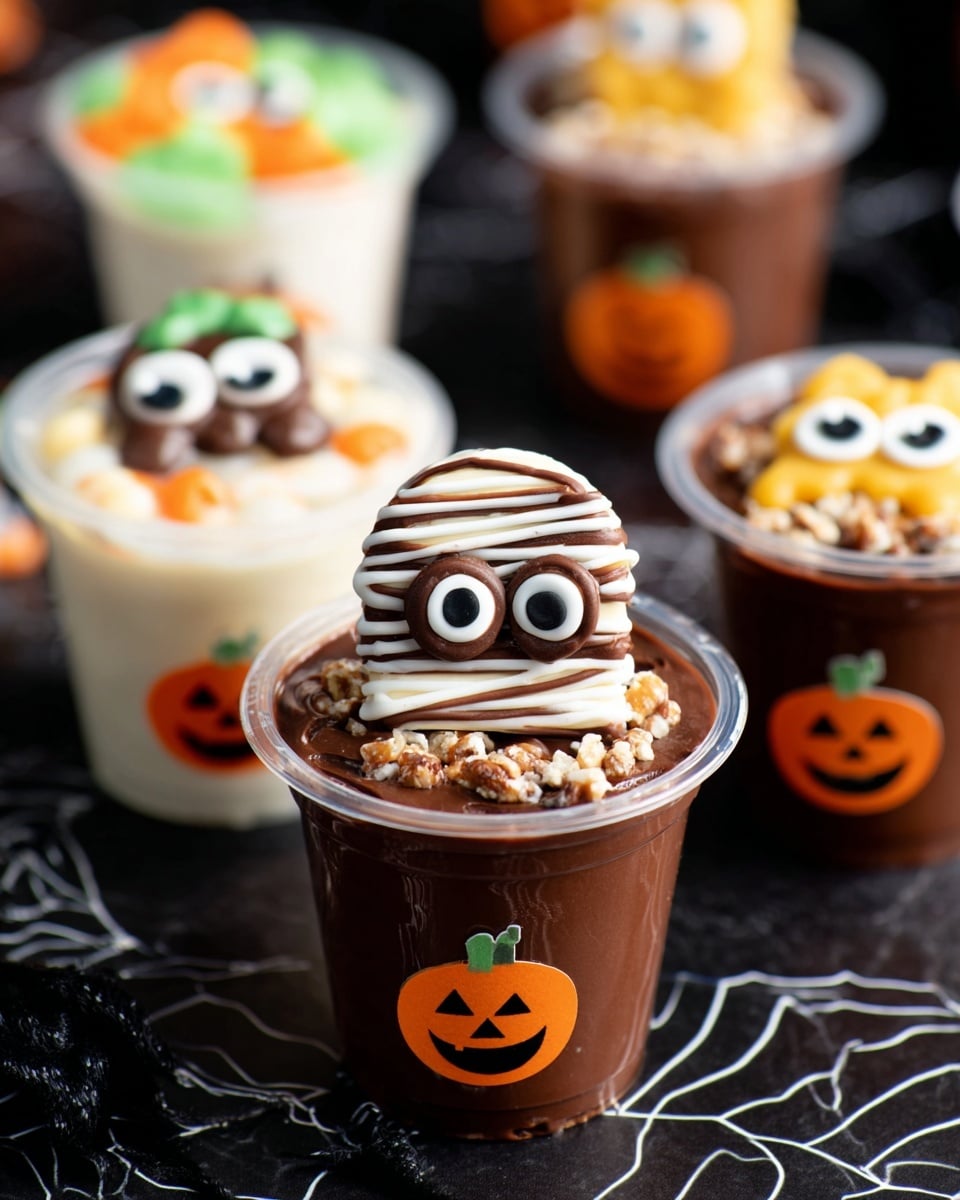
Mummy Pretzels with Spooky Pudding Cups Recipe
If you’re looking for a fang-tastic treat that’ll wow your friends and family this Halloween, I’ve got the perfect combination for you. My Mummy Pretzels with Spooky Pudding Cups Recipe is not just adorable but super easy to make, and it brings together salty, sweet, and creamy flavors in a fun, festive way. Seriously, once you try this, it’ll be a hit at your spooky celebrations—plus, the kiddos love joining in on the decorating!
Why This Recipe Works
- Mix of Textures: The crunchy pretzels paired with smooth pudding create a delightful contrast that keeps everyone coming back for more.
- Eye-Catching Fun: Using candy melts and eyeballs to turn simple pretzels into mummies makes the dessert super festive and engaging for kids.
- Simple Assembly: No fancy baking skills required—you just melt, dip, and decorate, which saves time and gives you more moments to enjoy the party.
- Versatile Flavors: Combining vanilla and chocolate puddings with peanut butter and apples creates layers of flavor that please a crowd with diverse tastes.

Ingredients & Why They Work
Each ingredient in the Mummy Pretzels with Spooky Pudding Cups Recipe plays a special role—whether it’s adding flavor, texture, or that spooky visual appeal. Choosing the right candy melts and fresh apples really elevates the taste and look of this easy Halloween treat.
- Pretzels: I like using classic twisted pretzels because their shape makes wrapping the candy melt “bandages” so much easier and more fun to decorate.
- White, orange, and green candy melts: These colors bring a festive Halloween palette; white for the mummy wraps, and orange and green to drizzle a bit more spooky flair.
- Chocolate candy melts: Perfect for adding those dark details like “glue” and decorating; makes the eyes really pop.
- Candy eyeballs: The must-have finishing touch—totally fun and creepy when placed just right!
- Snack Pack puddings (vanilla and chocolate): Using single-serve packs makes prep super quick and mess-free, plus the two flavors give a nice contrast.
- Apple diced: Adds a fresh, slightly tart crunch that balances the sweetness and creaminess.
- Crushed pretzels: For an extra crunchy topping that ties the whole flavor profile together.
- Peter Pan peanut butter: Adds a rich, nutty note that blends beautifully with the chocolate pudding.
Tweak to Your Taste
This recipe is a playground for creativity, and I love how easy it is to swap out ingredients or add fun twists. You can make it as simple or as elaborate as you want — your guests won’t even mind if the pretzels look a little “messy” because the flavors are what count most!
- Variation: I’ve tried swapping peanut butter for almond butter to accommodate allergies—it still tastes amazing and creamy! You could also use dairy-free pudding if you’re catering to vegan friends.
- Seasonal Change: For a fall twist, sprinkle some cinnamon or nutmeg over the pudding mix before adding pretzels—it adds a cozy warmth.
- Difficulty Level: If you want to get fancy, use a piping bag for the candy melts for perfect mummy “bandages,” but honestly, a fork works great too and it’s faster when you’re in a rush.
Step-by-Step: How I Make Mummy Pretzels with Spooky Pudding Cups Recipe
Step 1: Melt the Candy Melts Carefully
First, gather your white, orange, green, and chocolate candy melts. Follow the package instructions to melt them separately—usually microwave in short bursts of 20-30 seconds, stirring in between to avoid burning. I like to use separate bowls so I can dip the pretzels easily without mixing colors. Keep a close eye because candy melts can seize up if overheated.
Step 2: Dip the Pretzels & Let Them Set
Line a baking sheet with parchment paper. Now, dip your pretzels into the melted candy — white for the mummy wrap effect is my favorite start. Place them gently on the lined sheet and let them cool for about 15 minutes. If the candy hardens before you’re done, just microwave briefly again until smooth. Don’t rush this part; letting them set properly helps the candy look neat and keeps its “bandage” shape.
Step 3: Drizzle Colors and Add Candy Eyeballs
Once the base layer is set, grab a fork and drizzle orange and green candy melts over the pretzels for that extra spooky vibe. Then, attach the candy eyeballs using a dab of melted chocolate as glue—this step always brings a smile to everyone’s face, watching the mummies “come alive.” Let them set again for about 15 minutes.
Step 4: Prep the Spooky Pudding Cups
While the pretzels chill, get your pudding cups ready. Stick your favorite Halloween stickers on the outside—this is a fun step the kids usually love helping with! Mix a teaspoon of peanut butter and crushed pretzels into each chocolate pudding cup, and stir chopped apples into the vanilla ones. This blends creamy, crunchy, and fresh flavors delightfully.
Step 5: Assemble and Serve
Top each pudding cup with one mummy pretzel, then sprinkle some crushed pretzels over the chocolate cups and diced apples over the vanilla ones. These final touches not only look amazing but amp up the texture and flavor. Now, you’re ready to impress at your next Halloween party!
Pro Tips for Making Mummy Pretzels with Spooky Pudding Cups Recipe
- Don’t Overheat Candy Melts: Melting in short intervals prevents the candy from burning or seizing, making for a smooth coating.
- Use Parchment Paper: This keeps your pretzels from sticking and makes cleanup a cinch.
- Work Quickly: Candy melts harden fast, so plan your dipping and decorating in batches to avoid waste.
- Secure the Eyes Well: Use melted chocolate as glue for candy eyeballs to keep them firmly in place, especially if you plan to store or transport these treats.
How to Serve Mummy Pretzels with Spooky Pudding Cups Recipe
Garnishes
I usually garnish the pudding cups with a few extra candy eyeballs or a sprinkle of edible glitter if it’s a party night—it adds a little magical shimmer that kids totally love. For the pretzels, a quick dusting of colored sugar or edible spider webs can amp up the spooky factor.
Side Dishes
To round out the spread, I like pairing these mummy pretzels and pudding cups with some simple Halloween punch or a warm apple cider. Savory finger foods like mini sandwiches shaped like ghosts or cheese and crackers work well too if you want a balanced snack table.
Creative Ways to Present
For a Halloween party, I’ve lined up the pudding cups on a tiered stand wrapped with faux spider webs and placed the mummy pretzels around tombstone-shaped cookies. It’s an easy way to add drama without extra work. I also love using mini cauldrons or mason jars decorated with spooky stickers for serving individual portions with flair.
Make Ahead and Storage
Storing Leftovers
Leftover mummy pretzels can be stored in an airtight container at room temperature for up to 3 days—the candy stays crisp as long as it’s dry. Pudding cups should be refrigerated, covered tightly, to maintain freshness and prevent the apple from browning too quickly.
Freezing
I don’t recommend freezing the assembled pudding cups since the texture changes after thawing. However, you can freeze the plain pudding separately if it’s homemade. Pretzels aren’t great for freezing once coated, as the candy melts can crack or sweat during thawing.
Reheating
No reheating needed here! The mummy pretzels are best served at room temperature to keep their crunch, and pudding cups are a treat straight from the fridge. If you want the pudding a little less cold, just take them out 10 minutes before serving.
FAQs
-
Can I use regular chocolate instead of candy melts for the mummy pretzels?
While regular chocolate can work, candy melts are designed to harden quickly with a smooth finish, making them ideal for coating pretzels and decorating. If you use regular chocolate, temper it correctly or expect a softer finish that might not set as crisply.
-
Can I prepare the mummy pretzels ahead of time?
Absolutely! You can make the pretzels a day in advance and store them in an airtight container at room temperature. Just add the candy eyeballs a few hours before serving if you prefer them extra fresh and secure.
-
What’s the best way to keep the apple from browning in the pudding cups?
Mixing the diced apples into the vanilla pudding helps slow browning, but for best results, prepare and serve the pudding cups the same day. Adding a tiny squeeze of lemon juice to the apples before mixing can also help keep them fresh-looking.
-
Can this recipe be made nut-free?
Yes! Simply skip the peanut butter or substitute with a seed butter like sunflower seed butter. You might want to check that your pudding and candy melt ingredients don’t contain nut traces for allergy safety.
Final Thoughts
This Mummy Pretzels with Spooky Pudding Cups Recipe holds a special place in my Halloween traditions because it’s as joyful to make as it is to eat. It brings out my inner kid, especially when the kitchen fills with colorful candy melts and playful eyeballs. I’d say, give yourself permission to have a little fun with it, and share the experience with those who love a good spooky treat. Trust me, it’s a sweet, crunchy, creamy combo that won’t just disappear on your plate—it’ll create memories. So grab your pretzels, melt those candies, and enjoy every delicious step!
Print
Mummy Pretzels with Spooky Pudding Cups Recipe
- Prep Time: 15 minutes
- Cook Time: 30 minutes
- Total Time: 45 minutes
- Yield: 8 servings
- Category: Snack
- Method: No-Cook
- Cuisine: American
Description
Mummy Pretzels are a fun and festive Halloween treat combining crunchy pretzels dipped in colorful candy melts with cute candy eyeballs. Paired with delicious pudding cups topped with peanut butter, crushed pretzels, and diced apple, this recipe makes for a spooky and tasty snack or dessert that’s perfect for Halloween parties or family gatherings.
Ingredients
For the Mummy Pretzels:
- 3-4 cups pretzels
- 1 cup white candy melts
- 1 cup orange candy melts
- 1 cup green candy melts
- 1/2 cup chocolate candy melts
- Candy eyeballs
- Bowls to melt the candy in
For the Pudding Cups:
- 4 Snack Pack vanilla puddings
- 4 Snack Pack chocolate puddings
- 1 apple, diced
- Crushed pretzels (quantity as needed for topping)
- 4 tsp Peter Pan peanut butter
Other:
- Halloween stickers of your choice
Instructions
- Melt Candy Melts: Melt the white, orange, green, and chocolate candy melts separately following the instructions on each package, using separate bowls for each color.
- Prepare Baking Sheet: Line a baking sheet with parchment paper or wax paper to place the dipped pretzels on.
- Dip Pretzels: Dip the pretzels into the melted candy melts of different colors and place them on the lined baking sheet. Allow the candy to set for 15 minutes until firm.
- Drizzle and Add Eyeballs: If the melted chocolate has hardened, re-melt it. Using a fork, drizzle different colors of melted chocolate over the pretzels. Add candy eyeballs to the pretzels, using melted chocolate as glue if necessary. Let the pretzels set for an additional 15 minutes.
- Decorate Pudding Cups: Place Halloween stickers on the outside of each pudding cup for decoration.
- Prepare Chocolate Pudding Cups: To each chocolate pudding cup, add 1 teaspoon of peanut butter and some crushed pretzels. Mix well to combine.
- Prepare Vanilla Pudding Cups: To each vanilla pudding cup, add 1/4 of the diced apple and mix gently to combine.
- Serve: Top each pudding cup with a mummy pretzel. Sprinkle crushed pretzels over the chocolate pudding cups and diced apple over the vanilla pudding cups for added texture and flavor.
Notes
- Use candy melts in your favorite colors for more variety and to match your Halloween theme.
- If candy melts harden while decorating, gently reheat in short intervals to avoid burning.
- Peanut butter can be substituted with almond or sunflower seed butter for allergies.
- Crushed pretzels add a nice crunch but can be omitted for a smoother texture.
- Stick candy eyeballs carefully with melted chocolate to avoid them falling off.
- Make sure to let the pretzels fully set before handling to prevent breaking the candy coating.
Nutrition
- Serving Size: 1 serving
- Calories: 250 kcal
- Sugar: 18 g
- Sodium: 300 mg
- Fat: 10 g
- Saturated Fat: 6 g
- Unsaturated Fat: 3 g
- Trans Fat: 0 g
- Carbohydrates: 35 g
- Fiber: 2 g
- Protein: 4 g
- Cholesterol: 5 mg
