
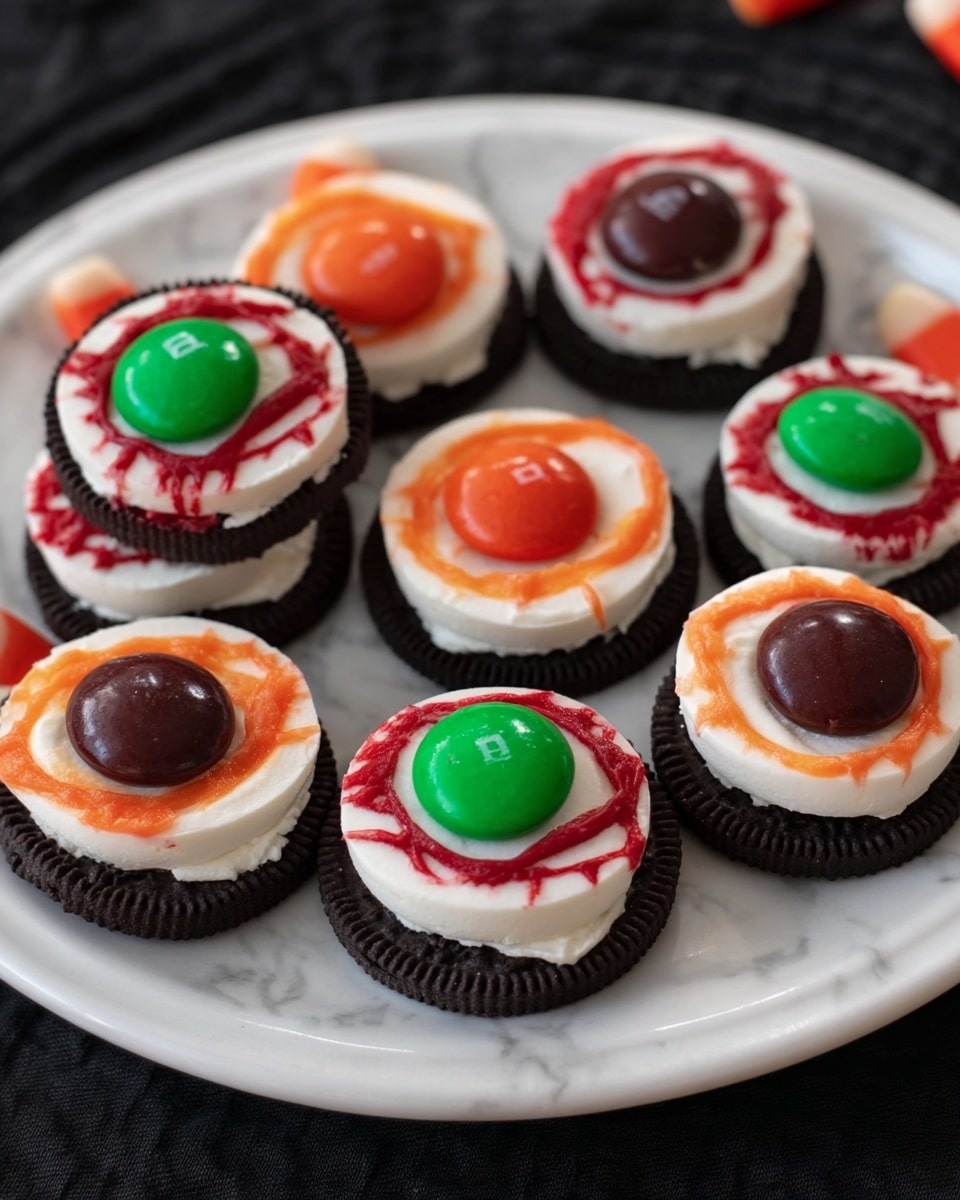
Oreo Eyeballs Halloween Treats Recipe
If you’re looking for a spooktacularly easy and adorable Halloween recipe, you’re going to love this Oreo Eyeballs Halloween Treats Recipe. These little creepy-cute eyeballs are made with just a few simple ingredients and a bit of creativity—no scary skills required! I first made them for a party last year, and trust me, they were the hit of the snack table. So stick with me, and I’ll walk you through exactly how to make these fun, festive treats that both kids and adults will enjoy gobbling up.
Why This Recipe Works
- Simple Ingredients: You likely have most of these treats at home already, making last-minute prep a breeze.
- Visual Wow Factor: The red “bloodshot” piped lines make these Oreos truly spooky and eye-catching on any Halloween spread.
- Kid-Friendly Assembly: Easy enough for little helpers with just a bit of piping involved for grown-up hands.
- Quick to Set: A chill in the fridge firms them up fast so you can move on to enjoying the party.

Ingredients & Why They Work
This Oreo Eyeballs Halloween Treats Recipe pulls together classic candy favorites that complement each other perfectly. The Oreos serve as the “eyeball base,” and the Life Saver Gummies add a jiggly pop of color, while the chocolate chips give the perfect pupil detail—plus a bit of chocolatey richness.
- Oreos: The sturdy cookie sandwich is the ideal “eye” because it holds its shape and has a creamy middle to gently scoop out.
- Life Saver Gummies: Their colorful translucence perfectly mimics the iris and adds fun texture.
- Chocolate Chips: Flat side up, these make the perfect pupils, adding a nice dark contrast.
- Red Candy Melting Chips: These melt smoothly and pipe easily, creating realistic bloodshot veins that look terrifyingly delightful.
Tweak to Your Taste
One of the reasons I keep coming back to this Oreo Eyeballs Halloween Treats Recipe is how easily you can make it your own. Whether you want to dial up the creepiness or the sweetness, there’s room for fun tweaks.
- Variation: I once swapped the Life Saver Gummies for sliced green or blue gummy rings to try a “monster eyeball” look — it was a colorful twist that kids loved!
- Dietary modification: Use vegan Oreos and dairy-free melting chocolate to make this treat allergy-friendly.
- Less mess: Skip the piping if you’re short on time; the gummies and chocolate chips look spooky enough alone.
Step-by-Step: How I Make Oreo Eyeballs Halloween Treats Recipe
Step 1: Prep Your Oreo Eyeballs Base
The trickiest part for me was carefully removing the top of each Oreo without breaking it, so I do this slowly and gently, using a butter knife. I save those tops for another treat (because waste not, want not!). Then, I lay the Oreo bottoms on a cookie sheet, so they have a nice, stable surface for decorating.
Step 2: Melt & Pipe the “Bloodshot” Veins
Melt your red candy melting chips in bursts of 30 seconds in the microwave, stirring in between to get a lovely smooth liquid. I transfer the melted candy into a sandwich bag, snip a tiny corner off, and carefully pipe thin zig zag lines from the center outwards on each Oreo to mimic those creepy bloodshot veins. This part really elevates the look—don’t rush it!
Step 3: Add the Iris With Gummies
Once your “veins” are done, place a Life Saver gummy right in the center of the Oreo—this gummy is the iris of your eyeball. Try to press it down gently so it sticks without smudging your red lines. This is where your treats start looking truly eerie and fun.
Step 4: Glue the Pupil in Place
Now, pipe a little dab of red chocolate on the gummy’s center to act like glue. Then, carefully place a chocolate chip flat side up to form the pupil of your eyeball. This detail makes your treat seem almost alive—my kids were seriously fascinated watching me add this part!
Step 5: Chill and Set
Pop your assembled Oreo eyeballs into the fridge for about 10 minutes so everything sets nicely. This chilling step keeps the candy hardened and makes them easier to handle for serving or packing up in treat bags.
Pro Tips for Making Oreo Eyeballs Halloween Treats Recipe
- Gentle Oreo Separation: Use a butter knife and slowly twist to keep the bottom intact; it makes decorating easier and less messy.
- Smooth Melting Chocolate: Stir frequently while microwaving candy chips to avoid burning and keep the piping perfect.
- Tiny Piping Tip: Snip off just the tiniest corner of your bag for fine bloodshot veins that look realistic but don’t overpower the look.
- Chill at the End: Refrigerate assembled eyeballs right away so candy hardens and treats hold up well, especially if you’re packing to go.
How to Serve Oreo Eyeballs Halloween Treats Recipe
Garnishes
I like to serve these Oreo eyeballs on a black or orange platter with a sprinkle of edible glitter for a little extra Halloween sparkle. Sometimes, I add a few plastic spider rings or candy corns around the tray to amp up the spooky vibes without overpowering the simple cuteness of the eyeballs.
Side Dishes
These eyeballs go surprisingly well alongside a bowl of spooky popcorn or a platter of pumpkin-shaped cheese balls. For a sweet and salty combo, I put out caramel apple slices nearby—it’s a big crowd pleaser at Halloween get-togethers.
Creative Ways to Present
Once, I arranged these Oreo eyeballs nestled inside a large hollowed-out pumpkin, creating a “creepy pumpkin eye nest” centerpiece. Another fun idea is serving them on skewers lined up like “eyeball kabobs,” which kids found hilarious. Get playful and watch how simple presentation makes the treats even more memorable!
Make Ahead and Storage
Storing Leftovers
I keep leftover Oreo eyeballs in an airtight container in the fridge, and they stay fresh and firm for up to 3 days. Keeping them cool also prevents the red candy veins from melting or getting sticky.
Freezing
Freezing these isn’t something I usually do because the gummy center changes texture when thawed, becoming a little tougher. If you want to try, freeze in a single layer in a sealed container and thaw slowly in the fridge to minimize gumminess.
Reheating
Reheating isn’t necessary here since these snacks are best enjoyed cold and fresh. But if you want the red candy slightly softened again, a few seconds in a warm spot at room temperature will do. Just avoid microwave reheating, or you risk melting the chocolate details.
FAQs
-
Can I use other cookies besides Oreos for this recipe?
Absolutely! While Oreos are ideal for their sturdy shape and familiar cream filling, you can experiment with other sandwich cookies that hold up well and have a contrasting middle—just choose ones that won’t crumble easily during separation.
-
What if I don’t have red candy melting chips?
You can substitute with red tinted white chocolate melts or even red icing piped from a tube. The key is to use something that melts smoothly and hardens quickly so your “bloodshot” effect looks clean and sets well.
-
Can kids help make the Oreo Eyeballs Halloween Treats Recipe?
Definitely! Kids love placing the gummies and chocolate chips. For the piping step, though, it’s best for an adult or older child to help to avoid mess and ensure neat lines.
-
How long can I store these treats before serving?
They’re best eaten within 2-3 days when stored in an airtight container in the fridge. Beyond that, the gummy texture changes and chocolate may lose its sheen.
-
Can I make this recipe vegan or allergy-friendly?
Yes! Just select vegan or allergy-friendly Oreos, and use dairy-free chocolate melts. Check that your Life Saver Gummies are vegan or substitute with another gummy candy that fits your needs.
Final Thoughts
This Oreo Eyeballs Halloween Treats Recipe has become my go-to easy Halloween party snack because it combines simplicity with such an awesome visual punch. Whether you’re making treats for your kids’ classroom party or your own spooky soirée, these eyeballs are a fun project that feels festive without any fuss. Trust me — once you try making and munching on these, you’ll want to keep this recipe handy every Halloween. Give them a whirl, and get ready to impress everyone with your adorable, creepy confectionery skills!
Print
Oreo Eyeballs Halloween Treats Recipe
- Prep Time: 15 minutes
- Cook Time: 10 minutes
- Total Time: 25 minutes
- Yield: 12 servings
- Category: Snack
- Method: No-Cook
- Cuisine: American
Description
Create spooky and delicious Oreo Eyeballs Halloween Treats with simple ingredients. These creepy snacks are perfect for Halloween parties, featuring bloodshot candy eyes made with red candy melts, gummy Life Savers, and chocolate chips.
Ingredients
Main Ingredients
- 12 Oreos
- 12 Life Saver Gummies
- 12 Chocolate Chips
- 1/4 cup Red Candy Melting Chips
Instructions
- Remove Oreo Tops: Carefully remove the tops of the Oreos and set them aside for use in another treat. Place the remaining Oreo bottoms on a cookie sheet.
- Melt Red Candy Chips: Heat the red candy melting chips in the microwave for 30 seconds, stir, then continue to heat in additional 15-second increments, stirring until the candy is completely melted and smooth.
- Pipe Bloodshot Lines: Transfer the melted red candy into a zippered sandwich bag and clip a tiny tip off one corner. Pipe tiny red zig-zag lines radiating from the center of each Oreo to the edges to simulate bloodshot eyes.
- Add Iris: Place one Life Saver gummy in the center of each Oreo as the iris of the eyeball.
- Attach Pupil: Pipe a small dab of the red melted candy onto the center of the gummy to act as glue, then place one chocolate chip flat side up in the center to serve as the pupil.
- Set Treats: Refrigerate the Oreo eyeballs for 10 minutes to allow the candy to set and harden before serving.
Notes
- Be careful when removing Oreo tops if you want to keep them intact for later use.
- If you don’t have red candy melts, you can use red-colored white chocolate or icing.
- The Life Saver gummies act as the iris, so choose colors that contrast well with the red piping for a spooky effect.
- Use a small piping tip or a tiny cut in the sandwich bag corner to control the candy flow for detailed lines.
- Store leftovers in an airtight container in the refrigerator to keep the candy from melting.
Nutrition
- Serving Size: 1 eyeball
- Calories: 120 kcal
- Sugar: 15 g
- Sodium: 80 mg
- Fat: 5 g
- Saturated Fat: 3 g
- Unsaturated Fat: 1 g
- Trans Fat: 0 g
- Carbohydrates: 20 g
- Fiber: 1 g
- Protein: 1 g
- Cholesterol: 0 mg


