
Halloween Mummy Oreo Cookies Recipe
If you’re looking for an easy but insanely cute treat to wow your friends and family this spooky season, I can’t wait to share my fan-freaking-tastic Halloween Mummy Oreo Cookies Recipe with you! These little mummies are not just adorable—they’re ridiculously simple to make, super fun to decorate, and perfect to bring out at any Halloween party or for a cozy night in with a scary movie. Trust me, once you try these, Oreo cookies will never be just cookies again. Let’s dive in!
Why This Recipe Works
- Simplicity: Uses just a few ingredients but creates a striking Halloween-themed cookie.
- No Baking Needed: With just melting and dipping, it’s ideal for any skill level and fast prep.
- Customizable: You can play with Oreo flavors or add other fun candy eyes or decorations.
- Visual Impact: The piped “mummy wraps” make each cookie uniquely adorable and perfect for Instagram-worthy snacks.

Ingredients & Why They Work
Every ingredient in my Halloween Mummy Oreo Cookies Recipe brings something important to the party—whether it’s flavor, texture, or that perfect spooky look. Picking the right type of Oreos and chocolate makes all the difference, so I’ve added tips that’ll help you shop smart and create flawless treats.
- Oreo Sandwich Cookies: Classic or flavored Oreos work well; double stuff adds creaminess and extra height for decorating.
- White Chocolate Melting Wafers: These melt smoothly and harden with a glossy finish, perfect for dipping and “bandage” piping.
- Paramount Crystals: Optional but highly recommended—they keep the melted chocolate shiny and prevent clumps or bloom, making your mummies look professional.
- Royal Icing Eyes: Cute and easy eyes bring your mummies to life—alternatively, you can use candy eyes or make your own with icing.
Tweak to Your Taste
I love giving Halloween Mummy Oreo Cookies my own little twists depending on who I’m baking for. Feel free to tweak the recipe and make it your own! Whether you want to add a little extra spooky flair or make it allergen-friendly, it’s really forgiving and super flexible.
- Variation: I once swapped out white chocolate wafers for orange candy melts to make “pumpkin” mummies—so cute and festive!
- Flavor Swap: Chocolate mint Oreos create a surprisingly delicious twist, adding a hint of coolness that pairs well with white chocolate.
- Dairy-Free Version: Use dairy-free white chocolate melts and vegan candy eyes to keep everyone included.
- Extra Decoration: Sprinkle a little edible glitter or tiny edible spiders on top for a more dramatic effect at your Halloween party.
Step-by-Step: How I Make Halloween Mummy Oreo Cookies Recipe
Step 1: Prep Your Space and Chocolate
First things first, line a baking sheet with parchment paper or a Silpat mat—that’s where your mummies will chill and set up. Then, melt your white chocolate wafers together with the paramount crystals in a microwave-safe bowl. I like to microwave in short bursts (30 seconds, then stir, then 15 seconds) to avoid overheating and seizing the chocolate. Stir gently but thoroughly—patience here pays off with perfectly smooth chocolate!
Step 2: Dip Those Oreos
Grab a fork or dipping tool and dunk each Oreo into the melted white chocolate, making sure it’s fully coated but not dripping. Tap off any excess gently—that’s key to avoid messy blobs on your tray. Place the dipped Oreos onto your lined sheet. Now the fun part: Immediately press the royal icing eyes onto the warm chocolate before it hardens. This quick move brings the mummies to life and helps the eyes stick just right.
Step 3: Pipe the Mummy Wraps
Pour your remaining melted chocolate into a piping bag or a simple sandwich bag with a tiny corner snipped off. Now, carefully pipe thin, irregular lines over each cookie to resemble mummy bandages. Don’t cover the eyes—you want those peeking out! Take your time here; the trick is to make the lines look a little random and overlapping, which adds to the charm. Once you’re satisfied, let the chocolate fully harden before moving or serving—about 15-20 minutes usually does the trick.
Pro Tips for Making Halloween Mummy Oreo Cookies Recipe
- Slow and Steady Melting: Melting the chocolate too fast leads to clumps—pause and stir often for velvety smooth results.
- Use Paramount Crystals: Adding these helps avoid dull or grainy chocolate, giving your mummies that pro-shop gloss.
- Piping Practice: If you’re new to piping, practice your mummy lines on parchment first—no stress if they’re not perfect; the charm is in the randomness!
- Eye Placement Timing: Adding eyes while chocolate is still wet prevents them from falling off—and keeps your mummies spooky-eyed, not eye-less!
How to Serve Halloween Mummy Oreo Cookies Recipe
Garnishes
I love adding a little extra charm on the serving platter—sometimes I sprinkle black and orange edible confetti or tiny Halloween sprinkles around the cookies just for a festive vibe. A few plastic spider rings or a touch of edible glitter add sparkle and fun without overwhelming those cute mummy faces.
Side Dishes
These Halloween Mummy Oreo Cookies are perfect alongside a big mug of hot cocoa or a spooky-themed punch. They also pair nicely with pumpkin-flavored treats like mini pumpkin muffins or roasted pumpkin seeds for a full Halloween snack spread.
Creative Ways to Present
I once arranged mine on a vintage wooden tray with dry ice underneath for a spooky fog effect—talk about a conversation starter! You can also stack them in clear jars decorated with Halloween ribbons or present them on themed cupcake stands for a cute Halloween dessert table display.
Make Ahead and Storage
Storing Leftovers
After your Halloween Mummy Oreo Cookies are set, store them in an airtight container at room temperature. I keep mine in a cool, dry place away from sunlight, and they stay perfect for 7+ days—still crisp and chocolatey, no soggy Oreos here!
Freezing
If you want to make them well in advance, you can freeze these cookies. Place them in a single layer on a tray until firm, then transfer to a freezer-safe container with parchment paper between layers. They freeze beautifully for up to a month—perfect for prepping your Halloween party early.
Reheating
Since these cookies don’t need reheating, I recommend letting frozen cookies thaw at room temperature for about 30 minutes before serving. This keeps the white chocolate’s shine and texture intact without melting the piped details.
FAQs
-
Can I use regular white chocolate instead of melting wafers?
While you can use white chocolate bars, they can be tricky to melt evenly and may seize. Melting wafers are formulated to melt smoothly and harden quickly without bloom, so they’re the easiest and most reliable option for this recipe.
-
What if I don’t have royal icing eyes?
No worries! You can use candy eyes from the baking aisle, draw eyes with edible markers, or even pipe small dots of black icing once your white chocolate sets.
-
How do I avoid the white chocolate melting off from the Oreo?
Make sure your Oreos are at room temperature and dry before dipping. Don’t coat them too thickly, and allow the chocolate to fully harden in a cool, dry spot (not the fridge, which can cause condensation and dull chocolate).
-
Can I make these ahead for a party?
Absolutely! They keep well for a week stored airtight and can be frozen too. Just add the edible eyes right before your event for the freshest look.
Final Thoughts
Honestly, this Halloween Mummy Oreo Cookies Recipe has become my go-to quick Halloween delight whenever I want to impress with minimal fuss. It’s a total crowd-pleaser, and I love how flexible it is for adding personal flair. Making these feels like a little kitchen party for just me or my family, creating cute memories along with tasty bites. You’re going to adore making these spooky little treats as much as eating them—so grab your Oreos and melting wafers, and let’s get our mummy on!
Print
Halloween Mummy Oreo Cookies Recipe
- Prep Time: 5 minutes
- Cook Time: 25 minutes
- Total Time: 30 minutes
- Yield: 25 cookies
- Category: Dessert
- Method: No-Cook
- Cuisine: American
Description
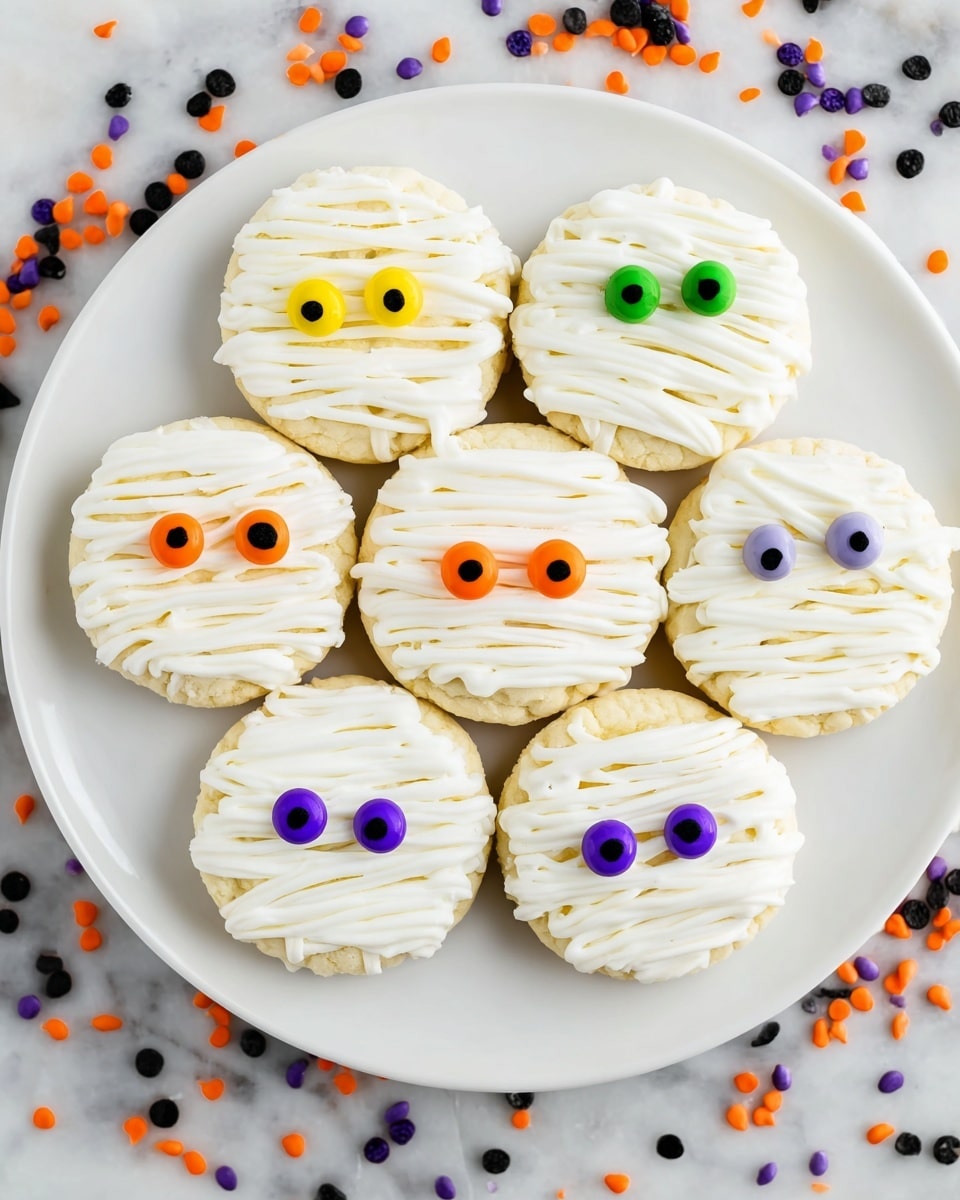
Halloween Mummy Oreo Cookies are a fun and spooky treat perfect for Halloween parties. These festive cookies feature Oreo sandwich cookies dipped in melted white chocolate, decorated with royal icing eyes, and piped with chocolate lines to resemble cute mummy wrappings. Easy to make and delightful to eat, they bring a playful touch to your holiday dessert table.
Ingredients
Main Ingredients
- 25 Oreo sandwich cookies, your favorite flavor
- 2 cups white chocolate melting wafers
- 2 tablespoons paramount crystals
- Royal icing eyes
Instructions
- Prepare the workspace: Line a baking sheet with parchment paper or a Silpat mat and set it aside for the dipped cookies to rest on.
- Melt the chocolate: In a microwave-safe bowl, add the white chocolate melting wafers and the paramount crystals. Microwave on medium heat for 30 seconds, then stir slowly. Continue microwaving in 15-second increments, stirring after each, until the chocolate is completely melted and smooth.
- Dip the Oreos: Using a fork or a dipping tool, dip each Oreo cookie into the melted white chocolate, tap lightly to remove excess coating, then transfer it to the lined baking sheet. Immediately place the royal icing eyes on the wet chocolate to create the mummy’s eyes. Let the chocolate set until hardened.
- Pipe mummy lines: Pour any remaining melted chocolate into a decorating bag or a sandwich bag and snip a small corner off. Pipe lines back and forth across each cookie to resemble mummy wrappings, being careful not to cover the eyes. Allow the chocolate to harden completely.
- Serve and enjoy: Once the chocolate is set, your Halloween Mummy Oreo Cookies are ready to be served. Enjoy your festive treats!
Notes
- Store the Halloween Mummy Oreo Cookies in an airtight container to keep them fresh for 7 or more days.
- Paramount crystals are optional but recommended to keep the white chocolate shiny and smooth and to prevent sugar or fat bloom.
Nutrition
- Serving Size: 1 cookie
- Calories: 150 kcal
- Sugar: 15 g
- Sodium: 90 mg
- Fat: 7 g
- Saturated Fat: 4 g
- Unsaturated Fat: 2 g
- Trans Fat: 0 g
- Carbohydrates: 20 g
- Fiber: 1 g
- Protein: 1 g
- Cholesterol: 0 mg
