
Black Cat Cookies Recipe
If you’re looking for a fun, festive treat that’s as adorable as it is delicious, you’re going to love this Black Cat Cookies Recipe. These cute cookies are perfect for Halloween parties, themed gatherings, or just a cozy night in with a spooky twist. I promise once you try this recipe, you’ll keep baking these little black cats year after year—they’re fan-freaking-tastic and surprisingly easy to make!
Why This Recipe Works
- Simple Ingredients: Uses a boxed cake mix base to save time, but still delivers rich flavor and soft texture.
- Fun Decor: The creative use of M&Ms, licorice, and sprinkles makes decorating a blast for all ages.
- Perfect Texture: The cookies are soft and pillowy, with a luscious black cocoa frosting that adds depth.
- Festive Appeal: These cookies are cute and spooky, ideal for Halloween or anytime you want to impress with minimal fuss.

Ingredients & Why They Work
The magic of this Black Cat Cookies Recipe comes from mixing familiar, pantry-friendly ingredients that come together quickly but taste special. Here’s why each plays its role perfectly:
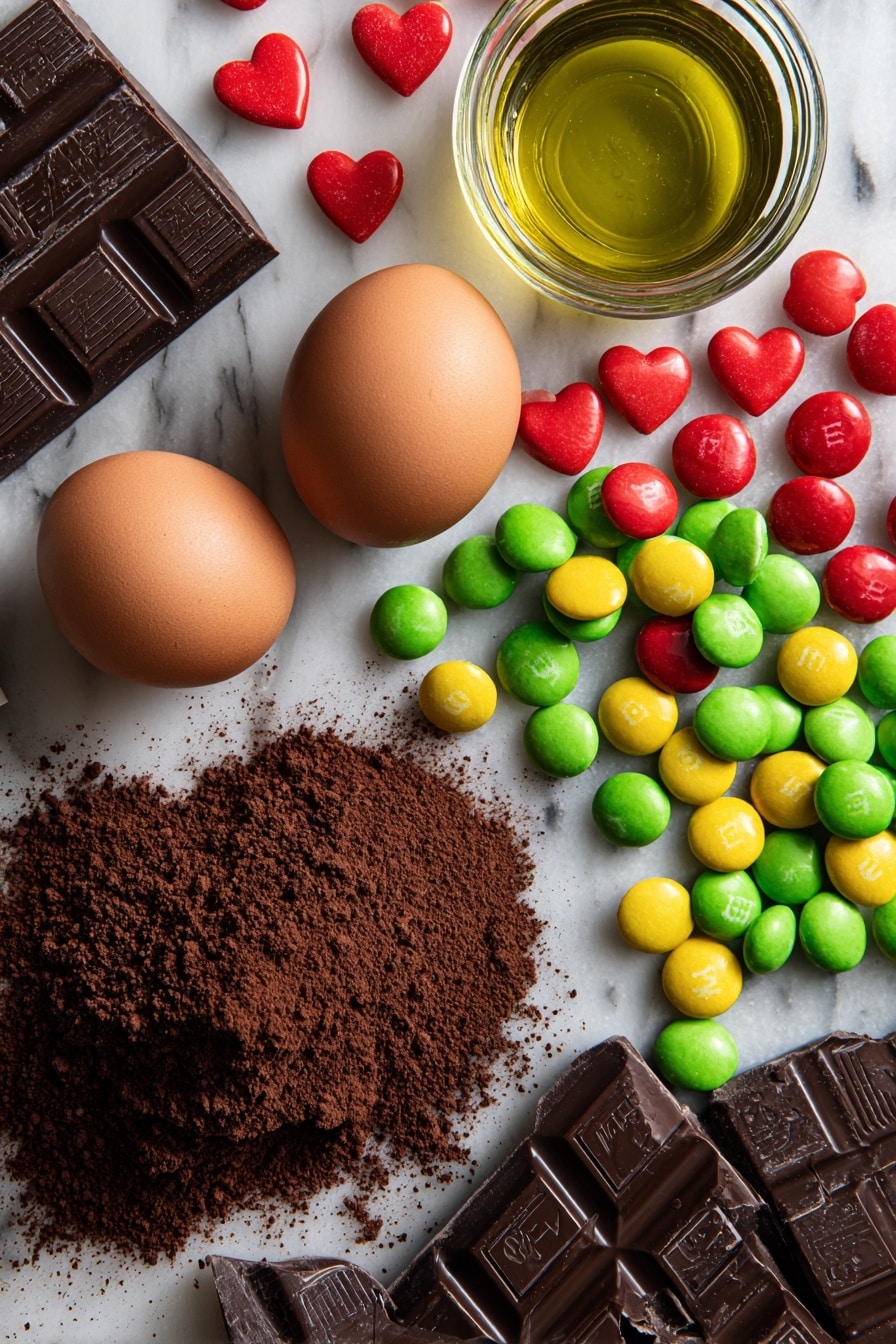
- Devil’s Food cake mix: This is the shortcut hero—providing chocolatey richness and soft crumb without fuss.
- Eggs: Bind everything together and add moisture for that tender crumb.
- Canola or vegetable oil: Keeps cookies moist and tender; I sometimes tweak amount depending on the cake mix size.
- Black food coloring (optional): Deepens the cookie color for a more dramatic black cat effect.
- Unsalted butter (for frosting): Creates a creamy, rich frosting base; make sure it’s softened!
- Powdered sugar: Sweetens the frosting with a smooth texture that’s easy to spread.
- Black cocoa powder: Gives the frosting its signature black color and an intense chocolate flavor.
- Vanilla extract: Rounds out the flavor with a warm, true vanilla note.
- Salt: Balances sweetness and brings out chocolate’s richness.
- Milk: Adjusts frosting to the perfect spreadable consistency.
- Decorations (M&Ms, heart-shaped sprinkles, black licorice, Hershey bars): These add personality and that clever cat look—don’t skip the edible marker for pupils; it’s such a fun finishing touch!
Tweak to Your Taste
I love how flexible this Black Cat Cookies Recipe is! You really can make it your own, whether you want to dial up the chocolate or switch decorations depending on the season or kids’ preferences.
- Variation: I’ve swapped black cocoa powder in the frosting for regular cocoa and added orange sprinkles for a more traditional Halloween vibe; it’s still delicious and kid-approved.
- Dietary Modifications: For a dairy-free twist, try using dairy-free margarine and plant-based milk in frosting—you won’t sacrifice much on taste.
- Seasonal Changes: Instead of black cats, adapt the same cookie base and frosting for other characters—like spooky owls or pumpkins—switching up decorations.
Step-by-Step: How I Make Black Cat Cookies Recipe
Step 1: Prepare Your Workspace
First things first: preheat your oven to 350°F and line two large baking sheets with parchment paper. This step might seem obvious, but trust me, having everything ready prevents that frantic scramble later—and your cookies will bake evenly without sticking.
Step 2: Mix Up the Cookie Dough
Grab a large bowl and stir together the Devil’s Food cake mix, eggs, and oil until it’s all combined and smooth. If you want your cookies extra black and spooky, add a few drops of black food coloring here. I usually start with two drops and add more if needed to get that perfect dark color.
Step 3: Shape and Bake Your Cookies
Using a tablespoon or cookie scoop, drop 1 1/2 tablespoon-sized balls of dough onto your parchment-lined sheets, spacing them about 2 inches apart. Don’t flatten them—you want that soft, pillowy rise. Bake for 8-10 minutes until the edges feel set but the centers might look a bit soft. This softness is totally fine because the cookies firm up as they cool. Let them rest for 5 minutes on the sheet before moving them to a wire rack.
Step 4: Whip Up the Black Cocoa Frosting
While the cookies chill out, start on the frosting. Beat softened unsalted butter in a medium bowl until creamy. Gradually add powdered sugar, black cocoa powder, vanilla extract, a pinch of salt, and 1 tablespoon of milk. Mix until smooth and spreadable. If it’s too thick, add a little more milk one teaspoon at a time. The key is a creamy texture that holds but spreads easily.
Step 5: Decorate Your Black Cat Cookies
Once the cookies are completely cool, spread a generous dollop of your luscious black frosting on each one. Now the fun part: eyes! Take your M&Ms and use a black edible marker to add pupils—this little detail brings your cats to life. Press two M&Ms onto each cookie for the eyes. Place a heart-shaped sprinkle upside down below the eyes as the nose. Next, snip small pieces of black licorice with kitchen shears and press them into the frosting around the nose for whiskers. Finally, break Hershey bars into triangles and press these on top for ears. Allow the frosting to set a few minutes before serving.
Pro Tips for Making Black Cat Cookies Recipe
- Watch Baking Time Closely: The edges should be firm but centers slightly soft to keep the cookies tender—not overbaked crunchy.
- Softened Butter is Key: For the smoothest frosting, make sure your butter is at room temperature—not melted.
- Use Parchment Paper: This keeps cleanup easy and prevents cookies from sticking or spreading too much.
- Frost After Cookies Cool: Applying frosting too soon can cause it to melt and ruin your perfect decorating canvas.
How to Serve Black Cat Cookies Recipe
Garnishes
I usually keep it simple with the suggested M&Ms, heart-shaped sprinkles, and black licorice whiskers because they create such an effective and charming look. Sometimes, I like to add a tiny edible glitter dust for a magical little sparkle that catches the light, especially for kids’ parties.
Side Dishes
Pair these with a warm cup of apple cider or hot chocolate for a cozy, fall-inspired snack. They also make a fantastic dessert alongside vanilla ice cream or a scoop of pumpkin spice gelato for that seasonal twist.
Creative Ways to Present
One Halloween, I arranged these cookies on a platter with leaf-shaped sugar cookies and little spiderweb doilies. It made such a fun centerpiece! You could also package a few in cellophane bags tied with orange and black ribbons for homemade gifts or party favors.
Make Ahead and Storage
Storing Leftovers
I’ve stored leftover Black Cat Cookies in an airtight container at room temperature away from sunlight for up to 3-4 days. They stay soft and delicious, but don’t forget to keep them separate from strong-smelling foods, so the chocolate taste stays pure.
Freezing
Freezing works wonderfully here. I flash-freeze the baked cookies on a tray until solid, then transfer them to a freezer-safe bag. You can keep them frozen for up to 3 months. When ready to enjoy, just thaw at room temperature, and they taste almost fresh-baked!
Reheating
If you want that freshly baked warmth, I lightly warm the thawed cookies in a 300°F oven for about 5 minutes. Be gentle, though, or the frosting might soften too much. Just enough warmth to bring out the flavors and soften the cookie slightly.
FAQs
-
Can I use a different cake mix for this Black Cat Cookies Recipe?
Absolutely! While Devil’s Food cake mix offers intense chocolate flavor and a deep color perfect for these cookies, you can experiment with other chocolate cake mixes too. Just keep in mind that smaller boxes might require adjusting oil amounts as noted in the recipe.
-
Is the black food coloring necessary?
Not really necessary, but it enhances the color dramatically for a spooky effect. If you prefer to avoid food coloring, the natural dark tone from the devil’s food mix plus the frosting still looks great.
-
How long will these cookies stay fresh?
Stored in an airtight container at room temperature away from direct sunlight, these cookies stay fresh and tasty for about 3-4 days.
-
Can I make the cookies gluten-free?
You’d have to find a gluten-free chocolate cake mix option as the base. Also ensure all decorations and frosting ingredients are gluten-free certified. It’s doable but requires checking labels carefully.
Final Thoughts
This Black Cat Cookies Recipe is truly one of my favorite easy treats to make—especially around Halloween. They bring a smile to everyone’s face, and the decorating process is pure joy, whether you’re making them with kids or on your own. If you give these a try, I just know you’ll fall in love too. So grab a box of cake mix, get your decorations ready, and let’s bake some charming black cats that taste as good as they look!
Print
Black Cat Cookies Recipe
- Prep Time: 25 minutes
- Cook Time: 10 minutes
- Total Time: 35 minutes
- Yield: 20 cookies
- Category: Dessert
- Method: Baking
- Cuisine: American
- Diet: Vegetarian
Description
Black Cat Cookies are a festive and fun treat perfect for Halloween or any spooky-themed event. Made from Devil’s Food cake mix, these soft and chocolatey cookies are decorated with black cocoa frosting, M&M eyes, licorice whiskers, heart-shaped sprinkles for noses, and Hershey chocolate ears to create adorable black cat faces.
Ingredients
Cookies
- 1 (15.25 ounce) box of Devil’s Food cake mix
- 2 large eggs
- 1/2 cup canola or vegetable oil (reduce to 1/3 cup if using a 13.25 ounce cake mix)
- Black food coloring (optional)
Frosting
- 1/2 cup unsalted butter, softened
- 1 3/4 cups powdered sugar
- 1/4 cup black cocoa powder
- 1 teaspoon vanilla extract
- Pinch of salt
- 1-3 tablespoons milk
Decorations
- 40 green or yellow M&Ms
- Black edible marker
- 20 large heart-shaped sprinkles
- Black licorice
- Hershey chocolate bars
Instructions
- Preheat Oven: Preheat the oven to 350 degrees Fahrenheit. Line two large baking sheets with parchment paper to prevent sticking and ensure even baking.
- Mix Dough: In a large bowl, combine the Devil’s Food cake mix, eggs, and oil until the mixture is well blended. Add black food coloring if you want a deeper black color for the cookies.
- Shape Cookies: Scoop 1 1/2 tablespoon-sized balls of dough onto the prepared baking sheets, spacing each about 2 inches apart. Do not flatten the dough balls to maintain a soft, puffy texture.
- Bake Cookies: Bake for 10 minutes or until the edges are set. The centers may be soft but will firm as the cookies cool. Let them cool on the baking sheet for 5 minutes before transferring to a wire rack to cool completely.
- Prepare Frosting: While the cookies cool, beat the softened butter in a medium bowl until creamy. Gradually add powdered sugar, black cocoa powder, vanilla extract, salt, and 1 tablespoon of milk, beating until smooth and spreadable. Adjust milk quantity to achieve desired consistency.
- Frost Cookies: Once cookies are fully cooled, spread a generous layer of the black cocoa frosting on top of each cookie.
- Decorate Eyes: Use the black edible marker to draw pupils on the green or yellow M&Ms. Press two M&Ms onto each frosted cookie to form the cat’s eyes.
- Add Nose: Place one large heart-shaped sprinkle upside down under the eyes on each cookie to serve as the cat’s nose.
- Attach Whiskers: Using kitchen shears, cut small pieces of black licorice and press them into the frosting around the nose to create whiskers.
- Create Ears: Break Hershey chocolate bars into pieces along the molded cuts, cut each piece into two squares, then diagonally cut each square into two triangles. Press two chocolate triangles into the top of each cookie to form the cat ears.
- Set Frosting: Allow the frosting to set for a few minutes before serving to ensure all decorations stay in place.
Notes
- Store the cookies in an airtight container at room temperature away from direct sunlight for 3-4 days to maintain freshness.
- These cookies can be frozen for up to 3 months. Flash-freeze them on a baking sheet until solid before transferring to an airtight container or freezer-safe bag to prevent sticking.
- If the frosting is too thick, add milk one teaspoon at a time to reach the desired spreadable consistency.
- Black food coloring is optional; the black cocoa powder in the frosting adds most of the dark color.
- You can substitute Hershey chocolate bars with any plain chocolate bars shaped into triangles for ears.
Nutrition
- Serving Size: 1 cookie
- Calories: 180 kcal
- Sugar: 15 g
- Sodium: 110 mg
- Fat: 10 g
- Saturated Fat: 4 g
- Unsaturated Fat: 5 g
- Trans Fat: 0 g
- Carbohydrates: 22 g
- Fiber: 1 g
- Protein: 2 g
- Cholesterol: 25 mg

