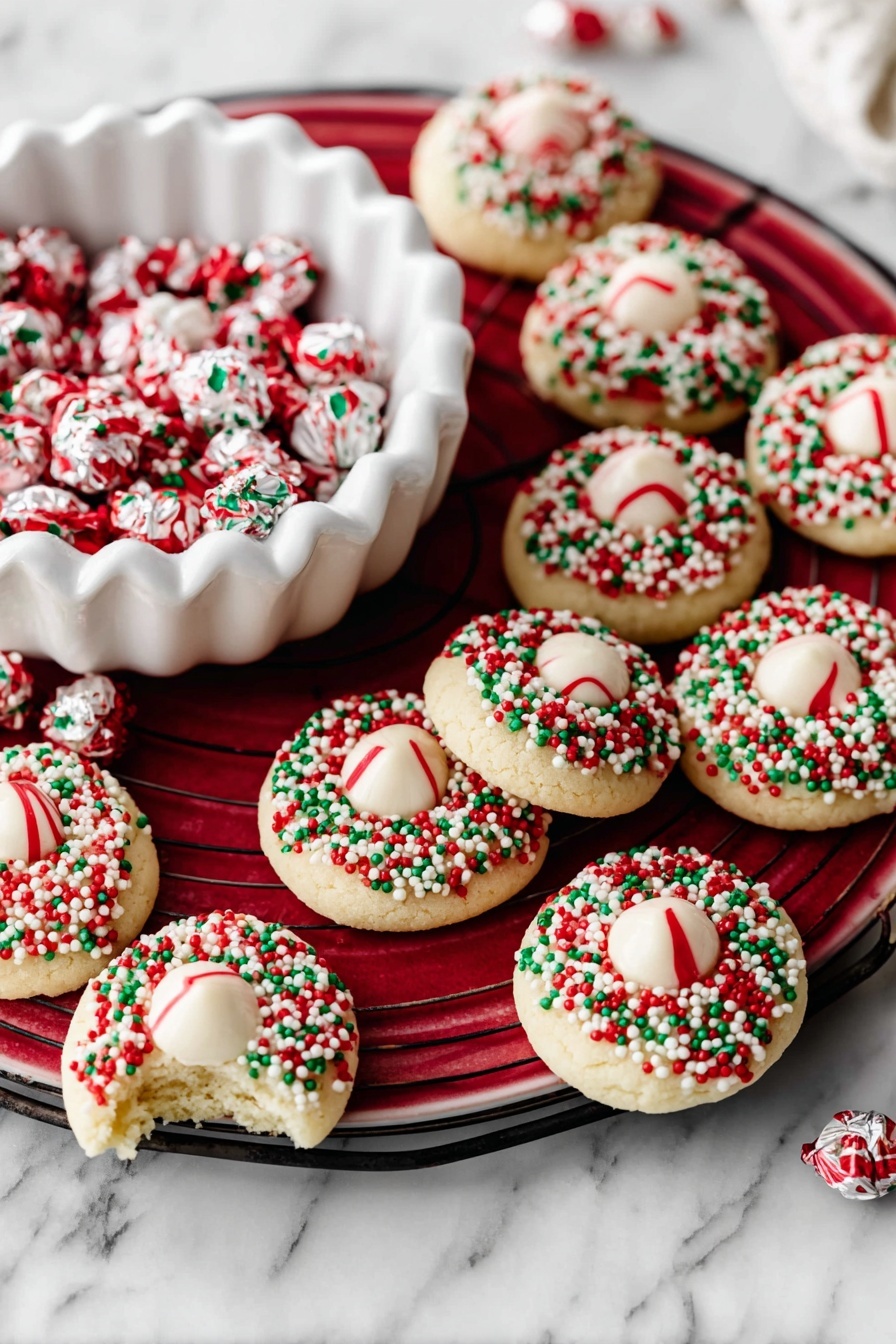
Candy Cane Kiss Cookies Recipe
There’s something so nostalgic and festive about these little treats, which is exactly why I had to share my beloved Candy Cane Kiss Cookies Recipe with you. These cookies combine a soft, buttery sugar cookie base with a burst of peppermint flavor and a perfectly gooey Hershey’s Kiss on top. Honestly, every time I bake them, the house smells like the holidays, and I get comments that they’re “the best Christmas cookies ever.” Stick with me because I’m going to walk you through how to make these beauties with no fuss—and share my favorite tips on how to make sure yours come out just right every time.
Why This Recipe Works
- Perfect Balance of Flavors: The peppermint extract pairs beautifully with the classic sugar cookie base and candy cane Kisses, giving you a festive twist without overpowering sweetness.
- Soft, Tender Texture: Creaming the butter and sugar properly creates just the right crumb—soft yet sturdy enough to hold the candy on top.
- Easy Prep & Chill Method: Chilling the dough balls with sprinkles helps the cookies maintain their shape while adding that charming, colorful coating.
- Melted Kiss Finish: Pressing the candy into the warm cookie and quick-freezing sets a gooey, melt-in-your-mouth center that’s pure holiday bliss.

Ingredients & Why They Work
Every ingredient in my Candy Cane Kiss Cookies Recipe is chosen to balance flavor, texture, and ease of baking. These components come together harmoniously to make a cookie that feels homemade but also a little special, perfect for gifting or your own sweet tooth moments.
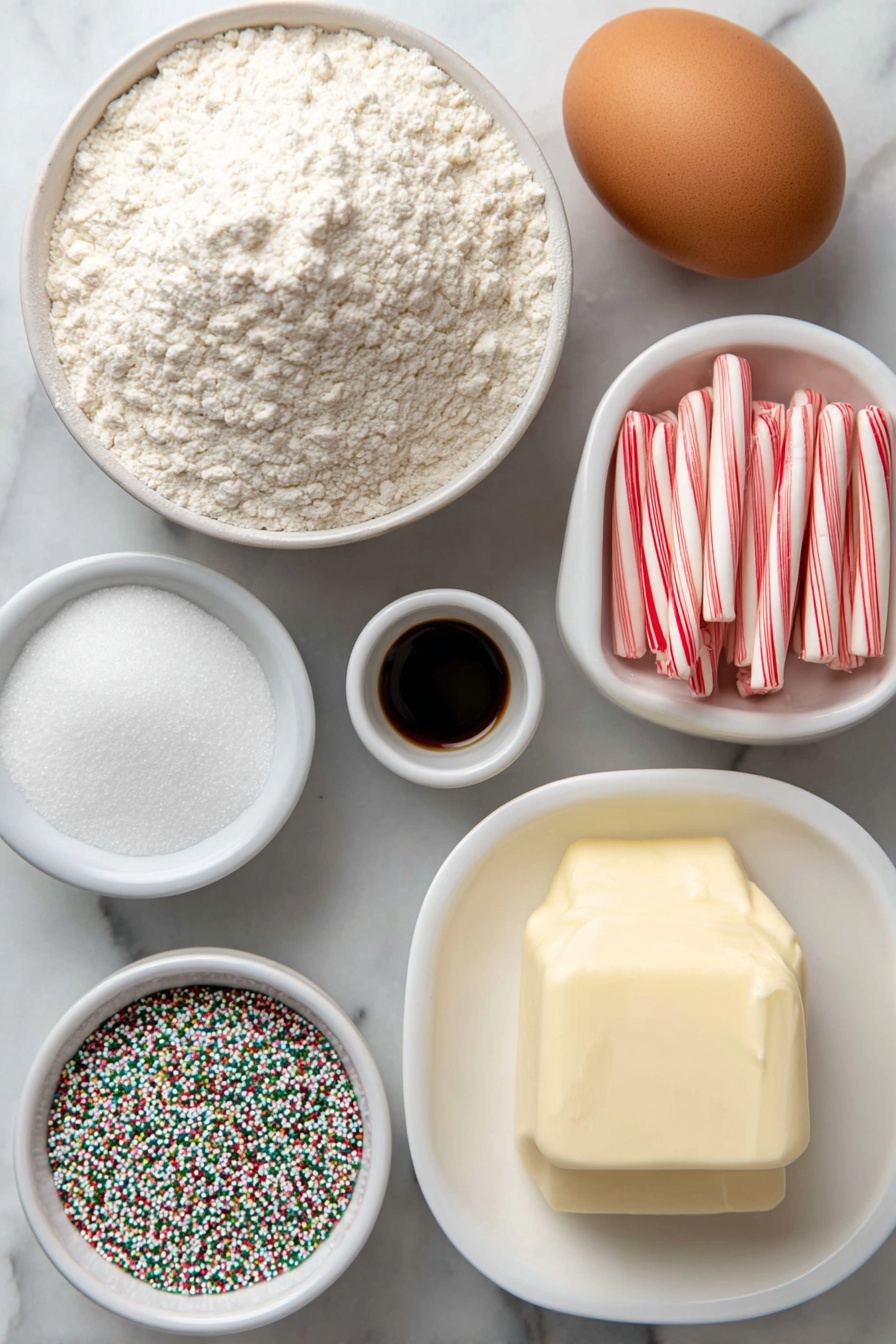
- All-purpose flour: This is the base of the cookie, giving it structure. Make sure to spoon and level your flour for accurate measuring so your dough doesn’t turn out too dense.
- Baking powder: Just enough to give a gentle rise and a tender bite, so your cookies aren’t flat and hard.
- Salt: Enhances all the flavors and balances the sweetness; don’t skip it!
- Unsalted butter: The star for richness and softness. I always soften it to room temperature for smooth creaming with sugar, which helps achieve that fluffy texture.
- Granulated sugar: Adds sweetness and helps with that slight crisp edge, which contrasts nicely with the soft center.
- Egg: Binds everything together and adds moisture. Room temperature eggs mix more evenly into the dough.
- Vanilla extract: Brings warmth and depth to the flavor, balancing the peppermint.
- Peppermint extract: This is your festive punch, giving that unmistakable candy cane flavor. I recommend starting with 1/4 teaspoon so it doesn’t overpower.
- Nonpareil sprinkles: I love using these tiny ball sprinkles because they cling nicely and add both color and texture.
- Candy cane Hershey’s Kisses: The iconic finishing touch. If you can’t find candy cane flavor, any Kiss or festive chocolate will do!
Tweak to Your Taste
I find that the beauty of this Candy Cane Kiss Cookies Recipe is how easy it is to swap or customize bits to really make it your own. Personally, I like to tweak the peppermint level depending on how ‘minty’ I feel that day, and I sometimes sub almond extract to get a softer profile if I want something less minty but still festive.
- Variation: I once rolled the dough balls in sparkling sugar instead of sprinkles for a more subtle crunch and a pretty shimmer—totally festive and delicious!
- Dietary swaps: For dairy-free baking, swapping butter for coconut oil or a vegan butter alternative works well—but the texture will be slightly different, so watch for softer dough.
- Chocolate lovers: Try swapping half the flour for cocoa powder to turn these into peppermint chocolate kiss cookies. Just a tip—add a little more sugar to balance the cocoa’s bitterness.
Step-by-Step: How I Make Candy Cane Kiss Cookies Recipe
Step 1: Whisk Dry Ingredients Together
Start by whisking the flour, baking powder, and salt in a medium bowl until everything is evenly mixed. It’s a simple step but trust me, it ensures your cookies have a uniform texture every time. Set this aside for now.
Step 2: Cream Butter and Sugar
Using a mixer fitted with a paddle attachment, beat the softened butter and sugar on high speed for about 3 minutes. This step is crucial—you want it to be fluffy and light, which gives the cookie that tender crumb. Scrape down your bowl sides if needed.
Step 3: Add Your Flavors
Mix in the egg, vanilla extract, and peppermint extract until fully combined. The gentle mint aroma will start filling your kitchen right now—I never get tired of that smell!
Step 4: Combine Dry and Wet Ingredients
Switch to low speed, then slowly add your flour mixture. Keep mixing until it just comes together—the dough will be thick and a bit stiff, but that’s exactly what you want.
Step 5: Roll & Sprinkle
Roll the dough into small balls, about a scant tablespoon each or roughly 20 grams. Here’s a trick: if the dough feels too firm to roll, warm your hands slightly or add a teaspoon of water to soften. Roll each ball generously in the nonpareil sprinkles so they’re fully coated. If the sprinkles aren’t sticking, try pressing the dough onto a plate piled with sprinkles for better adhesion.
Step 6: Chill the Dough Balls
Pop the sprinkle-coated dough balls onto a baking sheet or plate and chill them in your fridge for at least 20 minutes (up to 1 day if you cover them). This resting step stops the cookies from spreading too much and keeps those cute sprinkle coatings intact.
Step 7: Bake the Cookies
Preheat your oven to 350°F (177°C). Place the chilled dough balls about 2 inches apart on parchment-lined baking sheets. Bake for 12 minutes, or until the edges look set but centers may still seem soft. This slight under-bake is perfect—it keeps them tender and buttery.
Step 8: Add the Hershey’s Kisses
Right after taking the cookies out of the oven, quickly press a candy cane Kiss right in the center of each cookie. Use a thin spatula to gently transfer the warm cookies onto plates and then pop them into the freezer for 10 minutes. This chills the chocolate just enough so it doesn’t spread too much and sets the kiss perfectly.
Step 9: Serve & Enjoy
Remove from the freezer and dig in! These cookies stay fresh in an airtight container at room temperature for up to a week, but honestly—they rarely last that long in my house.
Pro Tips for Making Candy Cane Kiss Cookies Recipe
- Don’t Skip Chilling: I learned the hard way—chilling keeps the cookies from spreading too thin and helps the sprinkles stick perfectly.
- Room Temperature Ingredients: Butter and eggs at room temp mix smoothly, giving you an even dough—cold ingredients can cause cracking or uneven baking.
- Watch the Baking Time: The cookies might seem underdone in the middle, but they finish baking on the sheet, keeping them soft and tender.
- Press Kisses Immediately: Pressing the Hershey’s Kisses right out of the oven lets them melt just enough to stay put without losing their shape.
How to Serve Candy Cane Kiss Cookies Recipe
Garnishes
I typically keep it simple with these cookies because the colorful sprinkles and peppermint Kisses do all the work. But for parties, I like to dust them lightly with some powdered sugar for a “snowy” touch, or add crushed candy canes on top of the Hershey’s Kiss after pressing it in for extra festive flair.
Side Dishes
These cookies pair perfectly with a cozy mug of hot cocoa or peppermint mocha. If you’re hosting, layering them with a couple of other cookie varieties on a holiday platter makes for a diverse, irresistible spread.
Creative Ways to Present
For gifting, wrap a few cookies in parchment paper tied with red and white twine, or stack them in a clear jar layered with mini marshmallows and sprinkles. I like adding a little handwritten note describing the cookie—it’s a nostalgic touch people love.
Make Ahead and Storage
Storing Leftovers
After they cool completely, I store my Candy Cane Kiss Cookies in an airtight container at room temperature, layering parchment paper between to keep those sprinkles intact. They stay fresh for about a week this way—if you can keep your hands off them that long!
Freezing
If you want to make these ahead, freeze the sprinkle-coated dough balls for up to 3 months. When you’re ready, no need to thaw—just add a minute or two to the baking time. You can also freeze fully baked cookies for convenience, wrapped tightly to prevent freezer burn.
Reheating
Want to freshen up leftovers? Warm them for about 10 seconds in the microwave or 5 minutes in a 300°F oven. This softens the cookie and reawakens that melty Kiss finish, tasting almost like they’re freshly baked.
FAQs
-
Can I use regular chocolate Hershey’s Kisses instead of candy cane flavor?
Absolutely! While candy cane-flavored Kisses add a peppermint punch, regular milk chocolate or even other flavored Kisses will work wonderfully. Just keep in mind it changes the flavor profile slightly but still results in a delicious cookie.
-
Why do the sprinkles sometimes not stick to the cookie dough?
If your dough feels too dry or firm, the sprinkles won’t adhere well. Try warming your hands slightly when rolling, pressing dough balls into sprinkles on a plate, or adding a teaspoon of water to the dough to make it stickier.
-
Can I make the dough ahead of time?
Yes! You can prepare the dough, roll it into balls, coat with sprinkles, and refrigerate for up to a day before baking. For longer storage, freeze the dough balls for up to three months and bake from frozen with a slightly longer bake time.
-
What if I don’t have peppermint extract?
No worries! You can omit the peppermint extract or substitute almond extract for a classic sugar cookie flavor. The cookies will still be delicious—just a different flavor profile.
-
How do I know when the cookies are done?
Look for edges that look set and lightly golden, while the centers look soft and perhaps slightly underdone. Resist the urge to overbake—these cookies finish cooking on the baking sheet and stay nice and tender.
Final Thoughts
Honestly, this Candy Cane Kiss Cookies Recipe has become a tradition in my kitchen. There’s something so comforting about mixing up the dough, rolling it in sprinkles with little helpers, and then pressing those peppermint kisses on top. Whether you’re baking for a holiday party, gift boxes, or just because, these cookies always bring smiles and warm memories. I’m confident that once you make them, they’ll hold a special place in your festive cookie arsenal too. So, roll up those sleeves and enjoy every minty, buttery bite—you’ve got this!
Print
Candy Cane Kiss Cookies Recipe
- Prep Time: 45 minutes
- Cook Time: 12 minutes
- Total Time: 1 hour 10 minutes
- Yield: 36 cookies
- Category: Dessert
- Method: Baking
- Cuisine: American
- Diet: Vegetarian
Description
Candy Cane Kiss Cookies are festive sugar cookies featuring a peppermint twist, coated in colorful sprinkles and topped with candy cane flavored Hershey’s Kisses. These soft, chewy cookies are perfect for holiday celebrations and are simple to make with a short chilling time and quick bake.
Ingredients
Dry Ingredients
- 2 cups + 1 Tablespoon (260g) all-purpose flour (spooned & leveled)
- 1 and 1/2 teaspoons baking powder
- 1/4 teaspoon salt
Wet Ingredients
- 10 Tablespoons (142g) unsalted butter, softened to room temperature
- 1 cup (200g) granulated sugar
- 1 large egg, at room temperature
- 1 teaspoon vanilla extract
- 1/4 teaspoon peppermint extract
Coating and Topping
- 1/2 cup (about 90g) nonpareil sprinkles
- 32–36 candy cane flavor Hershey’s Kisses, unwrapped
Instructions
- Prepare Dry Ingredients: Whisk the flour, baking powder, and salt together in a medium bowl until fully combined. Set aside for later.
- Cream Butter and Sugar: In a large bowl using a hand-held or stand mixer fitted with a paddle attachment, beat the softened butter and granulated sugar together on high speed for about 3 minutes until the mixture is creamy and well combined.
- Add Egg and Extracts: Add the egg, vanilla extract, and peppermint extract to the butter and sugar mixture. Beat on medium speed for about 1 minute until everything is incorporated. Scrape down the sides and bottom of the bowl as needed to ensure even mixing.
- Combine Wet and Dry Ingredients: Gradually add the flour mixture to the wet ingredients and mix on low speed until the dough is fully combined. The dough will be thick and dense.
- Form Dough Balls and Coat with Sprinkles: Roll the dough into balls about 1 scant tablespoon each, approximately 20 grams per ball. If the dough feels dry, use the warmth of your hands to help form balls. Roll each dough ball generously in nonpareil sprinkles. If sprinkles don’t stick well, press dough balls into sprinkles on a plate, or add 1 teaspoon of water to the dough and try again.
- Chill the Dough Balls: Place the sprinkle-coated dough balls on a baking sheet or plate. Chill them in the refrigerator for 20 minutes up to 1 day. Cover if chilling for longer than 1 hour.
- Preheat Oven: While chilling, preheat your oven to 350°F (177°C).
- Bake the Cookies: Place the chilled dough balls about 2 inches apart on a lined baking sheet. Bake for 12 minutes or until the edges appear set. The centers may look slightly underbaked, which is normal. Avoid overbaking.
- Cool Slightly and Press Kisses: Remove cookies from the oven and cool on the baking sheet for 5 minutes. Immediately press a candy cane Hershey’s Kiss into the center of each cookie.
- Set the Candy: Using a thin spatula, gently transfer the cookies to a large plate or smaller plates. Place the plates in the freezer for 10 minutes to quickly set the candy.
- Serve: Remove from the freezer and serve. Store cookies covered at room temperature for up to 1 week.
Notes
- You can prepare the dough balls coated in sprinkles and chill them in the refrigerator up to 1 day ahead. Cover if chilling longer than 1 hour.
- Unbaked, sprinkle-coated dough balls freeze well for up to 3 months. Bake frozen dough balls for an extra minute without thawing.
- Baked cookies freeze well up to 3 months; thaw before serving.
- Substitute peppermint extract with almond extract for a classic sugar cookie flavor.
- Use nonpareils, sanding sugar, or jimmies-style sprinkles for coating.
- If candy cane-flavored Hershey’s Kisses are unavailable, use regular or flavored Hershey’s Kisses.
- For a chocolate variation, try chocolate peppermint thumbprint dough or chocolate crinkle dough, baking as described and topping with kisses after cooling 5 minutes.
- Use parchment paper or silicone baking mats to prevent sticking and for easy cleanup.
Nutrition
- Serving Size: 1 cookie
- Calories: 110 kcal
- Sugar: 8 g
- Sodium: 45 mg
- Fat: 6 g
- Saturated Fat: 3.5 g
- Unsaturated Fat: 2 g
- Trans Fat: 0 g
- Carbohydrates: 13 g
- Fiber: 0.5 g
- Protein: 1 g
- Cholesterol: 20 mg


