Chocolate Cherry Black Forest Pie Recipe
If you’ve ever dreamed of a dessert that combines the rich decadence of chocolate with the bright tang of cherries—all nestled under a fluffy cloud of cream—then you’re going to love this Chocolate Cherry Black Forest Pie Recipe. It’s one of those recipes I fell in love with because it feels fancy enough for a special occasion but surprisingly approachable for a cozy night in. Stick with me, and I’ll walk you through every step so your pie turns out perfect and impresses everyone at your table!
Why This Recipe Works
- Balanced Flavors: The tart cherries perfectly cut through the richness of the chocolate crust for a harmonious taste experience.
- Textural Delight: The lattice crust adds that just-right crunch while the creamy mascarpone topping melts on your tongue.
- Ease of Assembly: Using frozen cherries means no messy thawing, keeping the filling consistency spot on.
- Versatile Indulgence: You can make it ahead for celebrations or whip it up spontaneously for a sweet treat that wows.

Ingredients & Why They Work
This Chocolate Cherry Black Forest Pie Recipe carefully layers ingredients that bring both taste and texture—perfect for creating that iconic Black Forest experience with a pie twist. Here are some shopping tips and why each ingredient is key to your success.
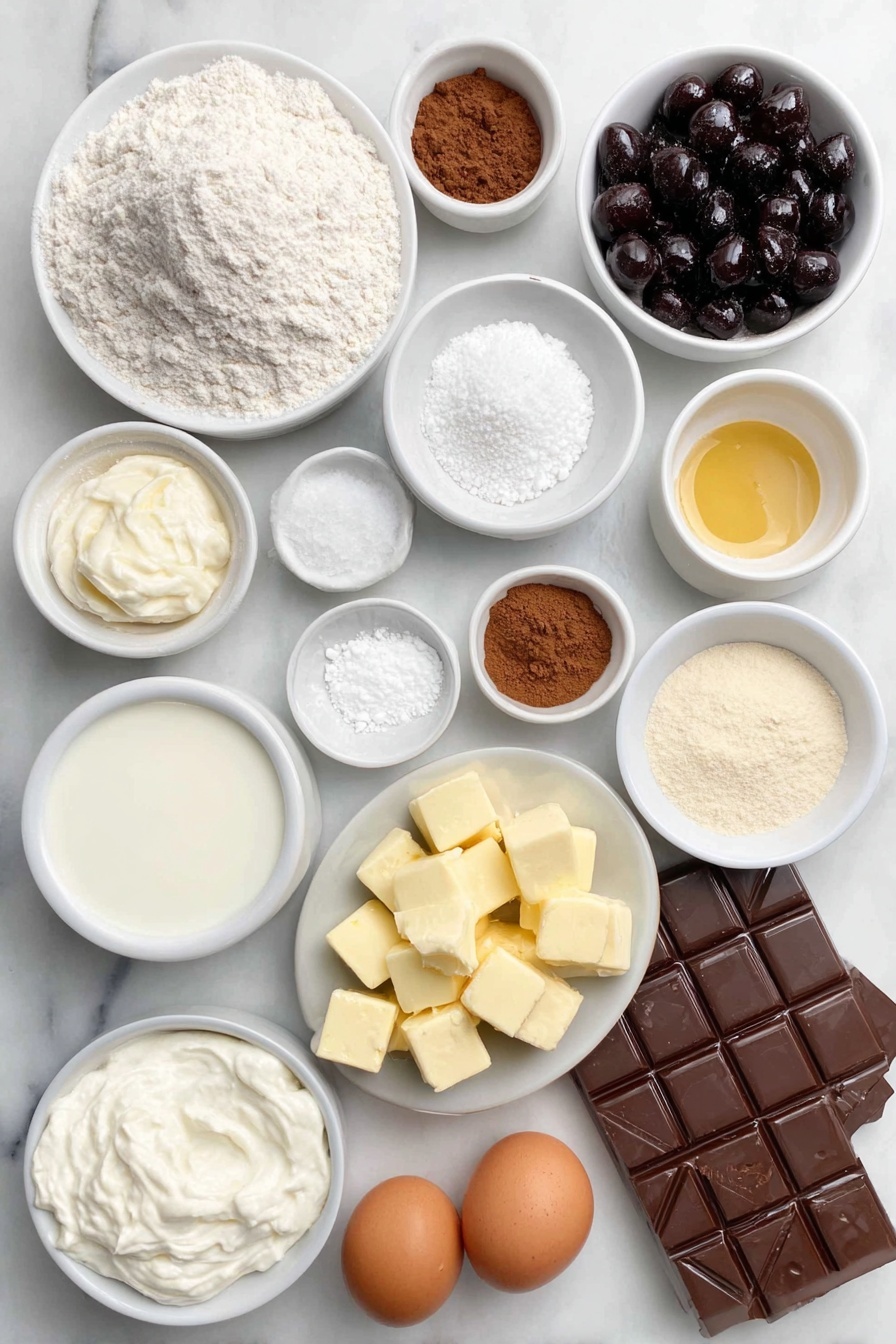
- All-purpose flour: The foundation of the crust, giving you that tender but sturdy texture you want to hold the filling.
- Cocoa powder: Adds rich chocolate flavor without extra fat—bringing that deep, dark note to the crust.
- Sea salt: A pinch enhances flavors and balances sweetness beautifully.
- Granulated sugar: Sweetens the crust and filling just right without overpowering.
- Unsalted butter: Frozen and cubed for a flaky crust that shatters delightfully when bitten.
- Sour cream: Adds moisture and a subtle tang that makes the crust tender and flavorful.
- Pure vanilla extract: Enhances all the flavors and aroma—don’t skip it!
- Cold water: Helps bring the dough together without making it tough—always add little by little.
- Frozen tart cherries: The star of the filling, tartness keeps the pie from being cloyingly sweet and holds its shape baked.
- Cornstarch: Thickens the cherry filling into that glossy, luscious texture you want.
- Ground cinnamon: A whisper of warmth that brings complex flavor notes to the cherries.
- Cherry liquor (optional): Adds authentic cherry depth and boozy goodness if you’re feeling indulgent.
- Almond extract: A little magic that counters the tartness with a subtle nutty aroma.
- Heavy whipping cream: Used to brush the crust for browning and whipping into the luscious topping.
- Demerara sugar: Adds crunch and pretty sparkle on the crust lattice.
- Mascarpone cheese: For rich and creamy whipped topping—makes the pie as dreamy as it looks.
- Dark chocolate bar: Shaved generously on top of the cream for elegance and extra chocolate punch.
Tweak to Your Taste
I love making this Chocolate Cherry Black Forest Pie Recipe my own by adjusting a few things depending on what I’m craving or who I’m baking for. Feel free to experiment—you might find a version you adore even more!
- Variation: When sharing with kids, I skip the cherry liquor and add a splash of cherry juice for flavor without the alcohol.
- Dietary tweaks: For gluten-free, swap the all-purpose flour with a reliable gluten-free blend—just keep the dough chilled well.
- Seasonal adjustment: Fresh cherries can be used if they’re in season—just increase the cornstarch by a tablespoon to compensate for extra juice.
- More chocolate: Feel free to add mini chocolate chips into the filling for a surprise melty hit inside the pie.
Step-by-Step: How I Make Chocolate Cherry Black Forest Pie Recipe
Step 1: Crafting the Perfect Chocolate Sour Cream Pie Crust
Start by mixing your dry ingredients—flour, cocoa powder, salt, and sugar—in a big bowl. Keep your butter cubes frozen and toss them in next, working them in with your fingers or a pastry cutter until the mixture looks like chunky peas. This bit is key—don’t overwork it! Then stir in the sour cream and vanilla, which adds moisture and a lovely tang, and slowly add cold water one tablespoon at a time to help the dough come together. When it holds without being sticky, gather it and fold it gently three times before splitting into two discs. Wrap those up and chill for at least an hour or even overnight if you have time.
Step 2: Mixing the Cherry Pie Filling
While the dough chills, preheat your oven to 355°F (180°C). In a large bowl, toss the frozen cherries right from the freezer with sugar, cornstarch, salt, cinnamon, cherry liquor, and almond extract until they’re evenly coated. The cold cherries make it easier to handle and help keep the filling from getting watery. Pop this mixture into the refrigerator while you roll out your crust.
Step 3: Assembling the Pie
Roll out one of your chilled dough discs on a floured surface to about a quarter-inch thickness. Carefully place it into your pie plate, letting it fall naturally without stretching. Pour in your cherry filling, making sure to include all that flavorful juice at the bottom of the bowl—it’s gold! Then roll out the second dough disc and cut it into 1.5-inch strips. Lay those strips over the pie to create a lattice pattern, overlapping and weaving them for that classic look. Trim any excess dough, then fold the edges under and crimp with your fingers or a fork. Brush the top with heavy cream and sprinkle generously with coarse demerara sugar to get that sparkling, golden finish.
Step 4: Baking to Perfection
Place your pie on a baking sheet (trust me, the filling bubbles over sometimes!) and pop it in the oven’s lower half for 60-75 minutes. Keep an eye out, and if the crust edges brown faster than the center, cover them with foil to avoid burning. The pie is done when you see the filling bubbling merrily and the crust looks crisp and set. Let it cool to warm or room temperature before slicing—this helps the filling thicken and set nicely.
Step 5: Whipping Up the Vanilla Mascarpone Cream
Whip heavy cream, sugar, vanilla extract, and salt until you see medium-stiff peaks popping up. Then add the mascarpone cheese and keep whipping until the mixture is thick and glossy with stiff peaks. This topping is where the pie shines—so creamy and slightly tangy. Dollop generously over your pie slices and shave dark chocolate over the top using a vegetable peeler for that gorgeous finishing touch.
Pro Tips for Making Chocolate Cherry Black Forest Pie Recipe
- Keep Butter Cold: I always freeze the butter in small cubes before mixing to create that flaky, layered crust everyone drools over.
- Use Frozen Cherries Directly: Handling them frozen stops the filling from becoming watery, which makes slicing easier and cleaner.
- Tent the Crust with Foil: When the crust starts browning too soon, foil saves the day by preventing burnt edges without sacrificing that perfect golden look.
- Serve Warm: I find the crust is so tender yet crisp just out of the oven, and letting the pie warm enhances the rich flavors beautifully.
How to Serve Chocolate Cherry Black Forest Pie Recipe
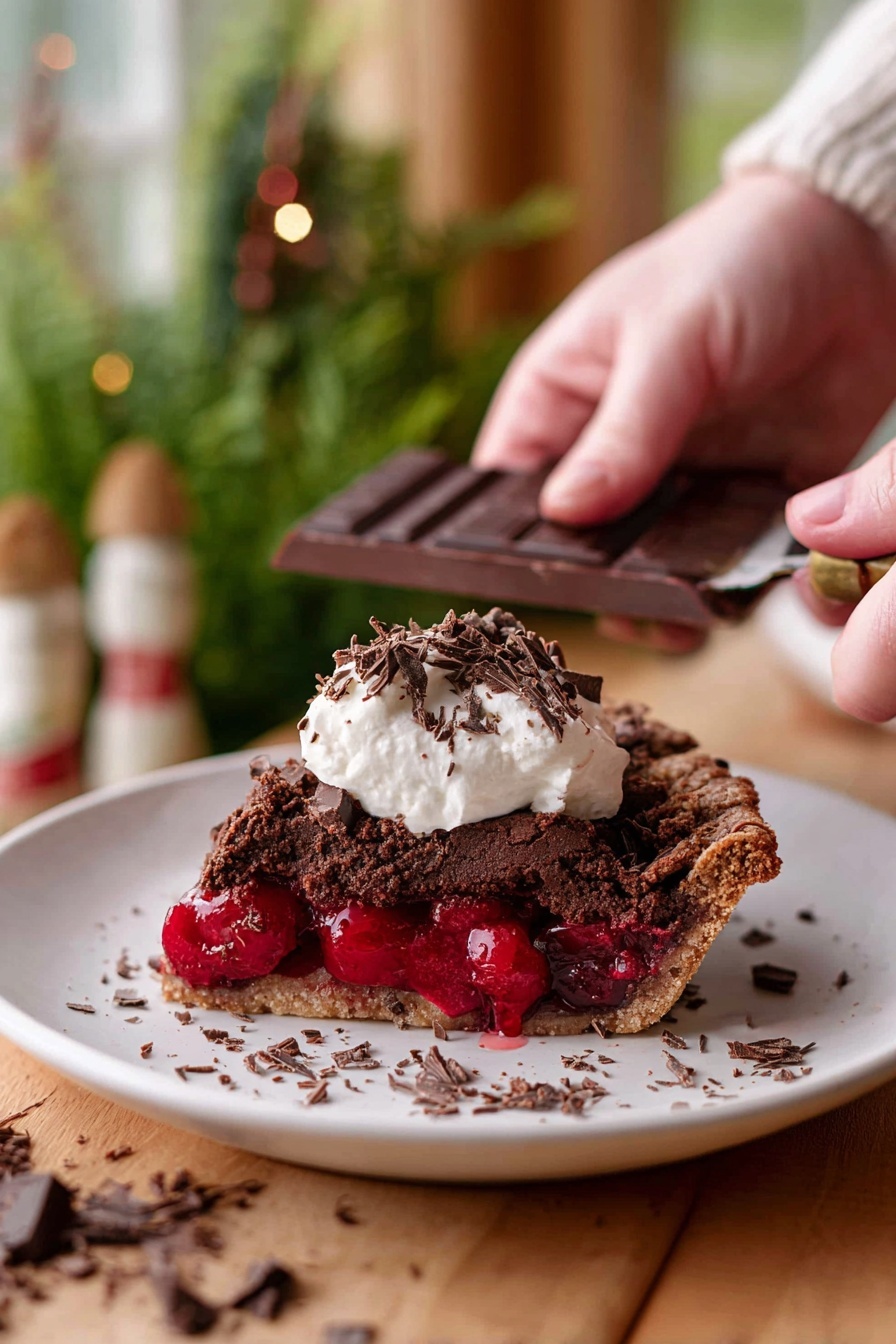
Garnishes
I adore topping each slice with a big dollop of the vanilla mascarpone cream and a generous shower of freshly shaved dark chocolate. The chocolate curls melt just a bit from the cream’s warmth and add an elegant look that makes every slice feel like a special treat.
Side Dishes
Since this pie is such a rich experience, I like to pair it with a fresh fruit salad or a tangy scoop of lemon sorbet to balance the richness. A cup of freshly brewed coffee or a glass of cherry-infused sparkling water also complements the flavors beautifully.
Creative Ways to Present
For a festive occasion, I’ve arranged mini individual lattice pies in small ramekins, perfect for dinner parties where everyone gets their own. Another fun twist is layering slices with a drizzle of cherry sauce and extra whipped cream to serve as an elegant dessert parfait.
Make Ahead and Storage
Storing Leftovers
I store the pie covered tightly in the fridge, and it keeps beautifully for up to five days. Since the filling uses cornstarch, the texture stays firm and juicy without breaking down. Just be sure to keep the crust from getting soggy by serving it soon after slicing.
Freezing
Freezing this pie can be tricky because cornstarch doesn’t always freeze well—it makes the filling a bit watery when thawed. If you want to freeze, swap cornstarch for arrowroot starch, which holds up better during freezing. Wrap the pie tightly and freeze for up to two months.
Reheating
To reheat, I pop slices in a low-temperature oven (around 300°F or 150°C) for about 10-15 minutes to warm through while keeping the crust crisp. Avoid microwaving—it tends to make the crust soggy and dull the pie’s texture.
FAQs
-
Can I use fresh cherries instead of frozen in the Chocolate Cherry Black Forest Pie Recipe?
Yes! Fresh cherries work well if in season, but because they contain more liquid, you might want to increase the cornstarch by a tablespoon to help thicken the filling. You’ll also want to pit and chop them if large, then toss them with the sugar and spices just like the frozen cherries.
-
Is there a gluten-free option for this pie crust?
Absolutely. Swap the all-purpose flour for a 1-to-1 gluten-free baking flour blend that includes xanthan gum for structure. Keep the dough chilled and handle it gently to maintain that nice flaky texture.
-
Can I make the mascarpone whipped cream ahead of time?
Yes! The mascarpone cream stays fresh and fluffy if you prepare it a day ahead and store it in an airtight container in the fridge. Just give it a quick whisk before serving if it has softened too much.
-
Why does the recipe use sour cream in the crust?
Sour cream adds moisture and a slight tang that balances the sweetness and chocolate richness, resulting in a tender, flaky crust. It also helps with the dough’s texture, making it easier to roll out and less likely to crack.
-
Can I skip the almond extract?
You can, but I recommend including it if possible since it gives that subtle nutty hint classic to Black Forest desserts. If you don’t have almond extract, a few drops of vanilla or even cherry extract can work as a substitute.
Final Thoughts
This Chocolate Cherry Black Forest Pie Recipe is one of those desserts that feels special without feeling intimidating. I treasure how it brings people together—whether it’s for a birthday, a comforting weekend treat, or when I just need a little sweet joy. I’m confident you’ll love the rich chocolate crust paired with bright cherries and that fluffy mascarpone topping as much as I do. Give it a try—you might even surprise yourself with how beautiful and delicious it turns out. Happy baking, friend!
Print
Chocolate Cherry Black Forest Pie Recipe
- Prep Time: 30 minutes
- Cook Time: 1 hour 15 minutes
- Total Time: 1 hour 45 minutes
- Yield: 12 slices
- Category: Dessert
- Method: Baking
- Cuisine: American
Description
This Chocolate Cherry Black Forest Pie combines a rich cocoa sour cream crust with a tart cherry filling, topped with a lattice crust and finished with vanilla mascarpone whipped cream. It’s a decadent dessert perfect for parties or special occasions.
Ingredients
Chocolate Sour Cream Pie Crust
- 2 ¼ cup all purpose flour
- ⅓ cup cocoa powder
- ½ teaspoon sea salt
- ¼ cup granulated sugar
- 1 cup unsalted butter cut into 1 cm cubes and frozen
- ⅓ cup sour cream cold
- 1 tablespoon pure vanilla extract
- ¼ cup cold water
Tart Cherry Pie Filling
- 1 ½ lbs tart cherries frozen, don’t defrost, about 6 cups
- ¾ cup granulated sugar
- 4 tablespoons cornstarch
- ¼ teaspoon sea salt
- ½ teaspoon ground cinnamon
- 2 tablespoons cherry liquor optional
- ½ teaspoon almond extract
- 2 tablespoons heavy whipping cream
- 2 tablespoons coarse demerara sugar
Vanilla Mascarpone Whipped Cream
- ¾ cup heavy whipping cream cold
- 2 tablespoons granulated sugar
- ½ teaspoon vanilla extract
- ⅛ teaspoon sea salt
- ½ cup mascarpone cheese cold
- ¼ bar dark chocolate for shaving on top
Instructions
- Prepare pie crust: Combine flour, cocoa powder, salt, and sugar in a large bowl. Add the cold butter and work it into the mixture until it resembles coarse peas. Mix in sour cream and vanilla extract. Gradually add cold water, about two tablespoons, mixing until the dough comes together. Flatten and fold the dough three times, then divide into two disks. Wrap and refrigerate for at least one hour or overnight.
- Prepare pie filling: Preheat oven to 355°F (180°C). In a large bowl, mix frozen tart cherries with sugar, cornstarch, salt, cinnamon, cherry liquor (if using), and almond extract. Chill in the fridge until ready to assemble.
- Roll out bottom crust: On a floured surface, roll out one dough disk to ¼ inch thickness. Transfer to a pie plate, allowing it to fit naturally without stretching.
- Add filling: Pour the cherry filling into the crust, including any juices and dry bits.
- Make lattice top: Roll out second dough disk and slice into 1.5 inch strips. Arrange them overlapping in a lattice pattern over the filling. Trim excess dough, leaving about 1 inch around the edge.
- Finish crust edges: Tuck the edges of the crust under and crimp with fingers or a fork to seal.
- Brush and sugar: Brush the top crust with heavy cream and sprinkle generously with coarse demerara sugar.
- Bake the pie: Place the pie on a larger baking sheet and bake in the lower oven rack for 75 minutes or until filling bubbles and crust is crisp. Tent with foil if edges brown too quickly.
- Cool pie: Allow the pie to cool until warm or room temperature before serving.
- Make whipped cream: In a large bowl or mixer, whip cold heavy cream, sugar, vanilla extract, and salt to medium-stiff peaks. Add mascarpone cheese and whip to stiff peaks. Use immediately or refrigerate up to 3 days.
- Serve: Spoon whipped cream over slices of pie and garnish with shaved dark chocolate using a vegetable peeler.
Notes
- You can prepare the pie and whipped cream a day ahead and store separately in the fridge until ready to serve.
- Store leftover pie covered in the fridge for up to 5 days; freezing is not recommended due to cornstarch thickener.
- For freezing, substitute cornstarch with arrowroot starch for better texture retention.
- Do not overwork the butter in the crust; keep it coarse and chunky for flakiness.
- Keep cherries frozen to make filling assembly easier and more manageable.
- Bake until the filling bubbles and the crust is crisp; tent with foil if the crust edges brown too quickly.
- Serve the pie warm for best texture with a tender yet crisp crust.
Nutrition
- Serving Size: 1 slice
- Calories: 420 kcal
- Sugar: 30 g
- Sodium: 150 mg
- Fat: 25 g
- Saturated Fat: 15 g
- Unsaturated Fat: 9 g
- Trans Fat: 0 g
- Carbohydrates: 45 g
- Fiber: 4 g
- Protein: 5 g
- Cholesterol: 70 mg
