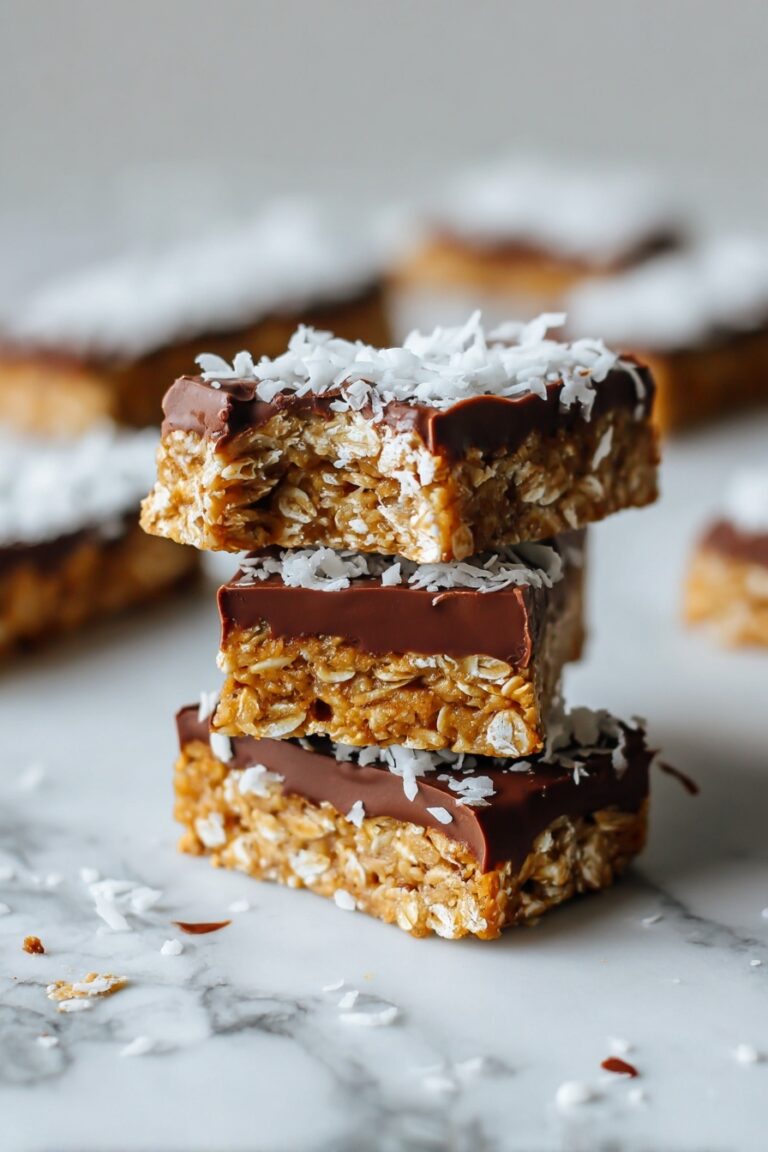
Chocolate Peanut Butter Oreo Bars Recipe
If you’re a fan of dreamy, rich desserts that combine all your favorite flavors, then you’re in for such a treat with this Chocolate Peanut Butter Oreo Bars Recipe. Seriously, you’ll get the perfect Oreo crust, a luscious peanut butter filling, and a silky chocolate topping—each bite is like a party in your mouth. Stick around because I’m going to share my best tips to nail these bars every single time. Trust me, once you try this, it’s going to be your new go-to for celebrations or just because.
Why This Recipe Works
- Simple Ingredients with Big Flavor: It uses pantry staples like Oreos and peanut butter, but the combo feels totally indulgent.
- Texture Magic: Crunchy Oreo base meets creamy peanut butter and a smooth chocolate layer on top—each bite is pure bliss.
- No Baking Required: Great for when you want an impressive dessert without heating up the kitchen or fussing with complicated steps.
- Customizable & Crowd-Pleasing: Easy to tweak with your favorite peanut butter or chocolate varieties, so everyone gets exactly what they love.

Ingredients & Why They Work
Let’s chat about ingredients real quick, because knowing why each one matters helps you appreciate the magic behind this bars recipe—and tackle any swaps with confidence.

- Oreo cookies: Using classic Oreos (not double stuffed) gives you just the right crunch and that signature chocolatey vibe in the crust.
- Unsalted butter: Melted butter binds the Oreo crumbs perfectly, so your base stays intact without getting greasy.
- Brown sugar: Adds a mellow caramel note to the peanut butter layer that deepens the flavor beautifully.
- Salt: Just a pinch balances the sweetness and enhances the peanut butter’s richness.
- Smooth peanut butter: Go smooth here—chunky textures don’t spread evenly and mess with the layers. Also, avoid natural peanut butter with oil separation for best results.
- Powdered sugar: Sweetens and firms up the peanut butter filling so it holds together perfectly.
- Semi-sweet chocolate: Melts nicely for the topping; choose your favorite variety, but semi-sweet strikes a perfect balance with the peanut butter.
- Shortening or vegetable oil: Added to the chocolate for a glossy finish and smooth spreadability.
Tweak to Your Taste
I love that this Chocolate Peanut Butter Oreo Bars Recipe is basically a blank canvas for creativity. Over time, I’ve personalized it a bit, and encourage you to do the same—that’s half the fun!
- Add a Crunch: Toss in some chopped roasted peanuts in the peanut butter layer for extra texture—I love the surprise of that little crunch.
- Mix up the Chocolate: Sometimes I swap semi-sweet for dark or even milk chocolate depending on the crowd. Dark adds an intense edge while milk chocolate amps up the sweetness.
- Go Nut-Free: If peanut allergies are a concern, sunflower seed butter can be a surprisingly delicious stand-in.
- Seasonal Twists: Sprinkle a pinch of cinnamon or even a dash of cayenne into the peanut butter for a subtle kick that’s unexpected but addictive.
Step-by-Step: How I Make Chocolate Peanut Butter Oreo Bars Recipe
Step 1: Preparing the Oreo Crust
The first time I made these bars, I didn’t have a food processor and was skeptical; but crushing the Oreos in a freezer bag with a rolling pin works just fine! Just make sure you get the crumbs super fine—no big chunks so your base holds together flawlessly. Once crushed, mix them well with melted butter so everything binds. The trick? Press that mixture firmly and evenly into an 8×8-inch pan lined with parchment or foil, which makes for an easy lift-out later.
Step 2: Crafting the Peanut Butter Layer
Now onto the peanut butter frosting! Beat unsalted softened butter with brown sugar until it’s silky smooth—don’t rush this part. Next, add in the peanut butter and salt, mixing until you see no lumps of butter. The key is folding in the powdered sugar gradually, about half a cup at a time, because it can be tough to fully incorporate. When it no longer sticks to your fingers, you’ve nailed the texture. Spread or gently press this over your Oreo crust into a level layer. I often use a piece of wax paper to smooth it out perfectly without the mess.
Step 3: Melting and Spreading the Chocolate Topping
Chop your chocolate finely to help it melt evenly. I prefer microwaving it gently on medium power in 45-second bursts, stirring between each interval. This patience prevents burning—I’ve ruined batches rushing this part! Once melted, stir in shortening or a little vegetable oil for that shiny, spreadable finish. Pour over the peanut butter layer and use a spatula to smooth the top gracefully.
Step 4: Letting the Bars Set and Slicing
Patience here really pays off. Let the chocolate harden on your countertop or pop it in the fridge if you’re short on time, but be mindful that fridge cooling can cause slight discoloration on the chocolate surface. When chocolate is nearly set, score the top gently with a sharp knife where you plan to cut to avoid cracking or messy edges. Once fully hardened, lift the bars out using the parchment overhang and slice with a sharp thin knife. Clean your knife between cuts for the best presentation!
Pro Tips for Making Chocolate Peanut Butter Oreo Bars Recipe
- Don’t Skip the Parchment: Lining your pan with parchment or foil with an overhang makes lifting bars out a breeze without breaking them.
- Control the Heat When Melting Chocolate: Melting slowly at medium power keeps chocolate smooth and prevents it from seizing.
- Smoothing Techniques: Wax paper or the back of a spoon can help get a perfectly even peanut butter layer without stickiness.
- Cut with Care: Warm your knife under hot water and dry it before slicing for clean, polished edges each time.
How to Serve Chocolate Peanut Butter Oreo Bars Recipe

Garnishes
I love to keep it simple: a gentle dusting of powdered sugar or a few crushed mini Oreos on top right after smoothing the chocolate gives a nice visual pop. Sometimes, if I’m feeling fancy, a drizzle of melted white chocolate adds contrast and makes these bars look extra special for guests.
Side Dishes
These bars are pretty much the star dessert on their own, but I like pairing them with a big scoop of vanilla ice cream or a fresh berry salad to balance out the richness. Coffee or a cold glass of milk also pairs beautifully for a nostalgic vibe.
Creative Ways to Present
For birthdays and celebrations, I’ve served these bars on a decorative platter lined with fresh mint leaves and edible flowers around the edges—that contrast of colors really wows people. Cutting the bars into fun shapes using cookie cutters is another way I’ve made them festive for kids’ parties.
Make Ahead and Storage
Storing Leftovers
I usually store leftover bars in an airtight container at room temperature for up to 3 days. If your kitchen is warm, the fridge works fine too, just bring the bars back to room temp before serving for the best chocolate texture.
Freezing
These bars freeze beautifully. I wrap them tightly in plastic wrap and then foil, so they don’t pick up freezer smells. When ready to eat, I thaw them overnight in the fridge and then let them sit a bit at room temp to soften slightly before serving.
Reheating
I usually don’t reheat these bars because they’re best chilled or room temperature. But if you want a melty treat, a quick 10-second zap in the microwave brings the peanut butter layer to life without melting the chocolate top too much.
FAQs
-
Can I use crunchy peanut butter for this Chocolate Peanut Butter Oreo Bars Recipe?
While you can technically use crunchy peanut butter, I recommend smooth peanut butter for a more uniform texture. Crunchy peanut butter might create lumps or make it harder to spread the filling evenly.
-
Do I have to refrigerate these bars?
You don’t have to refrigerate them if your kitchen is cool, but in warmer climates the chocolate topping might soften. If you want firmer bars and longer storage, refrigeration is your best bet.
-
What can I substitute for shortening in the chocolate layer?
If you don’t have shortening, ½ teaspoon of vegetable or coconut oil works great to give the chocolate a smooth, glossy finish.
-
How do I prevent the chocolate from discoloring in the fridge?
Chocolate can develop a white “bloom” when chilled suddenly. To minimize this, cool it gradually at room temperature or store the bars in an airtight container to reduce moisture exposure.
-
Can I make this recipe gluten-free?
Absolutely! Swap Oreos for a gluten-free chocolate cookie alternative, and double-check your peanut butter and chocolate labels to ensure they’re gluten-free.
Final Thoughts
This Chocolate Peanut Butter Oreo Bars Recipe has become one of my absolute favorites because it delivers on flavor with minimal fuss, and the nostalgic Oreo-peanut butter-chocolate combo just can’t be beat. I hope you give it a try soon and enjoy the smiles it brings at your table. Treat yourself, and maybe share a few (or not!) with friends—this recipe always gets rave reviews wherever I take it.
Print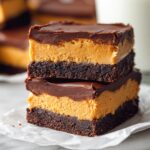
Chocolate Peanut Butter Oreo Bars Recipe
- Prep Time: 20 minutes
- Cook Time: 0 minutes
- Total Time: 1 hour 20 minutes
- Yield: 16 squares
- Category: Dessert
- Method: No-Cook
- Cuisine: American
Description
Peanut Butter Oreo Bars combine a crunchy Oreo base with a smooth peanut butter layer and a rich chocolate topping, creating a decadent no-bake treat that’s perfect for any occasion.
Ingredients
Oreo Base
- 15 Oreo cookies, not double stuffed
- 3 tablespoons unsalted butter (42 grams), melted
Peanut Butter Layer
- 1/4 cup unsalted butter (56 grams), softened
- 3 tablespoons brown sugar, light or dark
- 1/4 teaspoon salt (omit if using salted butter)
- 1 cup smooth peanut butter
- 1 2/3 cup powdered sugar (183 grams), sifted
Chocolate Topping
- 6 ounces semi-sweet chocolate (170 grams), or your favorite variety
- 2 teaspoons shortening, or 1/2 teaspoon vegetable oil
Instructions
- Prepare Pan: Line an 8×8 inch (20×20 cm) pan with parchment paper or aluminum foil, leaving an overhang around the sides for easy removal later.
- Make Oreo Crust: Crush the Oreo cookies (wafers and filling) in a food processor until fine crumbs form, or place them in a freezer bag and crush with a rolling pin. Mix the crushed cookies with melted butter, then press the mixture evenly into the bottom of the prepared pan.
- Make Peanut Butter Layer: Beat together the softened butter and brown sugar until smooth. Beat in the peanut butter and salt until fully combined and smooth. Gradually mix in the powdered sugar about 1/2 cup at a time until the mixture is thick, not sticky, and holds together well. Spoon this mixture evenly over the Oreo crust and spread or press it into an even layer using a spatula or piece of wax paper.
- Prepare Chocolate Topping: Chop the chocolate into very fine pieces and place in a heatproof bowl. Melt the chocolate by microwaving on medium power for 45 seconds at a time, stirring between intervals until fully melted, or melt using a double boiler over low heat. Stir in the shortening or oil to thin the chocolate slightly.
- Assemble Bars: Pour the warm chocolate evenly over the peanut butter layer and smooth the surface with a spatula.
- Set and Harden: Allow the chocolate topping to harden either at room temperature or in the refrigerator. Note that refrigeration may cause the chocolate to discolor, but this will not affect flavor or texture.
- Slice Bars: When the chocolate is about 90% hardened, score the top with a thin sharp knife where you plan to cut the bars to facilitate clean slicing. Once fully hardened, lift the bars from the pan using the parchment or foil overhang and place on a cutting board. Slice into 16 squares with a sharp, thin knife.
Notes
- Use smooth, commercially prepared peanut butter where the oil is fully mixed in, not natural peanut butter that separates.
- Nutrition details are estimates based on cutting the bars into 16 equal pieces.
- Store the bars in an airtight container at room temperature or refrigerate for longer freshness.
- The chocolate can be melted gently using a double boiler if you prefer not to use a microwave.
- Scoring the chocolate before it fully hardens helps achieve cleaner slices without cracking.
Nutrition
- Serving Size: 1 square
- Calories: 280 kcal
- Sugar: 22 g
- Sodium: 150 mg
- Fat: 18 g
- Saturated Fat: 6 g
- Unsaturated Fat: 10 g
- Trans Fat: 0 g
- Carbohydrates: 25 g
- Fiber: 1 g
- Protein: 5 g
- Cholesterol: 15 mg
