Chocolate Peanut Butter Rice Krispy Cups Recipe
If you’re on the hunt for a no-fuss, irresistibly delicious treat, then you’re going to love this Chocolate Peanut Butter Rice Krispy Cups Recipe. I’ve been making these for years, and let me tell you—they’re a total crowd-pleaser, perfect for those moments when you want something sweet with that perfect crunch and a chocolate-peanut butter punch. Keep reading because I’m sharing all the little tips that make these cups truly shine!
Why This Recipe Works
- Simple Ingredients: With just a handful of everyday pantry staples, you get maximum flavor and crunch without fuss.
- Perfect Texture Balance: Creamy peanut butter and crunchy Rice Krispies come together beautifully, topped with a silky chocolate layer.
- No-Bake Convenience: This recipe is quick to whip up—no oven needed—making it great for last-minute treats or kids’ snack time.
- Customizable: Whether you’re a fan of creamy or chunky peanut butter, dark or semi-sweet chocolate, this recipe adapts effortlessly.

Ingredients & Why They Work
Each ingredient in this Chocolate Peanut Butter Rice Krispy Cups Recipe plays an important role, giving you that perfect combo of sweet, salty, crunchy, and smooth. Plus, these are easy to find and great for quick assembly.

- Peanut Butter: Creamy peanut butter blends smoothly, binding everything together while giving rich flavor; chunky works too if you want extra crunch.
- Honey: Acts as a natural sweetener and sticky binder, avoiding the need for a processed sugar syrup.
- Salt: Just a pinch brings out the sweet, nutty flavors and balances the chocolate beautifully.
- Rice Krispies Cereal: The star crunchy ingredient—it’s light and airy, so it doesn’t feel heavy even with the peanut butter coating.
- Chocolate Chips: Semi-sweet melts down into a silky topping that hardens nicely, giving a satisfying snap with each bite.
Tweak to Your Taste
I love how versatile this Chocolate Peanut Butter Rice Krispy Cups Recipe is. Over time, I’ve tweaked it to suit different moods and preferences, and I highly encourage you to make it your own—trust me, it’s part of the fun!
- Nut butters variation: When I tried almond butter instead of peanut butter, I honestly loved the slightly different nutty flavor—it’s a fresh twist that works great.
- Sweetness level: You can adjust honey or swap it for maple syrup if you prefer a more delicate sweetness.
- Chocolate types: Feel free to use milk chocolate for a sweeter touch, or dark chocolate for a richer flavor profile.
- Add-ins: Toss in mini marshmallows or chopped nuts into the mix before pressing into the cups if you want more texture.
Step-by-Step: How I Make Chocolate Peanut Butter Rice Krispy Cups Recipe
Step 1: Melt and mix the peanut butter and honey
Start by lining your muffin pan with paper liners or giving it a light spray of cooking spray so nothing sticks. Then, gently melt the peanut butter, honey, and a pinch of salt in a small saucepan over medium heat. Stir often and patiently—aim for a silky smooth mixture, not too hot or bubbly. This step is key because it helps the ingredients bind properly to the cereal later.
Step 2: Coat the Rice Krispies
Pour 3 cups of Rice Krispies cereal into a medium bowl. Slowly pour the warm peanut butter mixture over the cereal and gently stir until every flake is coated. It takes a few minutes and some gentle folding, but you want the cereal covered without smooshing it all down. I find using a silicone spatula works best here.
Step 3: Pack into muffin tins
Scoop the mixture into each muffin liner until it’s about two-thirds full. Then press it down firmly but not too hard—you want a compact cup that will hold together, but still keep that light texture. I like using the bottom of a small glass or cup to press it evenly.
Step 4: Melt the chocolate and add the topping
Melt 2 cups of chocolate chips in short bursts in a microwave-safe bowl—30 seconds at a time, stirring between each—to prevent burning. Once smooth, spoon a generous layer of melted chocolate over each peanut butter cup. Let the chocolate spread naturally or gently smooth it out with a spoon for a polished look.
Step 5: Chill to set and enjoy!
Place the muffin tray in the fridge for at least 30 minutes to let the chocolate harden completely. Once firm, you can peel off the liners and serve. The best part? They’re ready to eat right away but you can also store them for later. I always keep a few stashed for a quick sweet boost during busy days.
Pro Tips for Making Chocolate Peanut Butter Rice Krispy Cups Recipe
- Use creamy peanut butter: It melts smoother and binds the cereal better for less crumbling.
- Don’t overheat the chocolate: Melting chocolate in short bursts prevents graininess and keeps it glossy.
- Press cups firmly, but gently: This helps them hold their shape without turning into a dense block.
- Refrigerate fully: Let the chocolate set completely in the fridge so you get that perfect snap when biting in.
How to Serve Chocolate Peanut Butter Rice Krispy Cups Recipe

Garnishes
I often sprinkle a tiny pinch of flaky sea salt on top of the melted chocolate before chilling—it cuts the sweetness and amps up the flavor. Sometimes I add mini chocolate chips or crushed peanuts on top for a little extra texture and pizzazz. It’s those small touches that impress guests and make the cups look like dessert magic.
Side Dishes
Since these cups are pretty rich, I like pairing them with fresh fruit plates or a small bowl of berries. They also go surprisingly well with a glass of cold milk or even a creamy coffee, balancing the sweetness perfectly.
Creative Ways to Present
For birthdays or special occasions, I’ve arranged these cups on a tiered dessert stand along with other homemade treats for an eye-catching spread. Wrapping each cup in decorative cupcake liners or placing a little decorative paper flag adds a fun party vibe. Oh, and gifting them in cute boxes with parchment paper is a huge hit—people love a homemade gift that’s both tasty and personal.
Make Ahead and Storage
Storing Leftovers
I keep these cups stored in an airtight container in the refrigerator—they stay fresh and crunchy for up to a week. Make sure to layer them with parchment paper if stacking, so they don’t stick together.
Freezing
Freezing works really well here. I pop the cups onto a baking sheet in a single layer until frozen, then transfer them to a freezer-safe container. They keep for about 2 months. When you want one, just thaw it in the fridge for a few hours or at room temp for 20 minutes—perfect for a ready-to-go treat.
Reheating
Since this is a no-bake recipe, reheating isn’t necessary, but if you want the chocolate a bit melty, warming for 10 seconds in the microwave does the trick. Just be careful not to overdo it or the peanut butter mixture can get oily and the cereal soggy.
FAQs
-
Can I use crunchy peanut butter instead of creamy in this recipe?
Absolutely! Crunchy peanut butter adds an extra bit of texture inside the cups. Just keep in mind that creamy peanut butter tends to melt more smoothly, making it easier to coat the cereal evenly.
-
Do I have to use honey or can I substitute it?
You can substitute honey with maple syrup or agave nectar if you prefer. Just note that the flavor and stickiness might vary slightly—honey provides a perfect balance of sweetness and binding for this recipe.
-
What kind of chocolate works best for the topping?
Semi-sweet chocolate chips are my go-to because they balance sweetness with a hint of bitterness, but milk chocolate or dark chocolate chips can work great too, just adjust to your personal liking.
-
Can I make this recipe gluten-free?
Rice Krispies cereal is typically not gluten-free, but there are gluten-free crispy rice cereals available in stores—just swap those in to make the cups safe for gluten-sensitive folks.
-
How long do these cups last once made?
Stored in an airtight container in the fridge, these cups stay fresh for about 5 to 7 days. They’re a great make-ahead treat for the week!
Final Thoughts
This Chocolate Peanut Butter Rice Krispy Cups Recipe has been a staple at my house for years, the kind of quick treat that feels homemade but hardly takes any time or stress. I love sharing it with friends because it’s approachable yet impressive. Whether you’re baking for a kid’s party, a cozy afternoon snack, or craving a nostalgic dessert, this recipe truly delivers the perfect combination of flavors and textures. Give it a try—I promise once you taste it, you’ll want to keep making it!
Print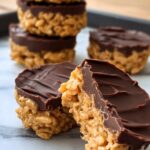
Chocolate Peanut Butter Rice Krispy Cups Recipe
- Prep Time: 10 minutes
- Cook Time: 0 minutes
- Total Time: 10 minutes
- Yield: 16 servings
- Category: Dessert
- Method: No-Cook
- Cuisine: American
- Diet: Vegetarian
Description
Delicious and easy-to-make Chocolate Peanut Butter Rice Krispy Cups that combine creamy peanut butter, honey, crunchy Rice Krispies cereal, and a smooth melted chocolate topping for a perfect no-bake treat.
Ingredients
Base Mixture
- 1 cup creamy peanut butter
- 6 tablespoons honey
- 1 pinch salt
- 3 cups Rice Krispies cereal
Topping
- 2 cups semi-sweet chocolate chips, melted
Instructions
- Prepare Muffin Pan. Line a muffin pan with muffin liners or spray it with cooking spray to prevent sticking.
- Melt Peanut Butter Mixture. In a small saucepan over medium heat, melt the peanut butter, honey, and a pinch of salt together until smooth.
- Combine with Cereal. Place the Rice Krispies cereal in a medium bowl, then pour the melted peanut butter mixture over it. Stir well to fully coat the cereal.
- Fill Muffin Cups. Spoon the mixture into the prepared muffin cups, filling each about two-thirds full. Press firmly to pack the mixture down evenly.
- Melt Chocolate. Melt the chocolate chips in a microwave-safe bowl by heating in short intervals and stirring until smooth.
- Add Chocolate Topping. Spoon the melted chocolate over the packed peanut butter cups, evenly covering the tops.
- Chill to Set. Place the muffin tray in the refrigerator and chill until the chocolate is firm and the cups are set.
- Serve. Once set, remove from liners if desired and enjoy your delicious Chocolate Peanut Butter Rice Krispy Cups!
Notes
- Use creamy peanut butter for a smoother texture or chunky for added crunch.
- Pressing the mixture firmly helps the cups hold their shape better.
- Melt chocolate carefully to avoid burning; stir frequently.
- Store leftovers in an airtight container in the refrigerator.
- For a gluten-free version, ensure your Rice Krispies cereal is gluten-free certified.
- Try using dark chocolate chips for a richer chocolate flavor.
Nutrition
- Serving Size: 1 cup
- Calories: 220 kcal
- Sugar: 15 g
- Sodium: 90 mg
- Fat: 12 g
- Saturated Fat: 5 g
- Unsaturated Fat: 6 g
- Trans Fat: 0 g
- Carbohydrates: 25 g
- Fiber: 2 g
- Protein: 5 g
- Cholesterol: 0 mg


