Chocolate Peppermint Candy Cane Cookies Recipe
If you’re on the hunt for the ultimate festive treat, you’ll want to stick around for this Chocolate Peppermint Candy Cane Cookies Recipe. These cookies have the perfect balance of rich, dark chocolate and refreshing peppermint with a delightful crunch from crushed candy canes that just scream holiday cheer. Trust me, once you bake a batch, they’ll be disappearing fast—so grab your apron, and let me walk you through how easy and fun this recipe is!
Why This Recipe Works
- Perfect Chocolate Blend: Using both Dutch-processed and black cocoa powders gives these cookies a deep, complex chocolate flavor that’s anything but ordinary.
- Crunch Meets Cream: The crushed candy canes on top not only add a festive crunch but also infuse that unmistakable peppermint aroma and taste, making every bite exciting.
- Texture Magic: Chilling the dough ensures the cookies bake up soft in the middle with crinkly edges you’ll fall in love with.
- Simple Yet Impressive: Even if you’re not a seasoned baker, this recipe is foolproof when you follow the steps carefully—no stress, just delicious results.

Ingredients & Why They Work
The magic in this Chocolate Peppermint Candy Cane Cookies Recipe is in how these ingredients come together – the rich cocoa powders give a bold chocolate base, while peppermint adds a holiday twist without overpowering. Here’s a quick rundown on what you need and why it’s key.
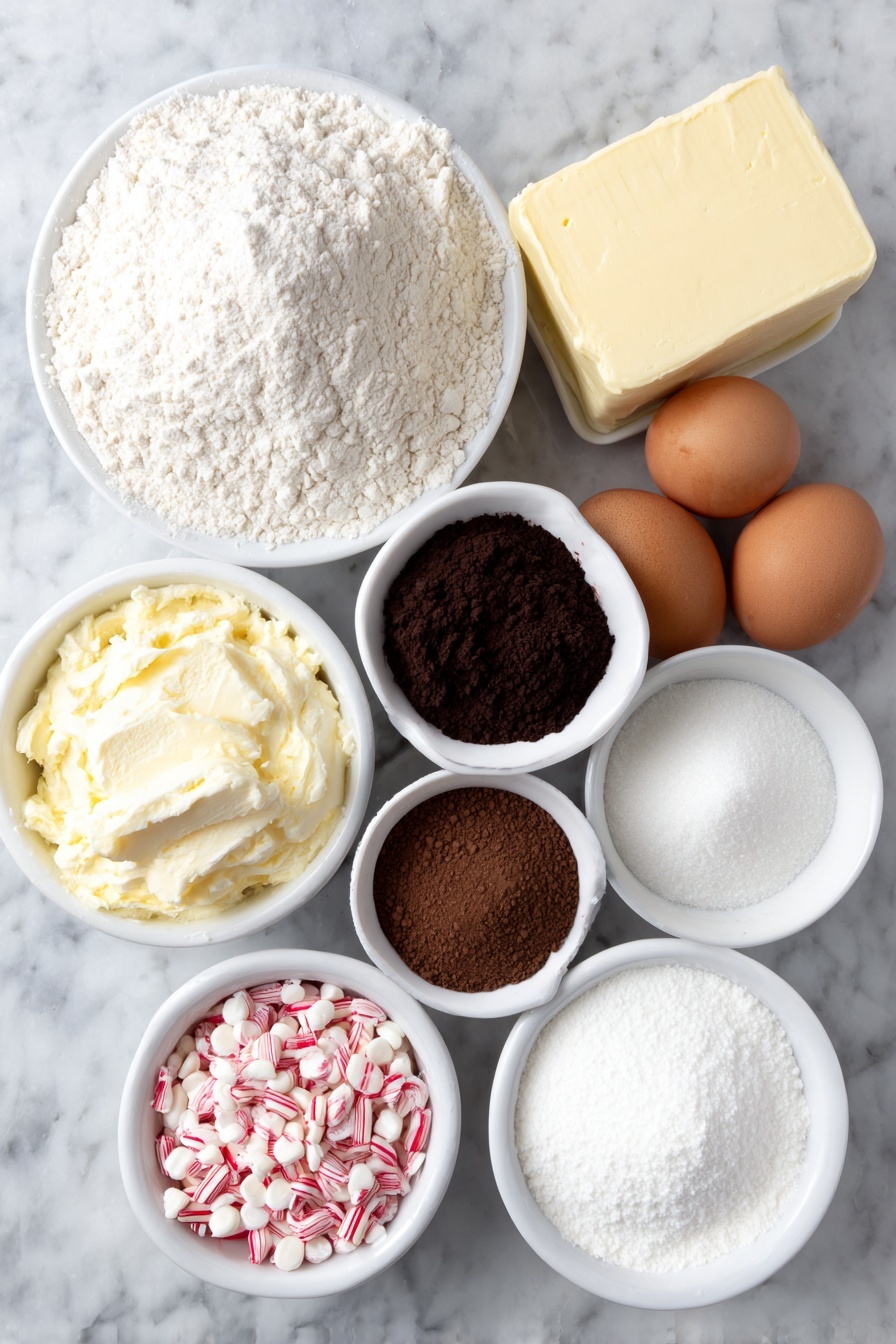
- All-purpose flour: The sturdy base for your cookies; using the right flour ensures the perfect chewy texture.
- Dutch-processed cocoa powder: This provides that smooth chocolate flavor and beautiful color without extra acidity.
- Black cocoa powder: Adds intense chocolate depth and a slightly powdery finish for a dramatic look.
- Baking soda: Gives cookies a subtle lift and the perfect crumb.
- Sea salt: Balances the sweetness and enhances the chocolate’s rich undertones.
- Unsalted butter: Room temperature is key—creaming it with sugars makes your cookies light and tender.
- Granulated sugar: Gives that classic sweetness and slight crisp around cookie edges.
- Light-brown sugar: Adds moisture and a hint of caramel flavor, which plays beautifully against the chocolate.
- Eggs: Helps bind everything and contributes to a chewy texture.
- Peppermint extract (optional): I always add this for a festive burst of minty freshness, but it’s up to you if you want to go full peppermint or keep it subtle.
- Bright White Candy Melts or white chocolate: For dipping the cookies, they add sweetness and a creamy contrast to the dark cookie.
- Vegetable shortening: Use sparingly to thin melted candy melts so they drip smoothly and coat evenly.
- Crushed candy canes: For that final festive crunch and peppermint punch—don’t skip this part!
Tweak to Your Taste
One of the best things about this Chocolate Peppermint Candy Cane Cookies Recipe is how easy it is to make your own. I’ve played with it a lot to find the perfect balance, but it’s totally your call how minty or chocolaty you want these cookies to be. You can even get a touch creative with toppings.
- Extra Minty: I sometimes add a little more peppermint extract if I want a chocolate-mint bomb. Just go easy—too much can be overpowering.
- Nutty Addition: Adding chopped toasted pecans or walnuts can add an unexpected crunch that pairs great with the chocolate and peppermint.
- Sweet Swap: If you’re avoiding candy melts, simply drizzle melted white chocolate or even vanilla frosting over the cookies before sprinkling candy canes.
- Dietary Mods: For gluten-free, swap the flour for a reliable gluten-free blend—texture may shift a bit but flavor remains fantastic.
Step-by-Step: How I Make Chocolate Peppermint Candy Cane Cookies Recipe
Step 1: Whisk the Dry Ingredients Together
I always start by whisking the all-purpose flour, Dutch-processed cocoa powder, black cocoa powder, baking soda, and sea salt in a medium bowl. Sifting the cocoa powders helps avoid clumps and gives the dough a smooth consistency. I set this aside while I work on the wet ingredients. This little prep saves you scrambling later!
Step 2: Cream the Butter and Sugars
In my stand mixer bowl, I beat room temperature unsalted butter with granulated sugar and light-brown sugar on medium-high speed until the mixture becomes light and fluffy. This usually takes about 2 to 3 minutes. The fluffier this is, the better your cookies will be because air gets incorporated, giving them a tender texture.
Step 3: Add Eggs and Peppermint Extract
Next, I reduce the mixer speed and add the eggs one at a time, mixing until fully combined before pouring in peppermint extract if you’re using it. Peppermint extract is potent, so I usually stick to 1 teaspoon—enough to make the cookies smell amazing without overwhelming the chocolate.
Step 4: Incorporate the Dry Ingredients
Now, I slowly add the dry flour and cocoa mixture into the wet ingredients, mixing on low speed or folding by hand. I stop as soon as everything is combined to avoid overmixing, which can make cookies tough. The dough will be thick and dark—getting excited yet?
Step 5: Chill the Dough
This is a crucial step—at least 1 hour in the fridge or even overnight. Chilling firms up the dough, making it easier to scoop and helps the cookies hold their shape in the oven. Plus, flavors deepen during this rest time.
Step 6: Scoop and Bake
Preheat your oven to 350°F (175°C) and line baking sheets with parchment paper or silicone mats. I use a medium cookie scoop to portion out the dough, about 9 cookies per sheet to leave enough space for spreading. Bake for around 10 minutes, keeping an eye on them—the centers should be set but soft. They’ll deflate and crinkle slightly as they cool, which is exactly what you want!
Step 7: Dip and Decorate
Once cooled, I melt white candy melts or white chocolate and thin it just a bit with vegetable shortening so it’s smooth and drizzle-able. Dipping each cookie halfway and then sprinkling with crushed candy canes turns simple cookies into festive works of art. Let them set completely on parchment paper before digging in.
Pro Tips for Making Chocolate Peppermint Candy Cane Cookies Recipe
- Don’t Skip Chilling: I learned the hard way that unchilled dough spreads too much, turning your cookies thin and flat instead of soft and chewy.
- Crush Candy Canes Fresh: Doing this right before garnishing keeps their crunch and prevents moisture from making them soggy.
- Use Quality Peppermint Extract: Cheap versions can taste artificial, so invest in a good one for that natural mint flavor.
- Even Baking Matters: Rotate your baking sheet halfway through to promote even browning and avoid burnt edges.
How to Serve Chocolate Peppermint Candy Cane Cookies Recipe

Garnishes
I usually keep it simple with just crushed candy canes, but sometimes I add a light dusting of powdered sugar for that snowy effect, which is so charming during the holidays. If you want to get fancy, a small drizzle of dark chocolate over the white-dipped side adds contrast and extra decadence.
Side Dishes
These cookies pair beautifully with a mug of hot cocoa or peppermint-spiked coffee. At parties, I serve them alongside a cheese board with mild cheeses like brie and some fresh fruit—the peppermint-chocolate combo surprisingly balances well with creamy and tart flavors.
Creative Ways to Present
For holiday gatherings, I like arranging these cookies on a rustic wooden tray lined with festive napkins. Wrapping a few up in clear cellophane bags tied with red and white twine makes perfect gifts that guests can take home. I even once stacked them like a little cookie tower centerpiece—it was a showstopper!
Make Ahead and Storage
Storing Leftovers
Once fully cooled and decorated, I store these cookies in an airtight container at room temperature for up to 4 days. Keeping them away from humidity is key to maintaining that crisp candy cane crunch and soft cookie center.
Freezing
I’ve had great success freezing the dough balls before baking—just scoop onto a tray, freeze until firm, then transfer to a freezer bag. When you want fresh cookies, bake straight from frozen adding a minute or two to baking time. Freezing post-bake cookies works too, but I prefer baking fresh every time.
Reheating
If you want to revive day-old cookies, pop them in a 300°F oven for 3 to 5 minutes to restore softness. Avoid microwaving—they tend to get rubbery fast that way. A warm cookie is the best way to enjoy their luscious chocolate and melty white coating!
FAQs
-
Can I use regular cocoa powder instead of Dutch-processed and black cocoa powders?
Yes, you can use regular unsweetened cocoa powder, but keep in mind the flavor and color won’t be as intense or rich. Mixing Dutch-processed and black cocoa powders gives the signature deep, dark look and taste of these cookies, but regular cocoa will still make delicious chocolate cookies.
-
Is peppermint extract necessary?
It’s technically optional, but I highly recommend it to enhance the peppermint flavor beyond just the candy canes. Without peppermint extract, your cookies will taste like chocolate with peppermint bits rather than chocolate peppermint cookies.
-
How can I avoid crackly candy melts when dipping?
Adding a small amount of vegetable shortening thins out the candy melts and helps them set smoothly without cracking. Melt them slowly and gently to prevent overheating, which also causes cracks.
Final Thoughts
This Chocolate Peppermint Candy Cane Cookies Recipe is one of those holiday treasures I keep coming back to because it’s both classic and a little unexpected. Every time I bake a batch, I’m reminded of cozy winter evenings and the joy of sharing something homemade with loved ones. I promise, once you try making these, you’ll want to keep them in rotation for every holiday season. So go ahead, whip up a batch, and enjoy the festive magic you’ve created!
Print
Chocolate Peppermint Candy Cane Cookies Recipe
- Prep Time: 1 hour 30 minutes
- Cook Time: 10 minutes
- Total Time: 1 hour 40 minutes
- Yield: 36 cookies
- Category: Dessert
- Method: Baking
- Cuisine: American
Description
Delight in festive Dark Chocolate Candy Cane Cookies featuring rich cocoa and a peppermint twist, finished with a coating of melted white chocolate and crushed candy canes for a perfect holiday treat.
Ingredients
Dry Ingredients
- 2 cups all-purpose flour
- 1/4 cup Dutch-processed cocoa powder, sifted
- 1/4 cup black cocoa powder, sifted
- 1 tsp baking soda
- 1/2 tsp sea salt
Wet Ingredients
- 1 cup unsalted butter, room temperature
- 1/2 cup granulated sugar
- 1 cup light-brown sugar, packed
- 2 large eggs, room temperature
- 1 tsp peppermint extract, optional
Topping
- 1 bag Bright White Candy Melts or white chocolate, melted*
- Vegetable shortening, as needed to thin candy melts
- Crushed candy canes
Instructions
- Prepare Dry Ingredients: In a medium bowl, whisk together all-purpose flour, Dutch-processed cocoa powder, black cocoa powder, baking soda, and sea salt. Set this mixture aside.
- Cream Butter and Sugars: In the bowl of a stand mixer, beat unsalted butter, granulated sugar, and light-brown sugar on medium-high speed for about 2 to 3 minutes until the mixture is light and fluffy.
- Add Eggs and Flavoring: Reduce the mixer speed, then add the eggs and peppermint extract (if using). Beat until well combined.
- Combine with Dry Ingredients: Add the dry ingredient mixture to the wet ingredients and mix on low speed just until combined to form the cookie dough.
- Chill the Dough: Cover and refrigerate the dough for at least 1 hour or overnight to firm up and enhance the flavors.
- Preheat Oven: Preheat your oven to 350°F (175°C) and line baking sheets with parchment paper or silicone baking mats.
- Scoop and Bake: Use a medium cookie scoop to portion the dough onto prepared baking sheets, about 9 cookies per sheet. Bake for approximately 10 minutes or until the cookies’ centers are set. Expect them to deflate and crinkle a bit upon cooling.
- Cool the Cookies: Allow cookies to cool on the baking sheets for 5 minutes, then transfer them to a wire rack to cool completely.
- Melt Candy Coating: Melt the Bright White Candy Melts or white chocolate, thinning with vegetable shortening as necessary to achieve a smooth, dippable consistency.
- Dip and Decorate: Dip each cooled cookie into the melted candy or white chocolate, place on parchment-lined baking sheets, and immediately sprinkle with crushed candy canes. Let set until firm before serving.
Notes
- Use peppermint extract to enhance the classic candy cane flavor, but it is optional if you want a milder taste.
- Chilling the dough for at least an hour solidifies the butter, helping cookies maintain their shape and develop texture during baking.
- Melt white chocolate or candy melts gently, preferably using a double boiler or microwave in short bursts, stirring frequently to avoid burning.
- Vegetable shortening can be added to candy melts to thin them for easier dipping and smooth coverage.
- Store cookies in an airtight container at room temperature for up to one week to maintain freshness.
Nutrition
- Serving Size: 1 cookie
- Calories: 180 kcal
- Sugar: 15 g
- Sodium: 110 mg
- Fat: 9 g
- Saturated Fat: 5 g
- Unsaturated Fat: 3 g
- Trans Fat: 0 g
- Carbohydrates: 22 g
- Fiber: 2 g
- Protein: 2 g
- Cholesterol: 30 mg


