Chocolate Pinwheel Cookies Recipe
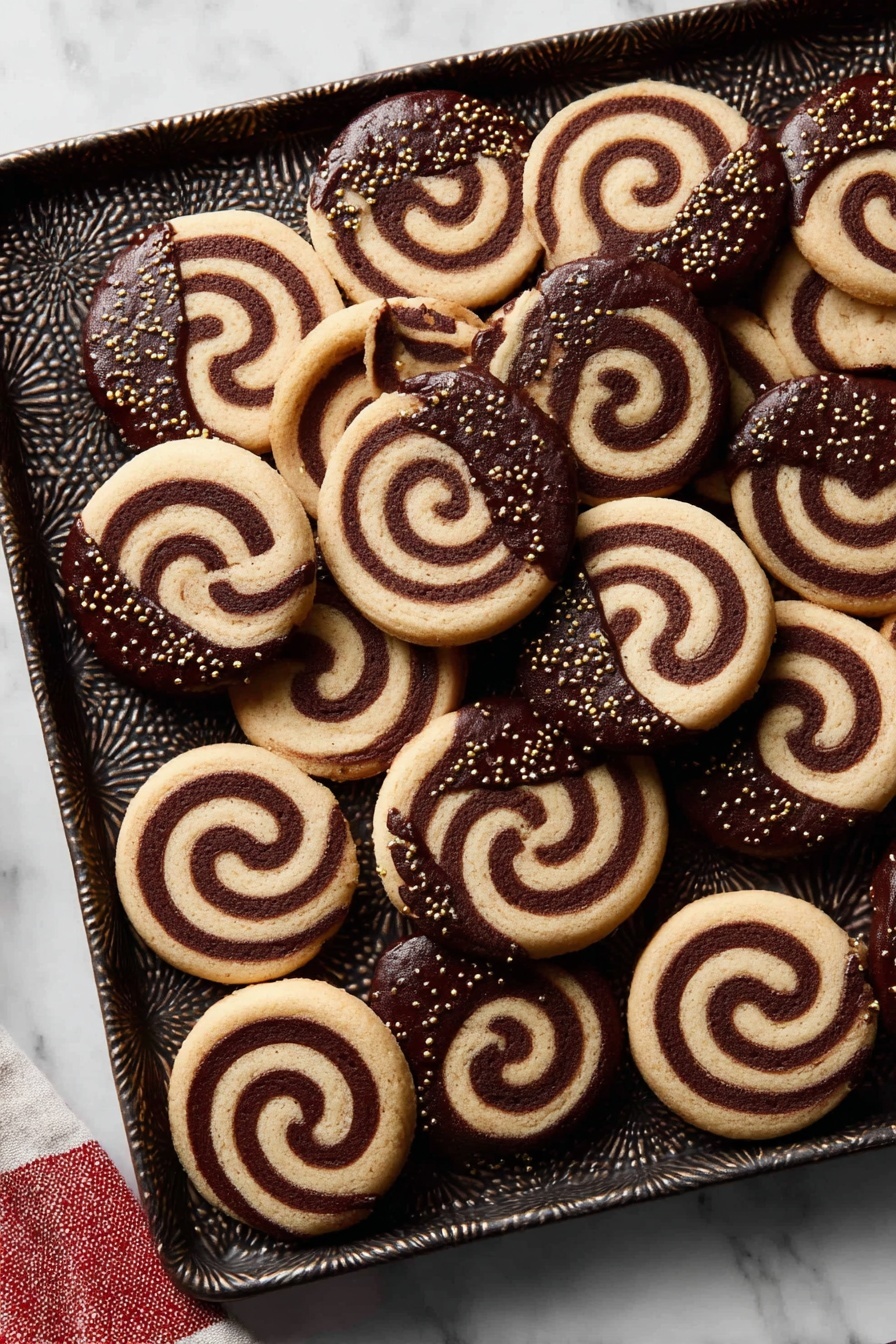
If you’re anything like me and love a cookie that’s not just delicious but also looks like a work of art, then you’re going to absolutely adore this Chocolate Pinwheel Cookies Recipe. It’s one of those fun, nostalgic treats that bring out the kid in all of us, with its swirly design and perfect balance of vanilla and chocolate flavors. Trust me, once you try these, you’ll want to bake them again and again – your kitchen smells like chocolate heaven, and the buttery vanilla dough just melts in your mouth. Ready to roll up those sleeves? Let’s dive in!
Why This Recipe Works
- Perfect Dough Balance: Combining rich butter with a hint of vanilla and cocoa powder creates a tender yet sturdy dough that holds the pinwheel shape beautifully.
- Simple Techniques: No fancy tools needed—just rolling, chilling, and slicing for a classic cookie experience anyone can master.
- Customizable Design: Easily tint the vanilla dough or swap flavors to make the cookie uniquely yours without losing the signature swirl.
- Soft Yet Crisp Texture: Balanced baking time ensures cookies are lightly crisp on the edges but melt-in-your-mouth soft inside—something I always aim for!
Ingredients & Why They Work
Every ingredient in this Chocolate Pinwheel Cookies Recipe plays a crucial role, ensuring the final cookie is both flavorful and visually stunning. I always recommend using high-quality vanilla extract and good cocoa powder because that really makes the flavors pop. Plus, the egg yolk adds richness, helping the dough hold together perfectly for slicing.

- All-purpose flour: Forms the sturdy base of the cookie dough; spooned and leveled for accuracy to keep texture just right.
- Baking powder: A tiny lift that makes the cookie light without puffing it up too much and losing the pinwheel shape.
- Salt: Balances sweetness and enhances the other flavors in the dough.
- Unsalted butter: Softened to room temperature, it brings richness and tenderness; make sure not to melt it or the dough gets too soft to work with.
- Granulated sugar: Adds sweetness and helps with a slightly crisp edge after baking.
- Egg & egg yolk: The egg binds the dough while the extra yolk adds richness, giving a smoother texture.
- Vanilla extract: A must-have; pure vanilla elevates the dough’s flavor beautifully.
- Cocoa powder: My favorite Dutch-process style gives that deep chocolate flavor without overpowering the vanilla dough.
- Milk: Just enough to moisten the chocolate dough and help the cocoa powder blend flawlessly.
- Espresso powder (optional): A secret ingredient I sneak in for an extra depth of chocolate flavor—trust me, it’s magic.
- Chocolate for dipping (optional): Using finely chopped baking chocolate makes melting and dipping a breeze; chocolate chips just don’t melt as well.
- Sprinkles (optional): Adds a fun, playful touch especially around holidays or parties.
Tweak to Your Taste
One of the reasons I love this Chocolate Pinwheel Cookies Recipe is how easy it is to make it your own. I’ve played around with switching up the flavors or adding a pop of color, so you don’t have to stick strictly to the classic combo. Don’t hesitate to experiment—it’s part of the fun!
- Colorful Variations: I sometimes use gel food coloring to tint the vanilla dough bright red or green during the holidays—it makes the pinwheel look festive and eye-catching.
- Flavor Swaps: Try adding peppermint or almond extract to the vanilla dough for a seasonal twist. Once, I made a batch with coconut extract, which was surprisingly delicious.
- Sprinkle Roll: Before slicing the logs, I love rolling them in sprinkles or coarse sugar for extra sparkle and texture, especially for special occasions.
- Chocolate Only Variation: If you’re not into vanilla, tint both doughs different colors or use two flavors—you still get that gorgeous swirl without the classic vanilla-chocolate combo.
Step-by-Step: How I Make Chocolate Pinwheel Cookies Recipe
Step 1: Mix up a buttery, dreamy dough
Start by whisking your flour, baking powder, and salt together—this makes sure the dry ingredients are evenly distributed. Then, beat your softened butter and sugar for about 3 minutes until you get that dreamy, light and fluffy texture. It’s worth the time; it sets the base for a tender cookie. Add the eggs and vanilla, beating on high until fully incorporated. Finally, slowly mix in the flour mixture until the dough forms. It’ll be thick and a bit sticky, which is perfect.
Step 2: Divide and conquer — chocolate it up
Divide your dough in half; one half is going to be vanilla, and the other is chocolate. For the chocolate dough, I add cocoa powder, milk, and (if you’re feeling adventurous) that half teaspoon of espresso powder. The espresso doesn’t make it taste like coffee, but it deepens the chocolate flavor beautifully.
Step 3: Chill out with your dough
Now comes the patience part—shape each dough half into a 1-inch-thick rectangle, wrap it well, and chill it for an hour to an hour and a half until it’s just firm enough to handle but still bendable. I learned the hard way that if you chill it too long or too cold, the dough gets brittle and cracks when rolling.
Step 4: Roll out, stack beautifully, and roll tight
Roll out each dough on parchment paper to roughly 8×14 inches; keep the chocolate dough slightly smaller so it fits nicely on top. I love using cocoa powder on my rolling pin and hands for the chocolate dough—it prevents sticking without adding extra flour. After rolling, carefully layer the chocolate dough atop the vanilla one, patting to remove air bubbles, then roll it tight from the long edge. Pro tip: use the parchment paper underneath to help guide your roll, and patch any cracks gently with your fingers. Then slice your log in half and wrap for another 2 hours in the fridge.
Step 5: Slice, bake, and enjoy that swirl magic
When ready, preheat your oven to 350°F (177°C). Slice your chilled logs into ½ inch thick cookies, spacing them well on parchment-lined sheets—these babies spread! Chill the slices for 10 minutes on the baking sheet if they got soft rolling them. Bake for 14–15 minutes or until edges are just lightly browned, then cool and optionally dunk in melted chocolate for that extra wow factor.
Pro Tips for Making Chocolate Pinwheel Cookies Recipe
- Don’t Skip the Chilling: It’s tempting to rush, but chilling firms the dough, making perfect slices and clean swirls easier.
- Parchment Paper is Your Best Friend: Rolling between sheets prevents sticking and helps transfer your dough with no tears.
- Use Espresso Powder for Depth: That tiny bit seriously cranks up the chocolate flavor without any coffee taste.
- Patch and Perfect: Don’t sweat small cracks in the dough—just gently press them back together with your fingers before rolling.
How to Serve Chocolate Pinwheel Cookies Recipe
Garnishes
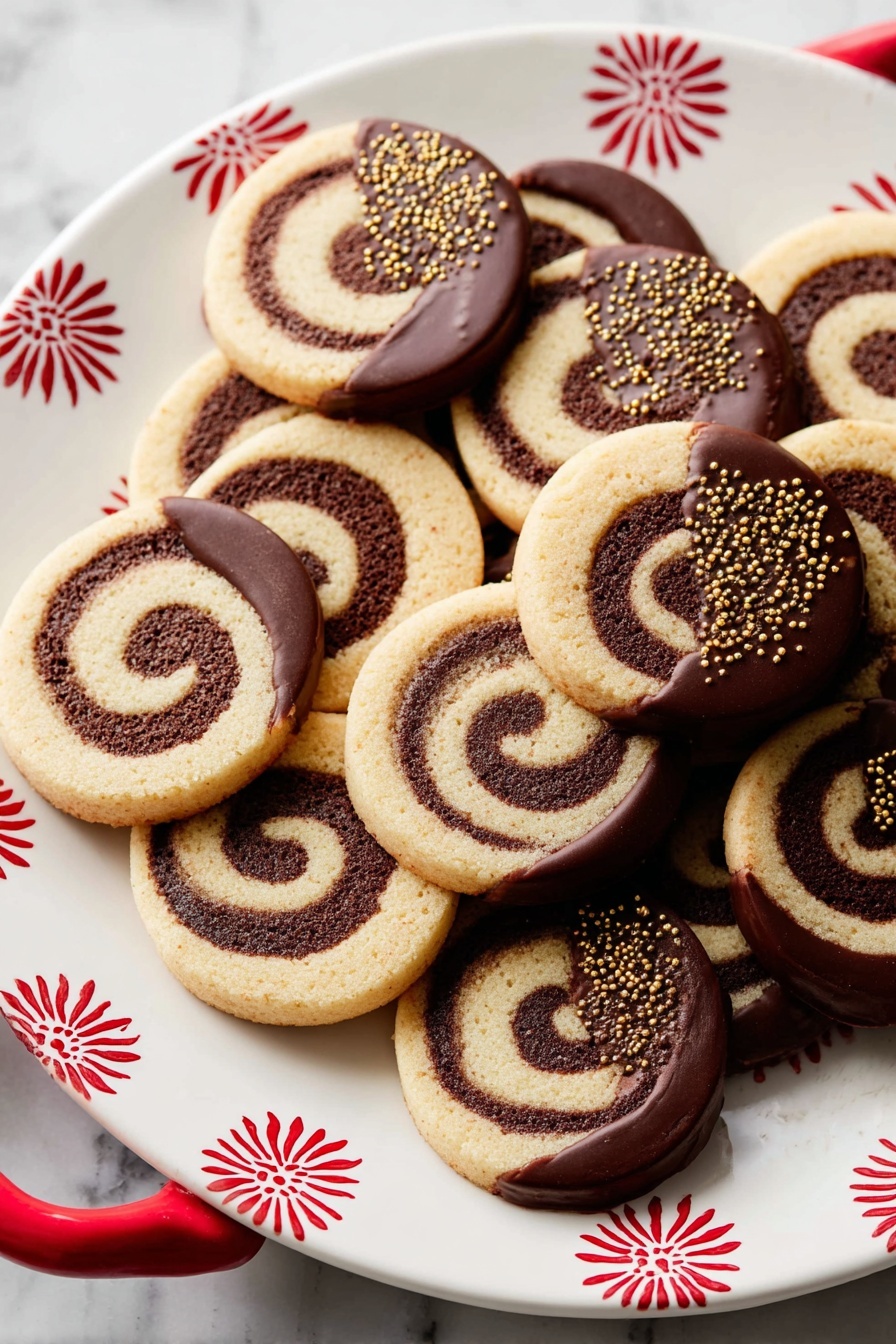
I usually keep it simple and let the pinwheel design steal the spotlight, but if I’m dipping these in chocolate, I love adding a sprinkle of festive colored sugar or edible gold shimmer on top before the chocolate sets. It adds a nice little crunch and makes them feel extra special without too much fuss.
Side Dishes
Chocolate Pinwheel Cookies pair beautifully with a simple cup of coffee, hot chocolate, or even a glass of cold milk for dunking. For holiday gatherings, I like to arrange them on a platter alongside fresh fruit and nuts to balance the sweetness.
Creative Ways to Present
For birthdays or festive parties, I’ve wrapped individual cookies in clear cellophane tied with ribbon, making charming favors. You could also stack a few on a pedestal plate to highlight the pinwheel pattern or even use them as fun garnish on a cake or cupcake stand.
Make Ahead and Storage
Storing Leftovers
Once baked and fully cooled, I store my Chocolate Pinwheel Cookies in an airtight container at room temperature, where they stay fresh for about a week. If they’re dipped in chocolate, I pop those in the fridge after a few days to keep the chocolate from getting sticky.
Freezing
I’ve found shaping the dough into logs and freezing them before slicing is a real time-saver. Just thaw overnight in the fridge, then slice and bake fresh cookies whenever you want. Baked cookies freeze well too—just thaw in the fridge overnight, then bring to room temp before enjoying.
Reheating
To warm leftovers, I gently heat cookies in a low oven (about 300°F) for 5 minutes or so, which brings back that soft, just-baked feel without drying them out. Microwave works too, but be super careful—just a few seconds to avoid melting any chocolate coating.
FAQs
-
Can I make this Chocolate Pinwheel Cookies Recipe gluten-free?
Absolutely! I suggest swapping the all-purpose flour for a 1:1 gluten-free baking blend that includes xanthan gum to maintain dough elasticity. Since gluten impacts texture, chilling times might vary slightly, so keep an eye on your dough’s pliability.
-
Why do my pinwheels crack when I roll them?
This usually happens if the dough is too cold or dry. To avoid it, chill the dough only until it’s firm but still flexible, and if cracks happen when rolling, gently patch them with your fingers. Also, rolling between parchment paper helps keep everything smooth without sticking.
-
Can I skip the chocolate dipping?
Yes! The cookies taste fantastic without it. The chocolate dip is optional and just adds a fun presentation and extra chocolate punch. If you skip it, consider rolling the logs in sprinkles or coarse sugar before slicing to jazz them up a bit.
-
How do I make the dough less sticky for rolling?
Sticky dough can be tricky! I find chilling for the recommended time helps a lot. You can also lightly dust your hands and rolling pin with flour or cocoa powder for the chocolate dough, but avoid adding too much flour directly to the dough since that changes the texture.
-
What’s the best way to store these cookies long term?
Freeze the shaped cookie logs wrapped tightly in plastic wrap for up to 3 months. When you want fresh cookies, thaw overnight in the fridge, slice, and bake. You can also freeze fully baked cookies in airtight containers, then thaw before serving.
Final Thoughts
I can’t recommend this Chocolate Pinwheel Cookies Recipe enough, especially if you love cookies that look as good as they taste. It’s been my go-to when I want to impress guests or bring a special treat to the party. The swirl is a showstopper, but the real magic lies in that buttery, perfectly balanced dough that’s both simple to make and wildly addictive to eat. Give this recipe a try—you’ll thank me with every bite!
Print
Chocolate Pinwheel Cookies Recipe
- Prep Time: 4 hours 15 minutes
- Cook Time: 15 minutes
- Total Time: 4 hours 30 minutes
- Yield: 28 cookies
- Category: Dessert
- Method: Baking
- Cuisine: American
- Diet: Vegetarian
Description
These classic Pinwheel Cookies feature a delightful swirl of vanilla and chocolate dough, creating a visually stunning and delicious treat. Perfect for holidays or any special occasion, they combine a tender buttery cookie base with rich cocoa flavor. Optionally dipped in chocolate and decorated with sprinkles, these cookies offer both taste and whimsy.
Ingredients
Base Cookie Dough
- 2 and 2/3 cups (333g) all-purpose flour (spooned & leveled)
- 3/4 teaspoon baking powder
- 1/2 teaspoon salt
- 1 cup (16 Tbsp; 226g) unsalted butter, softened to room temperature
- 1 cup (200g) granulated sugar
- 1 large egg
- 1 egg yolk, at room temperature
- 1 and 1/2 teaspoons pure vanilla extract
Chocolate Dough
- 2 Tablespoons (10g) unsweetened natural or dutch-process cocoa powder
- 1 Tablespoon (15ml) milk
- Optional: 1/2 teaspoon espresso powder
Optional for Dipping
- 6 ounces (170g) white, semi-sweet, or dark chocolate, finely chopped
- Optional: sprinkles
Instructions
- Make the dough: Whisk the flour, baking powder, and salt in a medium bowl and set aside. In a large bowl, beat the butter and sugar on medium-high speed for about 3 minutes until creamed. Add egg, egg yolk, and vanilla extract; beat on high speed until combined, about 1 minute. Scrape the bowl as needed.
- Combine dry and wet ingredients: Add the flour mixture to the wet ingredients and mix on low speed until combined to form a thick, sticky dough. Remove dough from the bowl.
- Divide the dough: Divide the dough approximately in half, using the slightly smaller portion for the chocolate dough if uneven.
- Prepare the chocolate dough: Place half the dough back in the mixing bowl. Add cocoa powder, milk, and espresso powder if using, beat on low speed until combined.
- Shape and chill dough blocks: On a lightly floured surface, form each dough half into a 1-inch-thick rectangle about 4×5 inches. Wrap in plastic wrap or parchment and refrigerate for 60–90 minutes until less sticky but pliable.
- Roll out the doughs: Roll vanilla dough on lightly floured parchment to an 8×14-inch rectangle, refrigerate briefly. Roll chocolate dough on similarly prepared parchment to near the same size. Place chocolate dough on top of vanilla dough carefully, smoothing and patching as needed.
- Roll into a log: Starting from a long edge, tightly roll the stacked doughs into a log using the parchment paper to assist. Cut the log in half into two 7-inch logs.
- Chill again: Wrap dough logs tightly and refrigerate for 2 hours up to 4 days before slicing and baking.
- Preheat oven and prepare baking sheets: Preheat oven to 350°F (177°C) and line two baking sheets with parchment paper or silicone mats.
- Slice and bake cookies: Slice each log into 14 half-inch-thick cookies. Space cookies 2 inches apart on baking sheets. If dough softens, chill sliced cookies for 10 minutes before baking. Bake for 15 minutes until edges are lightly browned.
- Cool and optionally dip in chocolate: Cool cookies on baking sheets for 5 minutes, transfer to racks to cool completely. For dipping, melt chopped chocolate in double boiler or microwave, dip half of each cookie, add sprinkles if desired, and let set.
Notes
- Baked cookies freeze well for up to 3 months. Thaw overnight in refrigerator before serving.
- Cookie dough logs can be refrigerated up to 4 days or frozen up to 3 months before baking.
- Gel food coloring can be added to vanilla dough to tint it for colorful pinwheels.
- You can flavor or skip the chocolate dough, but tinting half the dough is recommended to maintain the pinwheel pattern.
- Roll dough logs in sprinkles or coarse sugar before slicing for added texture and decoration. Use a pastry brush with water if sprinkles won’t stick.
- Use baking chocolate bars for dipping chocolate, as chocolate chips contain stabilizers that interfere with melting.
- Do not roll doughs directly on countertop; use parchment paper and silicone mats to prevent sticking and ease transfer.
Nutrition
- Serving Size: 1 cookie
- Calories: 130 kcal
- Sugar: 8 g
- Sodium: 70 mg
- Fat: 7 g
- Saturated Fat: 4 g
- Unsaturated Fat: 2 g
- Trans Fat: 0 g
- Carbohydrates: 15 g
- Fiber: 1 g
- Protein: 1 g
- Cholesterol: 25 mg

