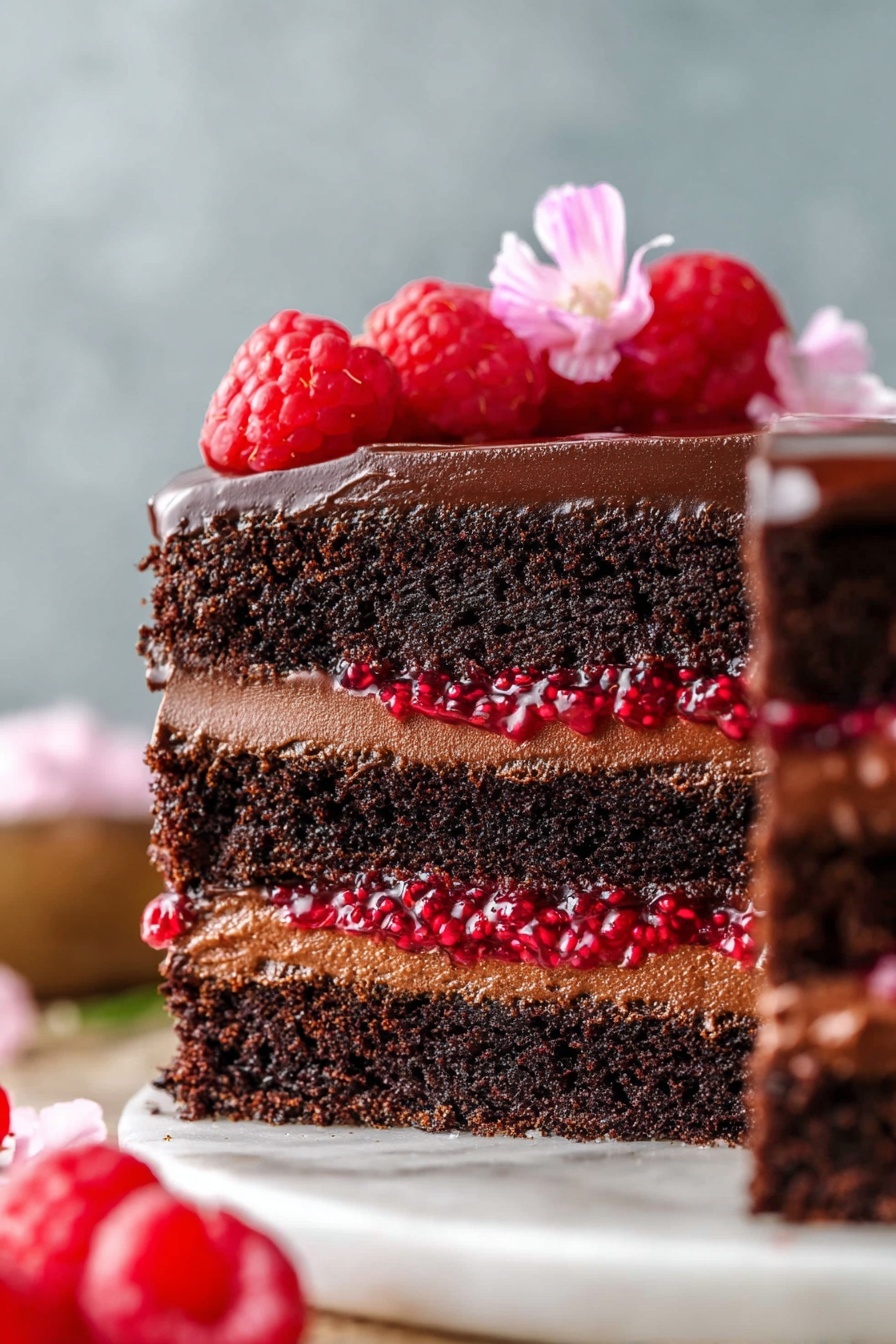
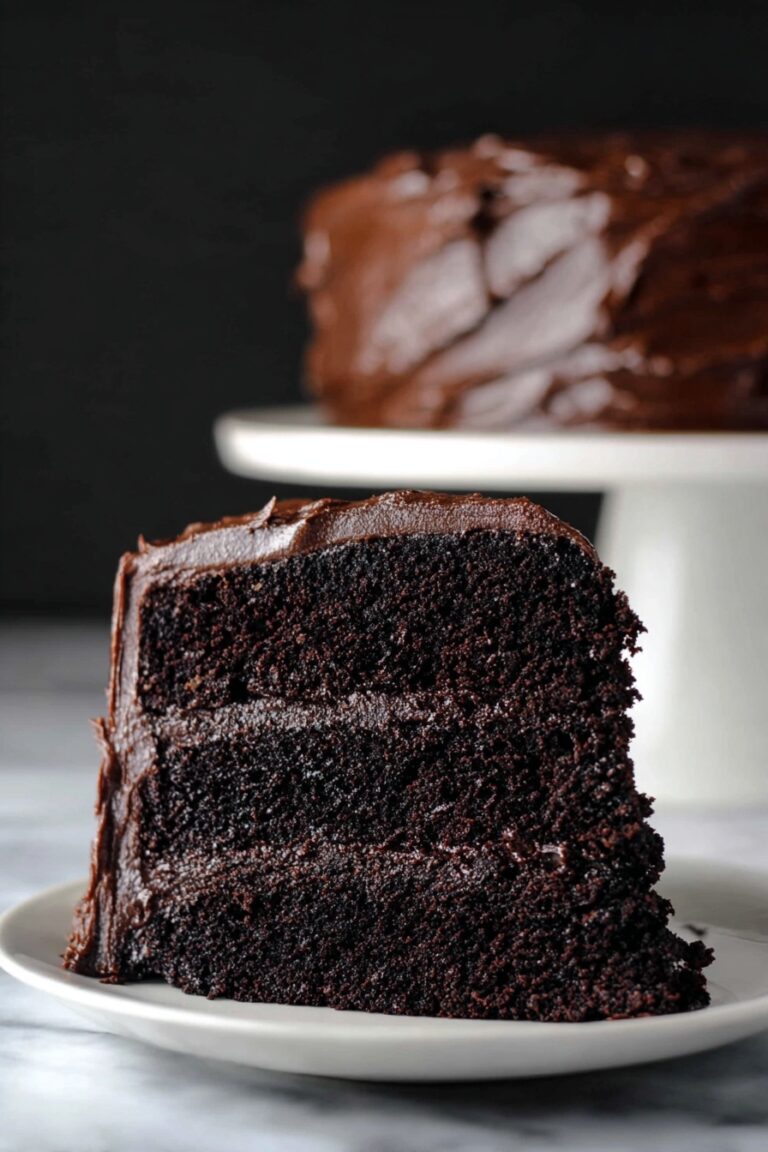
Chocolate Raspberry Cake Recipe
If you’re craving a dessert that’s as stunning as it is delicious, you absolutely must try this Chocolate Raspberry Cake Recipe. It’s one of those recipes that never fails to impress—moist chocolate layers bursting with rich cocoa flavor, a tangy raspberry filling that brightens every bite, and a luscious frosting that ties it all together perfectly. Trust me, whether you’re baking for a special occasion or a cozy night in, this cake will have everyone asking for seconds.
Why This Recipe Works
- Perfect Balance: The rich chocolate cake and tangy raspberry filling create a harmonious flavor combo that’s both indulgent and refreshing.
- Moistness Factor: Using both oil and melted butter with buttermilk ensures the cake stays unbelievably moist and tender.
- Homemade Filling & Frosting: Making the raspberry filling and frosting from scratch lets you control sweetness and texture, elevating the final cake beyond store-bought recipes.
- Visual Wow: Layering with a frosting dam keeps the filling in place, so the cake looks as gorgeous as it tastes.

Ingredients & Why They Work
The ingredients I use in this Chocolate Raspberry Cake Recipe all contribute to a cake that’s decadent yet balanced. Each one plays a role, from the cocoa powder delivering deep chocolate notes to the fresh raspberries brightening things up. When shopping, I always pick fresh, ripe raspberries if I can, but frozen works just fine in a pinch—just thaw them before cooking.

- All-Purpose Flour: Provides structure without weighing down the cake; easy to work with.
- Granulated Sugar: Balances the cake’s bitterness from cocoa with sweetness that’s not overpowering.
- Light Brown Sugar: Adds a subtle molasses flavor and keeps the crumb soft and tender.
- Dark Cocoa Powder: This is the chocolate powerhouse giving intense, rich flavor—don’t skip it!
- Baking Soda: Works with buttermilk to give the cake lift and a fine crumb.
- Salt: Enhances all the sweet and chocolate flavors.
- Neutral Cooking Oil: Keeps the cake moist and tender without adding flavor.
- Unsalted Butter: Adds richness and a luscious mouthfeel.
- Eggs: Bind ingredients together and add moisture and structure.
- Vanilla Extract: Rounds out flavor with warm, sweet notes.
- Buttermilk: Adds acidity to tenderize the cake and balance the cocoa’s bitterness.
- Hot Water or Coffee: Enhances the chocolate flavor and ensures the batter is smooth.
- Fresh or Frozen Raspberries: The star of the filling and frosting—bright, tart, and full of fresh flavor.
- Cornstarch: Thickens the raspberry filling for a perfect spreadable texture.
- Lemon Juice: Adds a subtle zing that makes the raspberry flavor pop.
- Powdered Sugar: For a smooth, sweet frosting texture.
- Natural Cocoa Powder (for frosting): To carry the chocolate flavor into the frosting, keeping it rich but not cloying.
- Heavy Cream: Smooths out the frosting so it’s easy to pipe and spread.
- Ganache (optional): Adds a silky decorative drip for an elegant finish.
Tweak to Your Taste
I love how flexible this Chocolate Raspberry Cake Recipe is when it comes to customization. Whether you want to dial up the chocolate, experiment with different fillings, or adjust for dietary preferences, this recipe welcomes it all. I’ve played around with a few tweaks myself that turned out great!
- Variation: I sometimes swap out hot water for strong espresso in the cake batter for an even deeper chocolate intensity—highly recommend if you love mocha vibes.
- Dairy-Free Option: Substitute the butter with coconut oil and buttermilk with a mix of plant milk and lemon juice to keep that tender crumb while making it vegan-friendly.
- Fruit Swaps: While raspberries are fantastic, blueberries or blackberries work well too if you want a change in berry flavor.
- Frosting Style: Feel free to make the frosting thicker by adding less heavy cream if you prefer a more structured decoration, or thinner for a lighter spread.
Step-by-Step: How I Make Chocolate Raspberry Cake Recipe
Step 1: Prepping the Pans and Mixing Dry Ingredients
I always start by preheating my oven to 350°F (175°C). Then I line the bottoms of three 8-inch round cake pans with parchment paper and grease and flour the sides. This little prep step helps the cakes release cleanly after baking, which is a lifesaver. Next, in a big bowl, whisk together all your dry ingredients—flour, sugars, cocoa powder, baking soda, and salt—until everything’s evenly mixed. This ensures that your cake will have a nice consistent crumb without surprises.
Step 2: Combining Wet Ingredients and Making the Batter
Next up, add your oil and melted butter to the dry ingredients and stir until combined. Then, mix in the eggs and vanilla extract until the batter is smooth and uniform — no lumps! Slowly add the buttermilk while stirring gently, so the batter stays light and doesn’t get overworked. The last bit is to carefully pour in the hot water or coffee. This step always surprises my friends; the batter looks really runny but don’t worry—that’s exactly what makes the cake so moist. Give it a good scrape around the bowl so every bit of flour gets incorporated.
Step 3: Baking and Cooling the Cake Layers
Divide the batter evenly among your prepared pans. I usually eyeball it or use a kitchen scale for precision—it really helps the layers stay even! Pop the pans in the oven for about 24 to 25 minutes. You’ll know they’re done when a toothpick inserted in the center comes out clean or with a few moist crumbs. Don’t rush removing them—the cakes will be delicate. Let them cool in the pans for 10-15 minutes, then run a knife around the edges and invert onto cooling racks. Full cooling is essential before we move onto decorating.
Step 4: Making the Fresh Raspberry Filling
While your cakes are cooling, it’s a great time to whip up the raspberry filling. In a saucepan, whisk together sugar and cornstarch, then stir in fresh or thawed frozen raspberries, water, and lemon juice. Cook this over medium heat, stirring constantly—you’re looking for the mixture to bubble and thicken, which takes about 5-10 minutes. Don’t rush the heat; it needs to thicken slowly for the best texture. When you see it hold a trail when you drag a spatula through, it’s ready. Let it cool to room temp.
Step 5: Whipping Up the Chocolate Raspberry Frosting
Now for the frosting! Beat softened butter until creamy and smooth. Add half of the powdered sugar, cocoa powder, and a tiny bit of salt, blending well on low speed to avoid a floury cloud. Gradually add the remaining powdered sugar. Now here’s the magic moment: add about a third of your raspberry filling a spoonful at a time, mixing it in gently so the frosting stays light but gets that delicious fruity undertone. Adjust thickness with heavy cream until it’s pipe-able but still holds shape.
Step 6: Assembling Your Chocolate Raspberry Cake
Once your cakes are fully cooled, level off any domed tops with a serrated knife so your layers stack nicely. Place your first layer on the cake stand or plate, spread a thin crumb coat around the edges, and pipe a ring of frosting to make a dam. This will hold the raspberry filling so it doesn’t spill out. Spread half your remaining raspberry filling inside the dam, then top with the next layer and repeat. Finish with the top cake layer and cover the whole cake with the rest of the frosting. If you want, do a quick crumb coat layer and refrigerate 15 minutes before the final frosting. For an elegant touch, add a ganache drip around the edges. Chill for at least 30 minutes before slicing.
Pro Tips for Making Chocolate Raspberry Cake Recipe
- Even Batter Distribution: Use a kitchen scale to divide batter equally between pans for perfectly layered cakes every time.
- Patience with Filling: Don’t rush the raspberry mixture thickening—medium heat and constant stirring prevent burning and ensure smooth texture.
- Frosting Consistency: Add heavy cream slowly and test frequently; frosting should hold shape but be easy to pipe and spread.
- Cooling Time: Allow cakes to cool completely before frosting or they’ll crumble and frosting will melt—resist the urge to rush!
How to Serve Chocolate Raspberry Cake Recipe
Garnishes
I love topping this cake with a handful of fresh raspberries and a few delicate mint leaves for a pop of color and freshness. A light dusting of cocoa or powdered sugar also adds a pretty finishing touch. If you’re feeling fancy, some edible flowers look gorgeous and festive on top!
Side Dishes
This cake pairs beautifully with a scoop of vanilla or raspberry sorbet, creating a lovely temperature contrast. A simple cup of freshly brewed coffee or rich hot chocolate also complements the flavors perfectly, especially for afternoon tea or dessert.
Creative Ways to Present
For special occasions, I’ve layered individual slices with a dollop of whipped cream and fresh berries in pretty dessert glasses for elegant mini trifles. Another time, I piped little frosting rosettes around the top edge and set thin chocolate shards upright for dramatic flair—super simple but ridiculously effective.
Make Ahead and Storage
Storing Leftovers
I usually keep any leftover cake covered tightly in the fridge, wrapped with plastic wrap or in an airtight container. It’s still incredibly moist and tasty when enjoyed within 3-4 days. Just bring slices to room temperature for the best texture before serving again.
Freezing
I’ve frozen the cake layers separately (fully cooled) wrapped in plastic and foil, then thawed them overnight in the fridge before frosting. The filling and frosting hold up well this way too. Just assemble the cake after thawing for a fresh-from-the-oven feel.
Reheating
Because this is a cake, I don’t really reheat slices, but letting refrigerated pieces sit out for 20-30 minutes brings the chocolate and frosting to their best texture. If you like, a quick zap for 10-15 seconds in the microwave can revive the moistness without melting the frosting.
FAQs
-
Can I use frozen raspberries for the filling?
Absolutely! Frozen raspberries work perfectly in this recipe. Just make sure to thaw them completely and drain any excess liquid before cooking the filling to prevent it from getting too watery.
-
What if I don’t have buttermilk?
You can easily make a buttermilk substitute by adding 1 tablespoon of lemon juice or white vinegar to 1 cup of milk, let it sit for 5-10 minutes, and then use it in your batter. This acidity helps tenderize the cake and activates the baking soda.
-
Can I bake this cake in two layers instead of three?
Yes, you can bake it in two 9-inch pans instead—just adjust the baking time slightly, starting to check around 30 minutes. The layers may be a bit thicker but will still taste fantastic.
-
How do I prevent the raspberry filling from making the cake soggy?
Using the frosting as a “dam” around the filling layers helps keep the filling in place so it doesn’t seep too deeply into the cake. Also, cooking the filling until it thickens properly ensures it spreads nicely without excessive moisture.
-
Can I make the ganache drip ahead of time?
It’s best to prepare the ganache shortly before decorating so it maintains the perfect pourable consistency for dripping. However, you can make it a day ahead, store it refrigerated, then gently warm and stir before using.
Final Thoughts
This Chocolate Raspberry Cake Recipe is one of those desserts I always come back to—it’s classic but still feels a little special every time. I love how the fresh raspberry filling cuts through the richness of the chocolate, creating a cake that’s full of flavor yet never too heavy. I hope you’ll give it a try soon and enjoy each bite as much as I do. Honestly, once you make it for friends or family, it quickly becomes a favorite you’ll want to bake again and again. Happy baking, friend!
Print
Chocolate Raspberry Cake Recipe
- Prep Time: 35 minutes
- Cook Time: 35 minutes
- Total Time: 1 hour 10 minutes
- Yield: 14 servings
- Category: Dessert
- Method: Baking
- Cuisine: American
- Diet: Vegetarian
Description
A decadent Chocolate Raspberry Cake featuring moist chocolate layers, tangy raspberry filling, and rich chocolate raspberry frosting, perfect for celebrations or special occasions.
Ingredients
Cake
- 1 ¾ cups (220 g) all-purpose flour
- 1 cup (200 g) granulated sugar
- 1 cup (200 g) light brown sugar firmly packed
- ¾ cup (75 g) dark cocoa powder
- 1 ½ teaspoons baking soda
- ¾ teaspoon table salt
- ⅔ cup (155 ml) neutral cooking oil
- ½ cup (113 g) unsalted butter melted
- 2 large eggs room temperature preferred
- 2 teaspoons vanilla extract
- 1 cup (236 ml) buttermilk room temperature preferred
- ½ cup (118 ml) very hot/boiling water or hot coffee
Raspberry Filling
- ½ cup (100 g) granulated sugar
- 3 Tablespoons cornstarch
- 3 cups (340 g) fresh or frozen raspberries
- 3 Tablespoons water
- 1 ½ Tablespoons lemon juice
Chocolate Raspberry Frosting
- 1 cup (226 g) unsalted butter softened
- 3 cups (375 g) powdered sugar
- ⅔ cup (65 g) natural cocoa powder
- ⅛ heaping teaspoon salt
- ⅓ cup (94 g) raspberry filling from above
- 1-2 Tablespoons heavy cream as needed
- Ganache drip for decorating optional
Instructions
- Prepare Cake Pans: Preheat oven to 350F (175C) and line the bottoms of three 8” round cake pans with parchment paper; grease and flour the sides. Set aside.
- Mix Dry Ingredients: In a large mixing bowl, whisk together flour, granulated sugar, light brown sugar, cocoa powder, baking soda, and salt until well combined.
- Add Wet Ingredients: Stir in neutral cooking oil and melted unsalted butter until mixture is fully combined.
- Add Eggs and Vanilla: Mix in eggs and vanilla extract, stirring until batter is uniform and smooth.
- Incorporate Buttermilk: Gradually add buttermilk, stirring constantly until well blended.
- Add Hot Water or Coffee: Slowly pour in very hot or boiling water or hot coffee, continuing to stir until fully incorporated; scrape sides and bottom of bowl to mix evenly.
- Bake the Cake: Divide batter evenly among prepared pans and bake in preheated oven for 25 minutes. Test doneness with a toothpick; it should come out clean or with few moist crumbs.
- Cool Cakes: Allow cakes to cool in pans for 10-15 minutes, then loosen edges with a knife and invert onto cooling racks. Cool completely.
- Prepare Raspberry Filling: In a small saucepan, whisk together sugar and cornstarch. Add raspberries, water, and lemon juice, stirring to combine.
- Cook Filling: Heat over medium heat, stirring constantly until raspberries release juice and mixture bubbles, about 5-10 minutes. Continue stirring and cook until mixture slightly thickens, about 2 minutes more.
- Cool Filling: Transfer filling to a heatproof container and cool to room temperature.
- Make Frosting: Beat softened butter with an electric mixer on low speed until smooth and creamy. Add half the powdered sugar, cocoa powder, and salt; beat until combined.
- Incorporate Remaining Sugar: Gradually add remaining powdered sugar on low speed until fully blended.
- Add Raspberry Filling to Frosting: Slowly add ⅓ cup of raspberry filling a spoonful at a time, mixing evenly into the buttercream.
- Adjust Consistency: Add 1-2 tablespoons heavy cream gradually until frosting reaches a smooth, pipe-able consistency. Transfer to a piping bag with a large open tip.
- Assemble Cake: Level cooled cakes if needed. Place one layer on a serving platter. Spread a thin layer of frosting on top, pipe a dam of frosting around edges, and fill with half the remaining raspberry filling.
- Layer Cakes: Repeat frosting dam and filling with second cake layer. Top with final layer.
- Final Frosting: Apply the remaining frosting evenly around the sides and top of the cake. Optionally, do a crumb coat and refrigerate for 15 minutes before final layer.
- Optional Decoration: Add ganache drip if desired according to ganache instructions.
- Chill Before Serving: Refrigerate cake for at least 30 minutes to set before slicing and serving.
Notes
- You should end up with approximately 1 ⅔ cups of raspberry filling before removing some for the frosting.
- Store cake in an airtight container in the refrigerator for up to 4 days to maintain freshness.
- Use neutral oil such as vegetable or canola oil for best results in cake texture.
- Hot coffee can be used instead of water to enhance the chocolate flavor.
- Ensure all wet ingredients are at room temperature for optimal batter consistency.
- Level cake layers carefully for an even and professional appearance.
- Optional ganache drip adds an elegant finish but can be omitted if preferred.
Nutrition
- Serving Size: 1 slice
- Calories: 420 kcal
- Sugar: 38 g
- Sodium: 220 mg
- Fat: 22 g
- Saturated Fat: 12 g
- Unsaturated Fat: 8 g
- Trans Fat: 0 g
- Carbohydrates: 54 g
- Fiber: 5 g
- Protein: 5 g
- Cholesterol: 60 mg