Christmas Peppermint Cheesecake Cookies Recipe
If you’re hunting for the perfect festive treat that’s bursting with flavor and has that melt-in-your-mouth texture, you’re in for a real delight. This Christmas Peppermint Cheesecake Cookies Recipe is one of those recipes that feels like wrapping up the joy of the holidays in a bite-sized cookie. I remember the first time I made these—everyone at the party kept coming back for more, and I knew right away this was a recipe worth sharing with you. So, let’s dive into why these cookies are a holiday must-have!
Why This Recipe Works
- Creamy Cheesecake Base: Using cream cheese gives these cookies a tender, rich crumb that’s way more complex than your average sugar cookie.
- Perfect Peppermint Punch: The peppermint extract paired with festive red and green dough swirls makes every bite feel like Christmas magic.
- Just Right Texture: These cookies are soft but hold their shape perfectly—no dry, crumbly disasters here.
- Easy to Customize: You can play with colors, skip the peppermint, or switch up the flavor extract to match your mood or holiday vibe.

Ingredients & Why They Work
What I love about this Christmas Peppermint Cheesecake Cookies Recipe is how simple, quality ingredients come together to create such a showstopper. When you pick your ingredients thoughtfully, the flavors just shine through.

- Cream Cheese: This adds a tangy richness and keeps your cookies wonderfully soft.
- Butter: Use unsalted and room temperature for perfect creaming with the cream cheese.
- Granulated Sugar: Sweetens the dough without overpowering the tangy cream cheese.
- Eggs: They bind everything together and add moisture.
- Vanilla Extract: Adds warmth and rounds out the flavors nicely.
- Flour: All-purpose works best; it gives structure and bite.
- Baking Powder: Helps the cookies rise just enough for that soft texture.
- Salt: Balances the sweetness and enhances flavor overall.
- Red and Green Food Coloring: The fun part—turning these cookies into holiday eye candy.
- Peppermint Extract: Just a hint of festive cheer that carries through each bite.
- Powdered Sugar (Optional): A delicate dusting adds that snowy, holiday-finish touch.
Tweak to Your Taste
One of the things I adore about this Christmas Peppermint Cheesecake Cookies Recipe is how adaptable it is. I often change things up depending on the mood or what’s in my pantry, and it always turns out great. You should totally tailor it to what YOU love.
- More Tartness: Sometimes I add a teaspoon of lemon juice instead of vanilla to amp up that cheesecake tang, which gives a lovely depth to the cookie.
- Skip Peppermint: If peppermint isn’t your thing, switch it for almond or citrus extract instead—just as delicious and festive.
- Color Play: Experiment with different food coloring combos beyond red and green; pink and white can be super cute too!
- Powdered Sugar Dusting: I love lightly dusting with powdered sugar, but sometimes I skip it for a cleaner presentation or if I’m sending these as gifts.
Step-by-Step: How I Make Christmas Peppermint Cheesecake Cookies Recipe
Step 1: Cream It Up Until Fluffy
Start by beating the cream cheese and butter at high speed until you get a fluffy, smooth mixture—this usually takes about 1-2 minutes. If you miss this step, your cookies can turn out dense, so take your time here! Then add the sugar and beat again until it’s fully incorporated and lighter in color. Adding the eggs and vanilla comes last in this initial phase—mix just enough to combine.
Step 2: Incorporate Dry Ingredients Gently
Whisk together the flour, baking powder, and salt separately, then gradually fold these into your butter and cream cheese mix. Stir just until everything’s combined—over-mixing can lead to tougher cookies, which we definitely want to avoid here.
Step 3: Chill and Color Your Dough
Divide your dough into three bowls and refrigerate for about 15 minutes. This makes handling a lot easier, especially since the dough is a bit sticky. After chilling, add your red and green food colorings and peppermint extract to the green dough bowl. Mix until you reach those beautiful festive hues without over-stirring, so the doughs remain distinct.
Step 4: Create Marbled Cookies
Here’s the fun part: take half a tablespoon of each color, gently roll them between your palms to create a marbling effect but don’t overdo it—you want those vibrant swirls and not a single muddy blob. Place them on your parchment-lined baking sheets, leaving enough space to spread.
Step 5: Bake to Perfection
Bake at 350°F for 10-11 minutes, watching closely to catch when they’re just lightly golden around the edges and still pale on top. Baking times vary, so I recommend checking after 10 minutes—the cookies will be soft but set. Let them cool on the sheet before moving to a wire rack, to avoid breakage.
Step 6: Optional Finishing Touch
I love adding a dusting of powdered sugar right before serving—it’s like snow on a sweet winter cookie. Totally optional but adds a charming, festive look.
Pro Tips for Making Christmas Peppermint Cheesecake Cookies Recipe
- Room Temperature Ingredients: Make sure your cream cheese and butter are softened to room temperature to avoid lumps and help your dough come together smoothly.
- Handle Dough With Care: Since the dough is sticky, chilling it first is key—it makes rolling and marbling easier without the dough sticking to your hands.
- Watch Your Oven: Ovens vary a lot, so keep an eye near the end of baking to prevent browning—these cookies should stay mostly pale for the best texture.
- Don’t Overmix Colors: When marbling your dough, stop mixing once you like the swirl pattern—overmixing will blend colors and lose that festive look.
How to Serve Christmas Peppermint Cheesecake Cookies Recipe

Garnishes
I usually keep it simple with just a light dusting of powdered sugar or sometimes I press a few crushed candy canes on top right after baking for extra crunch and peppermint pop. It’s a small touch, but it amps up the festive charm in a big way.
Side Dishes
Pair these cookies with a warm cup of cocoa or peppermint-spiked coffee to really lean into that holiday vibe. They also beautifully complement a holiday cheese board or a platter of other festive sweets.
Creative Ways to Present
If you’re gifting or serving at a party, arrange these cookies in a clear jar decorated with a red ribbon—or stack them in a festive tin layered with parchment paper. For a cozy party, I like placing them near the fireplace on a rustic wooden tray surrounded by pine sprigs and twinkle lights.
Make Ahead and Storage
Storing Leftovers
I keep my leftover cookies in an airtight container at room temperature for up to a week. This keeps them soft and fresh, but honestly, they rarely last that long in my house! If you want to extend their life, just make sure they’re completely cooled before storing to prevent sogginess.
Freezing
Freezing works great here. I wrap individual cookies in plastic wrap and then place them in a freezer bag for up to three months. When you’re ready to enjoy, just thaw at room temperature for a couple of hours—you’ll hardly tell they were frozen at all.
Reheating
If you want that freshly-baked warm cookie feeling, pop them in the microwave for 10-15 seconds or briefly in a 300°F oven for about 5 minutes. This refreshes the softness and lets those flavors come alive again.
FAQs
-
Can I omit the peppermint extract in this Christmas Peppermint Cheesecake Cookies Recipe?
Absolutely! If peppermint isn’t your favorite, you can skip it or substitute with vanilla, almond, or even orange extract. The cookies will still be delicious, just with a different flavor profile.
-
How do I get the dough not to stick to my hands when rolling?
Chilling the dough in the fridge for at least 15 minutes makes it less sticky and easier to roll. If it’s still sticky, give it a few more minutes chilled. You can also lightly flour your hands, but don’t overdo it as that can dry out the dough.
-
How do I know when the cookies are perfectly baked?
Look for cookies that are just turning light golden on the edges but remain pale on top. Overbaking makes them dry and crumbly, so when they look set but soft in the center, they’re ready to come out.
-
Can I make these cookies ahead of time?
Yes! You can make the dough ahead, refrigerate it for up to two days, or freeze it for longer. You can also fully bake and freeze the cookies. Just thaw before serving or gently reheat.
Final Thoughts
Honestly, this Christmas Peppermint Cheesecake Cookies Recipe quickly became one of my go-to holiday sweets because it combines everything I love—flavor, texture, and festive looks—without complicated steps. If you want to impress your friends and family with something a little different yet totally irresistible, you’ve got to try this recipe. Plus, the peppermint swirls bring such a fun, seasonal vibe that your cookies won’t just taste amazing, they’ll brighten the whole room. Happy baking, friend!
Print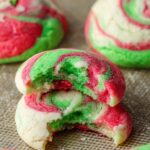
Christmas Peppermint Cheesecake Cookies Recipe
- Prep Time: 25 minutes
- Cook Time: 11 minutes
- Total Time: 36 minutes
- Yield: 44 cookies
- Category: Dessert
- Method: Baking
- Cuisine: American
- Diet: Vegetarian
Description
These Christmas Cheesecake Cookies are a festive and delicious treat featuring a creamy cheesecake base blended into a soft, buttery cookie dough. Marbled with red and green colors and infused with peppermint extract, these cookies bring holiday cheer with every bite.
Ingredients
Base Dough
- 8 oz cream cheese room temperature
- 1/2 cup butter room temperature
- 1 1/4 cup granulated sugar
- 2 eggs
- 1 teaspoon vanilla extract
- 2 1/2 cups flour
- 2 teaspoons baking powder
- 1/2 teaspoon salt
Coloring and Flavoring
- Red food coloring
- Green food coloring
- 1/2 teaspoon peppermint extract
Optional
- Powdered sugar for dusting
Instructions
- Preheat Oven: Preheat your oven to 350 degrees F and line two baking sheets with parchment paper or silicone mats to prepare for baking.
- Mix Cream Cheese and Butter: Beat the cream cheese and butter together at high speed for 1 to 2 minutes until the mixture is fluffy and smooth.
- Add Sugar and Eggs: Add the granulated sugar to the cream cheese mixture and beat for another 1 to 2 minutes until fully incorporated and fluffy. Then beat in the eggs and vanilla extract for 1 minute.
- Combine Dry Ingredients: In a separate bowl, whisk together flour, baking powder, and salt. Gradually add these dry ingredients to the wet mixture and stir until just combined to avoid over-mixing.
- Divide and Chill Dough: Separate the dough evenly into three small bowls and refrigerate for 15 minutes to firm up.
- Add Colors and Flavor: After chilling, add red food coloring to one bowl of dough, green food coloring and peppermint extract to another, and leave the third plain. Mix until the colors are evenly distributed. If dough feels sticky, chill again briefly.
- Form Cookies: Take 1/2 tablespoon of each colored dough and gently roll them together between your palms to create a marbled effect. Be careful not to blend the colors too much. Repeat to form all cookies and place them on the prepared baking sheets.
- Bake: Bake cookies at 350 degrees F for 11 minutes. Look for cookies that are light in color with just a slight browning on the bottom, avoiding overbaking for a soft texture.
- Cool and Finish: Let cookies cool on the baking sheet for a few minutes before transferring them to a wire rack to cool completely. Optionally, dust with powdered sugar before serving.
Notes
- Store cookies in a tightly sealed container for up to one week or freeze for up to three months.
- For a more tart and cheesy flavor, substitute the vanilla extract with 1 teaspoon of lemon juice or omit extracts altogether.
- Peppermint extract is optional and can be omitted or replaced with other flavorings according to preference.
- Do not overbake the cookies as they can become dry and biscuit-like; watch for light color and slight browning on the bottoms.
Nutrition
- Serving Size: 1 cookie
- Calories: 140 kcal
- Sugar: 10 g
- Sodium: 110 mg
- Fat: 7 g
- Saturated Fat: 4 g
- Unsaturated Fat: 2 g
- Trans Fat: 0 g
- Carbohydrates: 18 g
- Fiber: 0.5 g
- Protein: 2 g
- Cholesterol: 30 mg

