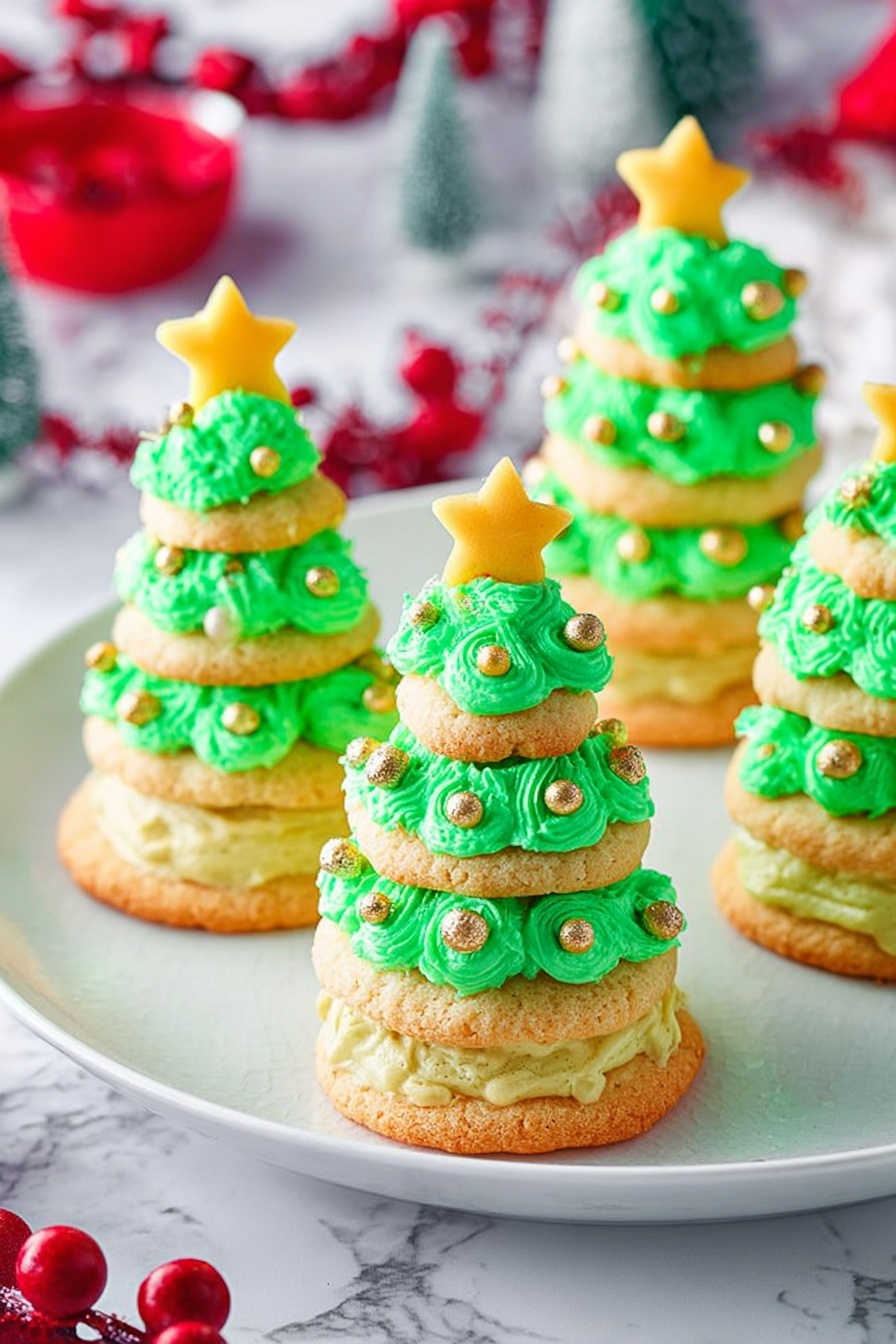
Christmas Tree Cookies with Buttercream Frosting Recipe
If you’re looking to add a festive touch to your holiday baking this year, let me introduce you to my absolute favorite recipe: Christmas Tree Cookies with Buttercream Frosting Recipe. These little stacks of joy aren’t just adorable—they’re packed with buttery goodness and topped with the creamiest, most vibrant green buttercream you’ll ever taste. Trust me, once you make these, they’ll become your go-to Christmas treat that everyone will be raving about. Ready to dive in? Let’s do this!
Why This Recipe Works
- Perfect Texture: The cookies are crisp on the edges but tender inside, making these irresistible to bite into.
- Classic Buttercream: The frosting is smooth, creamy, and just sweet enough to complement the cookie without overpowering it.
- Festive and Fun: Stacking three sizes of cookies creates charming Christmas tree shapes that bring out the holiday spirit.
- Customizable: You can easily swap garnishes or food coloring to match your holiday theme perfectly.

Ingredients & Why They Work
When you dive into this Christmas Tree Cookies with Buttercream Frosting Recipe, you’ll want ingredients that not only taste amazing together but also bake and decorate beautifully. The balance of butter and sugar in the cookies gives you that melt-in-your-mouth feel, while the buttercream frosting is light enough to pipe easily but rich enough to hold its shape.
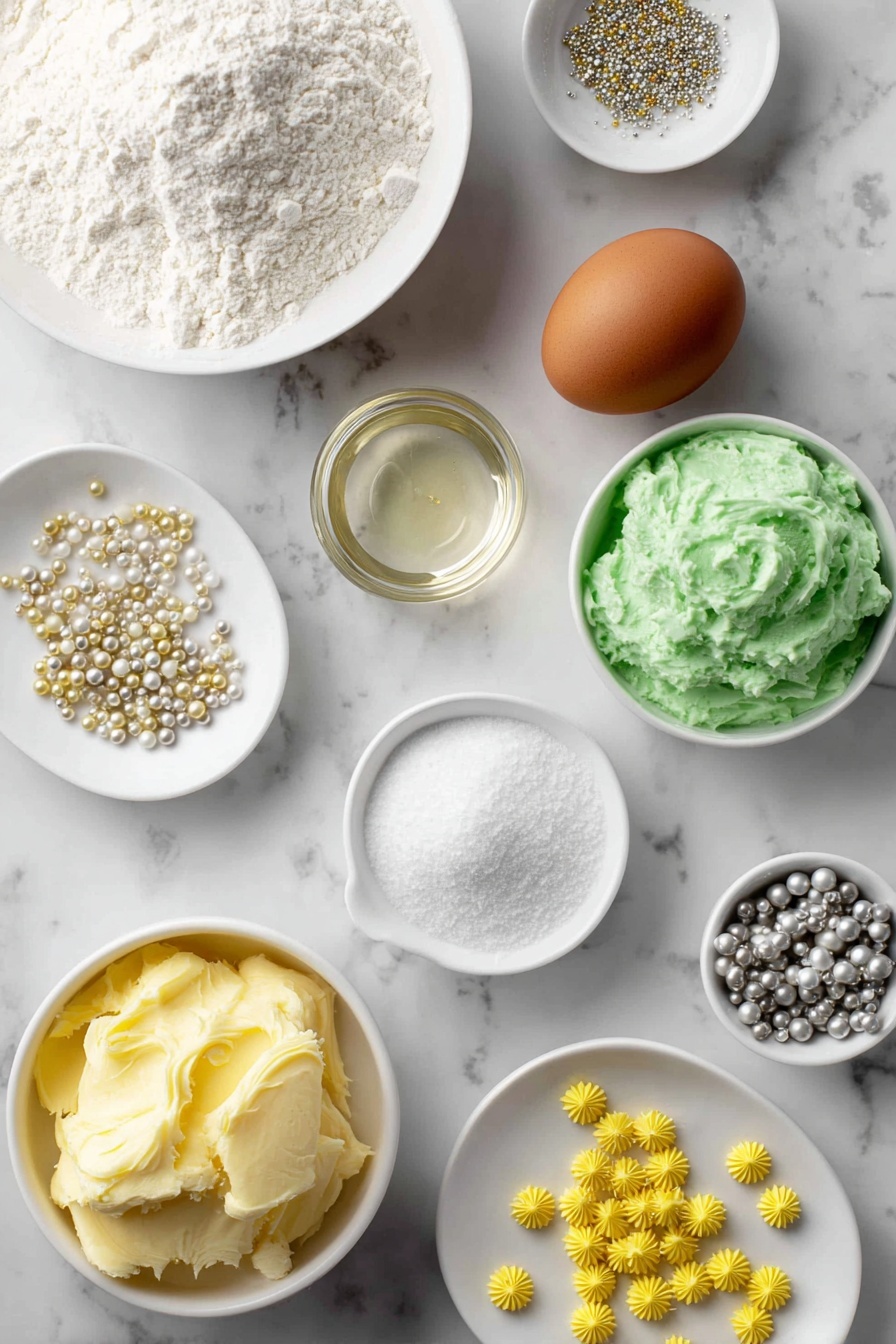
- Unsalted butter: Using unsalted butter lets you control the saltiness and ensures a clean flavor throughout both the cookies and frosting.
- Confectioners’ sugar: Powdered sugar is the secret to smooth frosting and tender cookies since it dissolves quickly.
- Vanilla extract: A simple touch of vanilla amps up the overall flavor and makes the cookies smell like holiday magic.
- All-purpose flour: Gives structure to your cookies without making them tough or chewy.
- Baking soda and salt: These balance the sweetness and help the cookies rise just enough.
- Green food coloring: Adds that iconic Christmas tree hue to the buttercream frosting — don’t be shy about getting the shade you love!
- Yellow star sprinkles and pearl-shaped sprinkles: These tiny details turn your cookies into show-stoppers, just like the ones I use every year.
Tweak to Your Taste
I love how this Christmas Tree Cookies with Buttercream Frosting Recipe is a perfect canvas for personalization. Whether you want to pump up the vanilla, swap out food coloring for a fun pastel, or add some holiday spices, making it your own only makes the experience more special.
- Variation: One of my favorite twists is adding a teaspoon of cinnamon or nutmeg to the dough for a warm, spiced cookie that smells like a winter wonderland.
- Dietary swap: You can try using dairy-free butter alternatives and plant-based milk in the frosting for a vegan-friendly option — just adjust sweetness to taste.
- Festive colors: I sometimes mix green with a bit of blue food coloring to get a deeper forest green that looks stunning under twinkle lights.
Step-by-Step: How I Make Christmas Tree Cookies with Buttercream Frosting Recipe
Step 1: Creaming the Butter and Sugar
I start by beating the softened butter on high speed until it’s light and creamy—this usually takes about 2 to 3 minutes and makes all the difference for a tender cookie. Then, I add the confectioners’ sugar and keep beating until they’re perfectly blended and fluffy. Be sure to scrape down the bowl occasionally; it helps everything mix evenly.
Step 2: Adding the Egg and Vanilla
Next, I add the egg and vanilla extract, beating until everything is incorporated. This gives your dough that classic cookie flavor and helps bind everything together just right.
Step 3: Mixing Dry Ingredients and Forming Dough Balls
After sifting in flour, baking soda, and salt, I mix on low speed just until everything’s combined—overmixing can make your cookies tough, and that’s the last thing we want! Then, the fun begins: I divide the dough into three sizes of balls—small (1 tsp), medium (2 tsp), and large (3 tsp). I recommend making about 20 of each size to get enough stacks going.
Step 4: Baking the Cookies
Baking times vary by size, so I bake one size at a time for best results: large balls bake about 10 minutes, medium for 7-8 minutes, and small for 5-6 minutes. Watch the edges—they should be set and lightly golden, even if the center still looks slightly soft; it will firm up as it cools. I always bake on the center rack and rotate the pan halfway through for even cooking.
Step 5: Making the Buttercream Frosting
Once cookies are cooling, I start the frosting—beating softened butter until creamy, then gradually adding confectioners’ sugar. I work the vanilla and salt in, then add drops of green food coloring a few at a time, to get the perfect shade. You can’t rush this part; the longer you beat it, the fluffier your frosting becomes.
Step 6: Decorating and Stacking
I like to pipe the frosting using a star tip, covering the large and medium cookies with generous layers. On small cookies, I pipe a cute swirl to look like the tree’s leafy top, then place a yellow star sprinkle on each one to mimic a shining star. Finally, stack a large cookie at the base, a medium one in the middle, topped with a small frosted cookie to create adorable little Christmas trees. Decorating with gold and silver pearl sprinkles really adds festive sparkle.
Pro Tips for Making Christmas Tree Cookies with Buttercream Frosting Recipe
- Room Temperature Ingredients: Make sure your butter and egg are at room temperature for a smooth dough and frosting that pipes beautifully.
- Bake in Batches: Baking one cookie size at a time helps you monitor doneness, preventing under- or over-baked cookies.
- Don’t Overmix Flour: Stop mixing as soon as the flour disappears to keep your cookies tender.
- Pipe with Confidence: Use a good-quality piping bag and a star tip for frosting that holds its shape and looks professional.
How to Serve Christmas Tree Cookies with Buttercream Frosting Recipe
Garnishes
I usually stick to yellow star sprinkles on top for that classic Christmas tree look, but sometimes I add silver and gold pearl sprinkles on the frosting layers for a little sparkle. Red and green jimmies also work if you want to get playful and extra festive. Honestly, these tiny details bring a lot of joy both visually and in taste.
Side Dishes
This recipe pairs wonderfully with a warm cup of hot cocoa or a classic eggnog. If you’re hosting a cookie exchange, these stack beautifully alongside gingerbread men and peppermint bark for a cookie spread that’s as pretty as it is delicious.
Creative Ways to Present
I love arranging these Christmas tree cookies on a tiered cake stand sprinkled with edible glitter or dusting the display with powdered sugar “snow.” Another fun idea is placing them in festive clear cellophane bags tied with ribbon—for charming homemade gifts that friends will adore.
Make Ahead and Storage
Storing Leftovers
Once decorated, I store these Christmas tree cookies in an airtight container at room temperature for up to 4 days. The buttercream keeps them moist and flavorful without getting too soft. I avoid the fridge personally because it can dry out the cookies, but if your kitchen is warm, refrigerate them and bring to room temp before serving.
Freezing
I’ve had great luck freezing the baked but undecorated cookies in airtight containers or ziptop bags. When you’re ready to enjoy, just thaw completely, then decorate with the buttercream frosting fresh. This keeps your cookies tasting like they just came out of the oven.
Reheating
If you want to warm up your cookies before serving, pop them in a preheated oven at 300°F for just 2-3 minutes. Avoid microwaving or heating too long, as it can melt the frosting or dry the cookie out. This little warm-up brings out all the buttery goodness.
FAQs
-
Can I make these Christmas Tree Cookies with Buttercream Frosting Recipe ahead of time?
Absolutely! You can bake the cookies up to a week in advance and store them in an airtight container at room temperature. It’s best to frost them the day you plan to serve for the freshest, best-tasting results.
-
Can I use a different frosting instead of buttercream?
Yes, royal icing or cream cheese frosting can work, but buttercream is my top pick because it pipes smoothly and tastes rich without being overpowering. If you substitute, just make sure the frosting is stiff enough to hold the stacked cookies together.
-
How can I make sure my cookies don’t spread too much while baking?
Using chilled dough helps keep the shape, and baking on parchment paper or a Silpat liner evenly distributes heat. Also, don’t over-cream your butter and sugar, as that can cause spreading. Watching baking times closely helps, too.
-
What if I don’t have a star piping tip?
No worries! You can use any round tip or even a zip-top bag with the corner snipped off. The frosting might look a bit different but will still taste amazing and hold your cookie stack together.
Final Thoughts
This Christmas Tree Cookies with Buttercream Frosting Recipe holds a special place in my heart every holiday season. They’re not just cookies—they’re tiny celebrations stacked high with love and sweetness. Whether you’re making them for family, friends, or as festive gifts, I promise you’ll feel that warm holiday glow as you bake and share these pretty little trees. Give it a try, and I know you’ll be adding this recipe to your holiday traditions too.
Print
Christmas Tree Cookies with Buttercream Frosting Recipe
- Prep Time: 30 minutes
- Cook Time: 10 minutes
- Total Time: 1 hour 10 minutes
- Yield: 20 servings
- Category: Dessert
- Method: Baking
- Cuisine: American
Description
Create festive Stacked Christmas Tree Cookies featuring buttery sugar cookies layered with creamy green buttercream frosting and decorated with colorful sprinkles, perfect for holiday celebrations.
Ingredients
Cookies
- ¾ cup unsalted butter, softened
- ¾ cup confectioners’ sugar
- 1 large egg
- 1 teaspoon vanilla extract
- 2 ¼ cups all-purpose flour
- 1 teaspoon baking soda
- ½ teaspoon salt
Buttercream Frosting
- 1 cup unsalted butter, softened
- 4 cups confectioners’ sugar
- 1 teaspoon pure vanilla extract
- ¼ teaspoon salt
- Drops green food coloring, as desired
Garnishing
- Yellow star sprinkles
- Silver and gold pearl-shaped sprinkles
Instructions
- Preheat Oven and Prepare Baking Sheets: Preheat your oven to 350°F and line at least two baking sheets with Silpat liners or parchment paper; set aside to ensure easy cookie removal.
- Make Cookie Dough Base: In a stand mixer with paddle attachment or large bowl with electric mixer, beat softened butter on high speed until creamy, about 2 to 3 minutes. Scrape down the sides of the bowl to incorporate all butter.
- Add Sugar and Cream: Add the confectioners’ sugar and beat until fully incorporated and creamy, approximately 3 minutes.
- Incorporate Egg and Vanilla: Add the egg and vanilla extract; beat until well combined, scraping down the bowl as needed to ensure even mixing.
- Add Dry Ingredients: Add all-purpose flour, baking soda, and salt to the wet mixture and beat until just combined. Avoid overmixing to maintain tender cookies.
- Portion Cookie Dough Balls: Form cookie dough balls of three sizes: 1 teaspoon, 2 teaspoons, and 3 teaspoons. Aim for about 20 balls of each size, totaling roughly 60 balls.
- Bake the Cookies: Place cookie balls on prepared sheets with spacing. Bake large (3 tsp) dough balls for about 10 minutes, medium (2 tsp) for 8 minutes, and small (1 tsp) for 6 minutes or until edges are set. Allow cookies to cool on baking sheets for 10 minutes, then transfer to wire racks to cool completely.
- Prepare Buttercream Frosting: In a clean mixing bowl, beat softened butter on high speed until smooth and creamy, about 3 to 4 minutes.
- Add Sugar Gradually: Add half the confectioners’ sugar and beat on medium speed to incorporate, scrape sides, then add remaining sugar and beat again until fully combined.
- Add Flavor and Color: Add vanilla extract and salt, beating to combine. Slowly add green food coloring a few drops at a time, mixing on medium speed until desired shade is reached.
- Pipe and Assemble Cookie Trees: Fit a piping bag with a star tip and fill with frosting. Pipe onto largest cookies, then medium cookies, and swirl atop smallest cookies to mimic tree tops. Adorn small cookies with yellow star sprinkles.
- Stack Cookies: Assemble by stacking a large cookie base, then a medium cookie, topped with a small frosted cookie, repeating until all cookies are stacked forming festive Christmas trees.
- Decorate Trees: Sprinkle the assembled cookie trees with silver and gold pearl-shaped sprinkles or any preferred holiday sprinkles for decoration.
Notes
- Baking times vary based on cookie size, oven variances, ingredient brands, and climate; watch edges to determine doneness rather than strictly following the clock.
- For best results, bake one sheet at a time on the center rack, rotating the sheet halfway through baking.
- After decorating, store cookies in an airtight container in the fridge for 1 to 2 weeks or at room temperature for up to 4 days to keep fresh.
- To freeze, store baked but undecorated cookies in an airtight container or zip-top bag. Thaw before frosting for best texture.
Nutrition
- Serving Size: 1 cookie tree
- Calories: 250 kcal
- Sugar: 20 g
- Sodium: 100 mg
- Fat: 15 g
- Saturated Fat: 9 g
- Unsaturated Fat: 5 g
- Trans Fat: 0 g
- Carbohydrates: 28 g
- Fiber: 1 g
- Protein: 2 g
- Cholesterol: 40 mg

