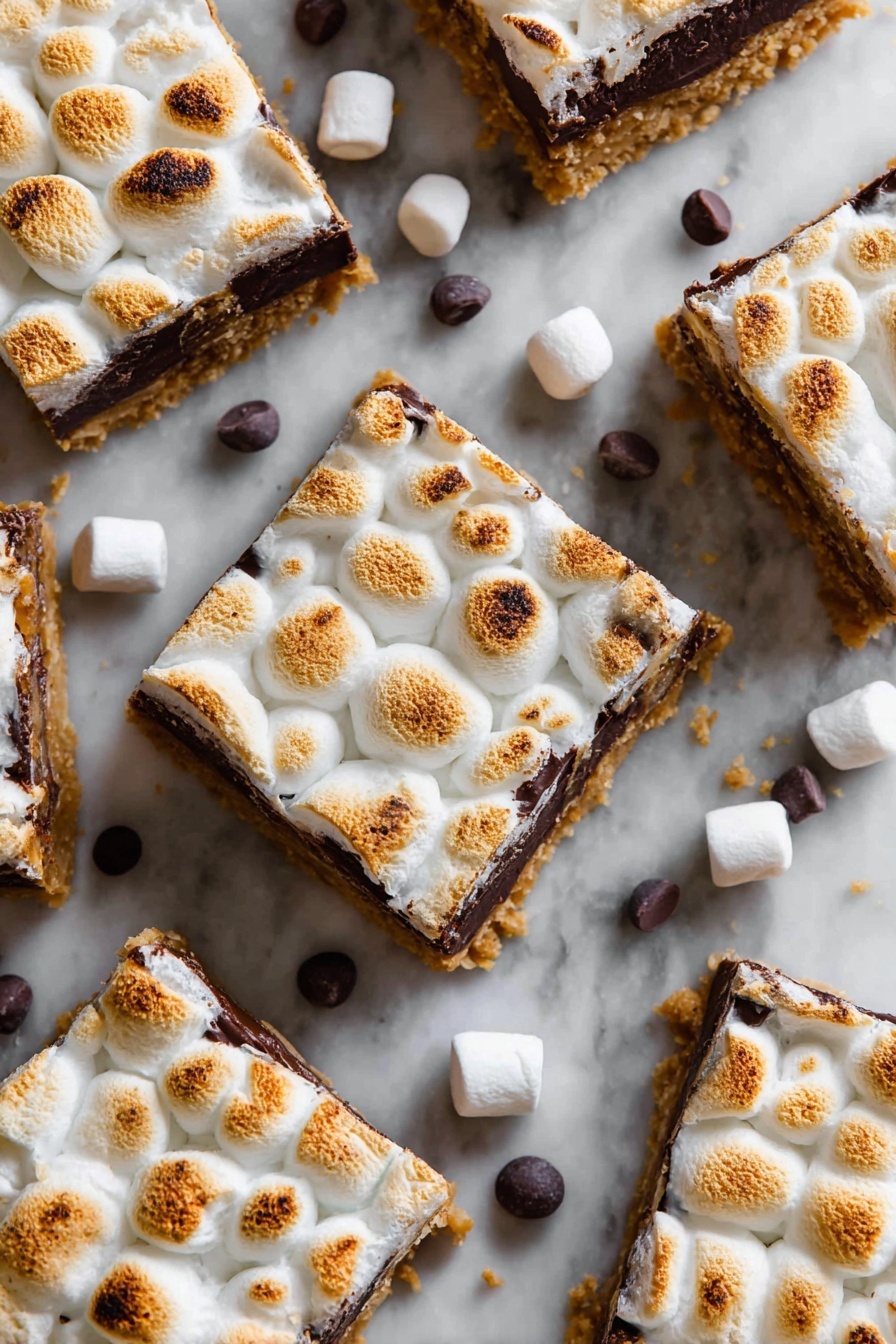
Classic S’more Bars Recipe
If you’ve been craving that nostalgic campfire treat but without the hassle of an open flame, you’re in for a real treat. This Classic S’more Bars Recipe is like your favorite s’mores, but in one easy-to-make, gooey, chocolatey bar form. I’ve made these a dozen times, and honestly, they always disappear fast at parties and family gatherings. Stick with me, and I’ll walk you through everything so your bars come out perfect every single time.
Why This Recipe Works
- Simplicity Meets Flavor: With just a few ingredients, you get that classic campfire taste without fuss.
- Perfect Texture Balance: The crunchy graham crust mixed with melty chocolate and toasted marshmallows gives you that dreamy bite.
- Quick Baking Time: The total bake time is under 30 minutes, so you can satisfy those sweet cravings fast.
- Super Customizable: Easy to tweak with your favorite chocolate or marshmallows for personal flair.

Ingredients & Why They Work
These staples not only bring that iconic s’mores flavor but also combine to create each layer’s distinct texture and sweetness. Plus, finding them is a breeze at any grocery store—no hunting around necessary.
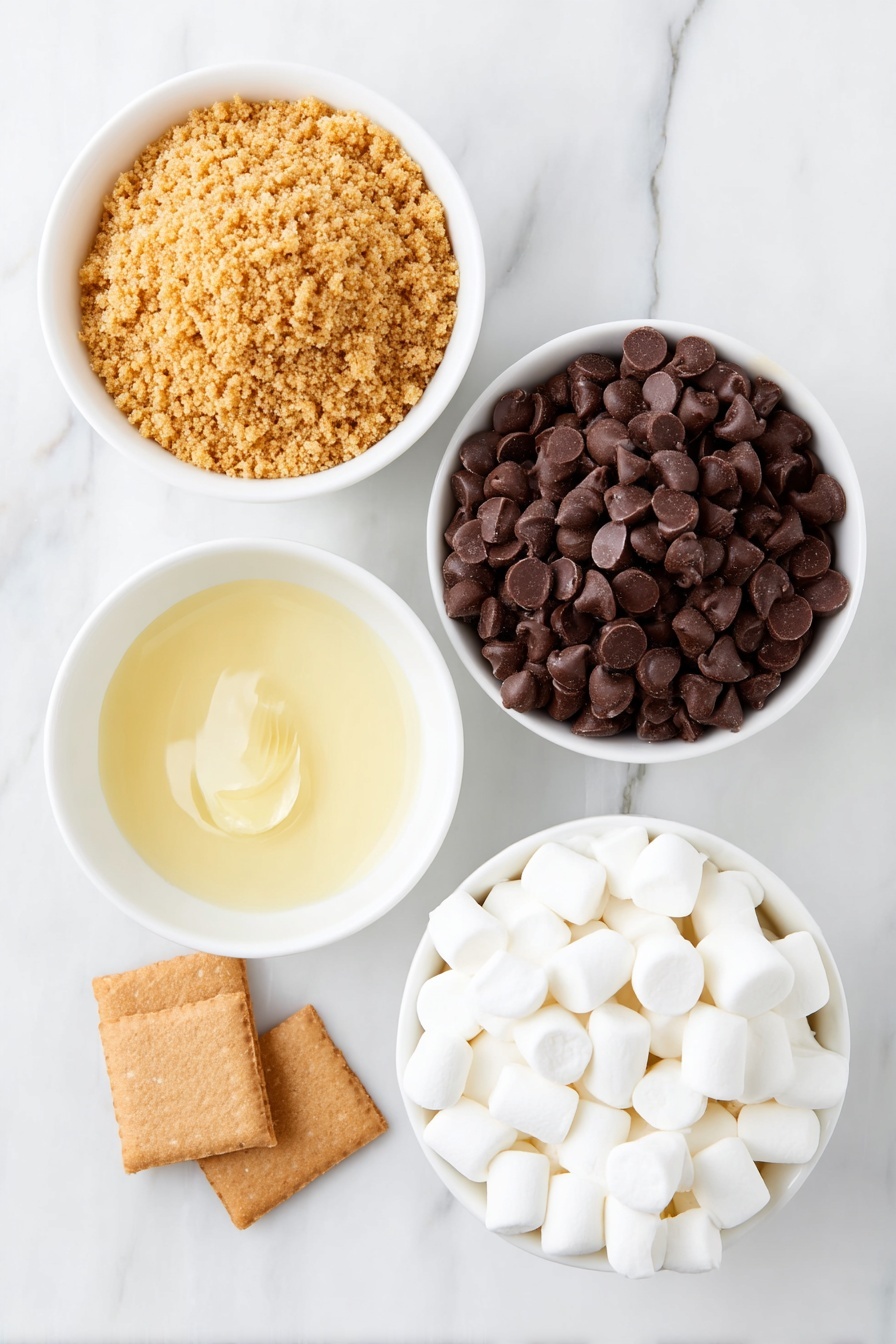
- Graham cracker crumbs: The crunchy base and sides are the foundation, providing that classic slightly sweet, buttery flavor.
- Melted butter: Binds the graham crumbs so the crust holds together firmly but still feels tender when you bite in.
- Chocolate chips: Use semi-sweet or milk chocolate based on your preference—this melts perfectly into gooey goodness during baking.
- Mini marshmallows: They toast beautifully on top, giving you that signature toasted flavor and a lovely golden-brown finish.
Tweak to Your Taste
One thing I love about the Classic S’more Bars Recipe is how easy it is to make it your own. Whether you prefer it more chocolatey, or want a little crunch, these variations let you experiment without risk.
- Variation: Sometimes I swap half the chocolate chips for peanut butter chips—adds a nice salty-sweet contrast that my kids adore.
- Dietary tweaks: If you’re dairy-free, coconut oil works well instead of butter, and vegan marshmallows are available at many stores now.
- Seasonal Spins: For a festive twist, sprinkle crushed candy canes on top during the holidays—it adds a fresh peppermint crunch.
Step-by-Step: How I Make Classic S’more Bars Recipe
Step 1: Prep Your Base
First things first: Preheat your oven to 350°F and grease a 9×13-inch baking dish with cooking spray. Then, mix the graham cracker crumbs with the melted butter until it’s all evenly combined. Press this mixture firmly into the bottom and up the sides of your pan—think of it like building a cozy little crust nest. Baking it for 8 minutes helps that crust set up so it won’t crumble when you slice later.
Step 2: Add the Magic Layers
Once the crust is slightly cooled but still warm, sprinkle the chocolate chips evenly over the crust. Then add a generous layer of mini marshmallows on top. This layering is key—if you put marshmallows before the chocolate, they don’t melt the same way, so trust the order here.
Step 3: Bake to Golden Perfection
Bake everything for about 20 minutes. Keep a close eye near the end—you want those marshmallows to turn a beautiful golden brown, giving you that lightly toasted texture without burning. Let the bars cool fully before popping them in the fridge; this helps everything set nicely for cleaner slices.
Step 4: Chill and Serve
After cooling at room temperature, stick the pan in the fridge for a bit—it firms up the bars so they cut like a dream. When ready, slice into squares, grab a tall glass of milk, and enjoy. I promise, they disappear faster than you can say ‘s’more’!
Pro Tips for Making Classic S’more Bars Recipe
- Press the Crust Firmly: Don’t be shy pressing the crust mixture into the pan—it helps create neat bars that hold together.
- Watch Marshmallows Closely: They can go from perfectly toasted to burnt quickly, so check at the 18-minute mark if your oven runs hot.
- Use Fresh Marshmallows: I once used stale marshmallows and ended up with a chewy, sticky mess—fresh ones toast up beautifully every time.
- Chill Before Cutting: Trust me, cutting while warm leads to gooey squares that won’t keep their shape.
How to Serve Classic S’more Bars Recipe
Garnishes
I usually keep garnishes simple—sometimes a light dusting of powdered sugar does wonders to give a little extra sweetness without overpowering. For a fun twist, you can drizzle melted chocolate or a touch of caramel sauce over the top right before serving. I love it because it adds a fancy look with minimal effort.
Side Dishes
Of course, these bars are great on their own, but I’ve found serving them alongside fresh berries really balances the sweetness. A scoop of vanilla ice cream or a cold glass of milk can’t be beaten either—perfect for soaking up all that melty goodness.
Creative Ways to Present
For parties, I like placing these bars on a wooden serving board with small bowls of additional chocolate chips, marshmallows, and graham crackers so folks can customize their bites. For kids’ birthdays, cutting bars into fun shapes using cookie cutters turns this treat into a real party star.
Make Ahead and Storage
Storing Leftovers
Once fully cooled and chilled, store your s’more bars in an airtight container in the fridge. They stay fresh for about 4–5 days, though I doubt they’ll last that long in your house! Keeping them cold maintains that perfect chewy texture without the marshmallows getting too sticky.
Freezing
I’ve frozen leftover bars wrapped tightly in plastic wrap and then in a freezer-safe bag. They freeze nicely up to a month. When thawed, just pop them in the fridge overnight to refirm. Keep in mind marshmallows might lose some of their fluffiness but still taste delicious.
Reheating
If you want to warm up chilled bars, I suggest a quick zap in the microwave for about 10 seconds or a few minutes in a low oven (around 300°F) just to soften the chocolate and marshmallows without melting the crust too much. This brings back that fresh-from-the-oven vibe beautifully.
FAQs
-
Can I use regular marshmallows instead of mini marshmallows?
You can, but mini marshmallows toast more evenly and fit nicely as a layer on top. Using large marshmallows might cause uneven melting and make the top patchy. If you only have regular ones, chop them into smaller pieces for better results.
-
Is it necessary to refrigerate the bars before cutting?
Yes! Cooling the bars in the fridge allows the chocolate and marshmallow to set nicely, making it much easier to get clean cuts. Cutting right after baking when still warm will be gooey and messy.
-
Can I make these gluten-free?
Definitely! Swap in gluten-free graham cracker crumbs, which are increasingly easy to find. The rest of the ingredients are naturally gluten-free, but always double-check labels to be safe.
-
What is the best chocolate to use?
Semi-sweet chocolate chips are classic here because they balance the sweetness of the marshmallows well. But feel free to use milk chocolate or even dark chocolate depending on your taste. Mixing different chips can create a richer flavor too.
-
How can I prevent marshmallows from burning?
Keep a close eye in the last 5 minutes of baking and remove them as soon as you see a golden brown color. If your oven tends to run hot, reduce baking time slightly or increase the rack height to keep the heat from direct contact.
Final Thoughts
This Classic S’more Bars Recipe is one of those magical recipes that brings back childhood memories while still feeling totally grown-up enough to share at a party or enjoy for a solo snack. The combination of crunchy, melty, and toasted textures is unbeatable in my book. I encourage you to try making these bars—you’ll love how simple and rewarding they are, and I bet they’ll become a go-to in your dessert lineup too!
Print
Classic S’more Bars Recipe
- Prep Time: 30 minutes
- Cook Time: 28 minutes
- Total Time: 58 minutes
- Yield: 6 servings
- Category: Dessert
- Method: Baking
- Cuisine: American
Description
Delicious and easy-to-make S’more Bars featuring a buttery graham cracker crust, melted chocolate chips, and toasted mini marshmallows baked to golden perfection. Perfect for a sweet treat or dessert.
Ingredients
Crust
- 2 cups Graham cracker crumbs
- 0.5 cup Melted butter
Topping
- 4 cups Chocolate chips
- 1 package Mini marshmallows
Instructions
- Preheat oven: Preheat your oven to 350 degrees Fahrenheit and grease a 9×13 inch baking pan with cooking spray to prevent sticking.
- Prepare crust: In a mixing bowl, combine the graham cracker crumbs and melted butter until evenly mixed. Press the mixture firmly into the bottom and up the sides of the greased baking pan to form an even crust.
- Bake crust: Place the pan in the oven and bake for 8 minutes to set the crust.
- Add toppings: Remove the pan from the oven. Evenly sprinkle the chocolate chips over the baked crust, then top with the mini marshmallows.
- Bake again: Return the pan to the oven and bake for 20 minutes until the marshmallows are golden brown and slightly toasted.
- Cool and chill: Remove from the oven and allow to cool completely. Then, place the pan in the refrigerator to set before cutting and serving.
- Serve: Once chilled, cut into bars and serve as a delicious dessert or snack.
Notes
- For a crispier crust, you can press the graham cracker mixture firmly and bake slightly longer before adding toppings.
- Use semi-sweet or milk chocolate chips based on your preferred sweetness.
- Allow the bars to cool completely before refrigerating to help them set better.
- Store leftover bars in an airtight container in the refrigerator for up to 3 days.
- You can add a pinch of salt to the crust mixture to enhance the flavor.
Nutrition
- Serving Size: 1 bar
- Calories: 350 kcal
- Sugar: 25 g
- Sodium: 150 mg
- Fat: 20 g
- Saturated Fat: 12 g
- Unsaturated Fat: 7 g
- Trans Fat: 0 g
- Carbohydrates: 40 g
- Fiber: 2 g
- Protein: 3 g
- Cholesterol: 30 mg

