Decadent Chocolate Lava Cakes Recipe
If you’re craving something that’s both show-stopping and surprisingly easy, you’re going to love this Decadent Chocolate Lava Cakes Recipe. I still remember the first time I made these — molten, gooey centers spilling out like warm chocolate hugs. Seriously, this isn’t just any dessert; it’s that perfect blend of richness and comfort that’ll make you want to invite friends over for an impromptu dessert party. Stick with me, and I’ll walk you through every step so your lava cakes come out flawless every single time.
Why This Recipe Works
- Perfect Balance of Texture: The edges bake into a delicate cake while the center stays molten and velvety.
- Simple Ingredients, Gourmet Results: With basic pantry staples and a few tricks, you get a dessert worthy of any fine dining restaurant.
- Customizable Flavor Boost: A hint of instant coffee elevates the chocolate without overpowering, making flavors more complex and deep.
- Fast & Impressive: Under 30 minutes total, perfect for when you want an impressive dessert in a flash.

Ingredients & Why They Work
The magic behind the Decadent Chocolate Lava Cakes Recipe lies in high-quality chocolate and a few simple ingredients that work together to create that signature molten center. Choosing the right chocolate and beating the eggs just right are key for success.

- Unsalted Butter: Provides richness and smoothness; using unsalted lets you control the saltiness.
- Premium Semisweet or Dark Chocolate: This is the star—choose a good-quality bar (60% cacao or higher) for intense flavor and silky texture.
- Instant Coffee (Optional): Enhances the chocolate depth without tasting like coffee—trust me, you want to add this.
- Vanilla Extract (Optional): Adds warmth and subtle complexity to the chocolate flavor.
- Salt: Balances sweetness and deepens flavor.
- Eggs and Egg Yolks: Give structure and silkiness; room temperature eggs whip up better and blend smoothly.
- Light Brown Sugar: Adds a gentle caramel note and moisture for a tender crumb.
- All-Purpose Flour: Holds the cake together just enough to set edges without over-baking the center.
Tweak to Your Taste
I love playing with this recipe depending on the season or my mood. While the classic version is fantastic on its own, adding little twists keeps it fresh and exciting every time I make it. Feel free to tweak the chocolate type or add your favorite mix-ins — just don’t stray too far from the core technique.
- Variation: I sometimes swirl in a spoonful of raspberry jam right before baking for a fruity surprise that pairs wonderfully with the rich chocolate.
- Dairy-Free Option: Substitute coconut oil for butter if you want a dairy-free version; it imparts a subtle tropical note but keeps that luscious texture.
- Make It Extra Boozy: Splash in a teaspoon of your favorite liqueur (like Grand Marnier or Kahlua) to add a grown-up flair.
Step-by-Step: How I Make Decadent Chocolate Lava Cakes Recipe
Step 1: Prep Your Ramekins and Oven
First things first: preheat your oven to 450°F (235°C). I recommend greasing four 6 oz ramekins thoroughly with baking spray or butter, then lightly dusting them with flour to help the cakes release easily. If ramekins aren’t handy, a jumbo muffin tin works great — just adjust the baking time accordingly. Don’t skip this step, or you’ll wrestle with stuck cakes later!
Step 2: Melt Butter and Chocolate
Place your chopped premium chocolate and butter into a microwave-safe bowl. Heat in 20-second bursts, stirring really well each time until everything is melted into a smooth, glossy mixture. Patience here is key — overheated chocolate can seize, so watch it closely. Once melted, stir in the instant coffee, vanilla extract, and salt to boost that chocolate complexity.
Step 3: Whisk Eggs and Sugar
In a separate bowl, combine your room-temp eggs, egg yolks, and brown sugar. Beat vigorously with a whisk for about 15 seconds until the mixture looks foamy — this little step introduces air for a light but sturdy cake texture. Then, pour this mixture into your chocolate bowl and gently fold until smooth and combined.
Step 4: Add Flour and Portion Out Batter
Sift the flour over your chocolate-egg mixture, then fold gently until just combined. Overmixing here can make your lava cakes tough, so fold with care. Divide the batter evenly among your prepared ramekins or muffin cups. I usually use a small ladle for this to avoid spills.
Step 5: Bake to Molten Perfection
Bake for 9-11 minutes if using ramekins. Your edges should be set and cake-like, but the center will still be jiggly to the touch—trust this sign! If you’re using a jumbo muffin tin, you’ll need only 6-7 minutes. Keep a close eye near the end; over-baking turns your molten centers dry.
Step 6: Cool and Unmold Carefully
Let the cakes cool for 5 minutes right out of the oven. Slide a thin knife around the edges to loosen them carefully. Then, using oven mitts (these ramekins get hot!), invert each cake onto a plate. I always warn guests that the “lava” inside will be super hot—patience pays off!
Pro Tips for Making Decadent Chocolate Lava Cakes Recipe
- Room Temperature Ingredients: Having your eggs and butter at room temp helps the batter combine smoothly and improves texture.
- Watch Your Bake Time: Baking one minute too long can dry out the lava center—set a timer and check early.
- Use Good Chocolate: A high-quality chocolate bar melts better and creates a richer molten center than chocolate chips.
- Let Them Rest Briefly: Cooling for 5 minutes ensures the cakes hold their shape when inverted but the center stays gooey.
How to Serve Decadent Chocolate Lava Cakes Recipe

Garnishes
My go-to garnish is simply a dusting of powdered sugar. It’s elegant without stealing focus from the rich chocolate. For a little extra indulgence, a scoop of creamy vanilla ice cream or a dollop of freshly whipped cream makes a perfect partner. Sometimes, I sprinkle flaky sea salt for a fun salty-sweet contrast that keeps everyone reaching for seconds.
Side Dishes
Decadent Chocolate Lava Cakes shine as a standalone dessert, but I love serving them alongside fresh berries or a tart cherry compote to cut through the richness. A small espresso on the side also matches beautifully for an adult dessert vibe.
Creative Ways to Present
For birthdays or dinner parties, I’ve plated these with a drizzle of raspberry coulis and a sprig of mint — it looks fancy but the prep is minimal. Another fun trick is serving the cakes in edible chocolate shells or with a dusting of gold leaf for extra wow factor. Trust me, your guests will think you went all out.
Make Ahead and Storage
Storing Leftovers
If you happen to have leftovers (rare in my house!), store them in an airtight container in the fridge and consume within 1-2 days for best quality. The molten middle will firm up in the fridge, so they’re less magical cold.
Freezing
I’ve frozen the batter in individual ramekins (wrapped tightly) with good results when baking from frozen—just add a couple minutes to the bake time. Baked lava cakes don’t freeze as well because the texture changes once reheated.
Reheating
To reheat, pop the cakes in a preheated 350°F oven for about 5 minutes to warm gently and revive that ooey-gooey center. Avoid microwaving directly, as it can make the edges rubbery and the center too hot.
FAQs
-
Can I use chocolate chips instead of a chocolate bar for this lava cake recipe?
You can, but I’ve found that premium chocolate bars melt more smoothly and create a richer molten center compared to chocolate chips. Chips often have stabilizers that affect melting, resulting in a less gooey texture. If you must use chips, choose high-quality ones and be aware the texture might differ slightly.
-
Why do you add instant coffee to the lava cake batter?
Adding a small amount of instant coffee powder intensifies the flavor of the chocolate without making the dessert taste like coffee. It’s a simple trick that many chocolatiers use to bring out deeper, more complex chocolate notes.
-
How do I know when the lava cakes are done baking?
Look for set edges that appear cakey and centers that are still slightly jiggly but spring back lightly when touched. Overbaking will dry out the molten center, so it’s better to start checking a minute or two before the recommended bake time.
-
Can I prepare the batter ahead of time?
Absolutely! The batter keeps well in the fridge for up to 3 days in an airtight container. When you’re ready to bake, just bring it to room temperature, stir gently, and bake as usual. It’s a great way to prep for a special event without stress.
Final Thoughts
This Decadent Chocolate Lava Cakes Recipe holds a special place in my heart because it turns an everyday craving into a little celebration. The way the chocolate spills out warm and molten reminds me of cozy nights spent with close friends, laughter, and the kind of sweetness that stays with you. Give this recipe a try, and I promise it’ll quickly become your favorite go-to when you want something decadent, impressive, and downright irresistible. Can’t wait to hear how your first batch turns out!
Print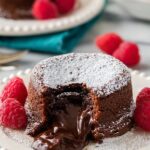
Decadent Chocolate Lava Cakes Recipe
- Prep Time: 20 minutes
- Cook Time: 11 minutes
- Total Time: 31 minutes
- Yield: 4 servings
- Category: Dessert
- Method: Baking
- Cuisine: American
- Diet: Vegetarian
Description
Decadent chocolate lava cakes with a molten center, featuring premium semisweet chocolate and a hint of coffee to enhance the chocolate flavor. These individual cakes are quick to prepare and perfect for serving warm with a dusting of powdered sugar or vanilla ice cream.
Ingredients
Chocolate Mixture
- ½ cup (113 g) unsalted butter cut into 8 pieces
- 6 oz (170 g) premium semisweet or dark chocolate bar coarsely chopped
- ½ teaspoon instant coffee (optional)
- ½ teaspoon vanilla extract (optional)
- ¼ teaspoon salt
Egg Mixture
- 2 large eggs + 2 large egg yolks room temperature
- ⅓ cup (66 g) light brown sugar firmly packed
Dry Ingredients
- ¼ cup (32 g) all purpose flour
Instructions
- Prepare Ramekins: Preheat oven to 450F (235C). Grease the bottom and sides of four 3 ½” diameter ramekins with baking spray or lightly grease and flour. Place them on a baking sheet and set aside.
- Melt Chocolate and Butter: Combine chopped chocolate and butter in a medium microwave-safe bowl. Heat in 20-second increments, stirring well between each until smooth and fully melted.
- Add Flavorings: Stir in instant coffee, vanilla extract, and salt into the melted chocolate mixture until well combined.
- Mix Eggs and Sugar: In a separate bowl, whisk together eggs, egg yolks, and brown sugar vigorously for 15 seconds or until well combined and foamy on top.
- Combine Mixtures: Pour the egg mixture into the chocolate mixture and stir until fully combined.
- Add Flour: Sift flour over the chocolate mixture and gently stir until just incorporated.
- Fill Ramekins: Evenly divide the batter among the prepared ramekins. Place the baking sheet with ramekins into the oven.
- Bake: Bake for 11 minutes if using ramekins. The edges should be set and cakey, centers slightly jiggly and spring back to the touch.
- Cool and Unmold: Let lava cakes cool for 5 minutes. Run a knife around edges to loosen, then carefully invert onto plates using an oven mitt as ramekins will be hot.
- Serve: Serve warm with a dusting of powdered sugar or a scoop of vanilla ice cream. Let them cool slightly if needed as the molten center will be hot.
Notes
- Substitute premium chocolate bars with 1 cup semisweet chocolate chips, though results may be less molten and flavorful.
- Instant coffee enhances the chocolate flavor without making the cakes taste like coffee.
- If ramekins are unavailable, use a 6-count jumbo muffin tin; bake for 7 minutes and yield 6 cakes instead of 4.
- Batter can be made up to 3 days ahead and refrigerated. Bring to room temperature before baking.
- Baked cakes are best served warm. They can be stored up to two days or frozen, but quality decreases when not eaten fresh.
Nutrition
- Serving Size: 1 cake
- Calories: 400 kcal
- Sugar: 30 g
- Sodium: 150 mg
- Fat: 28 g
- Saturated Fat: 17 g
- Unsaturated Fat: 10 g
- Trans Fat: 0 g
- Carbohydrates: 38 g
- Fiber: 3 g
- Protein: 6 g
- Cholesterol: 155 mg


