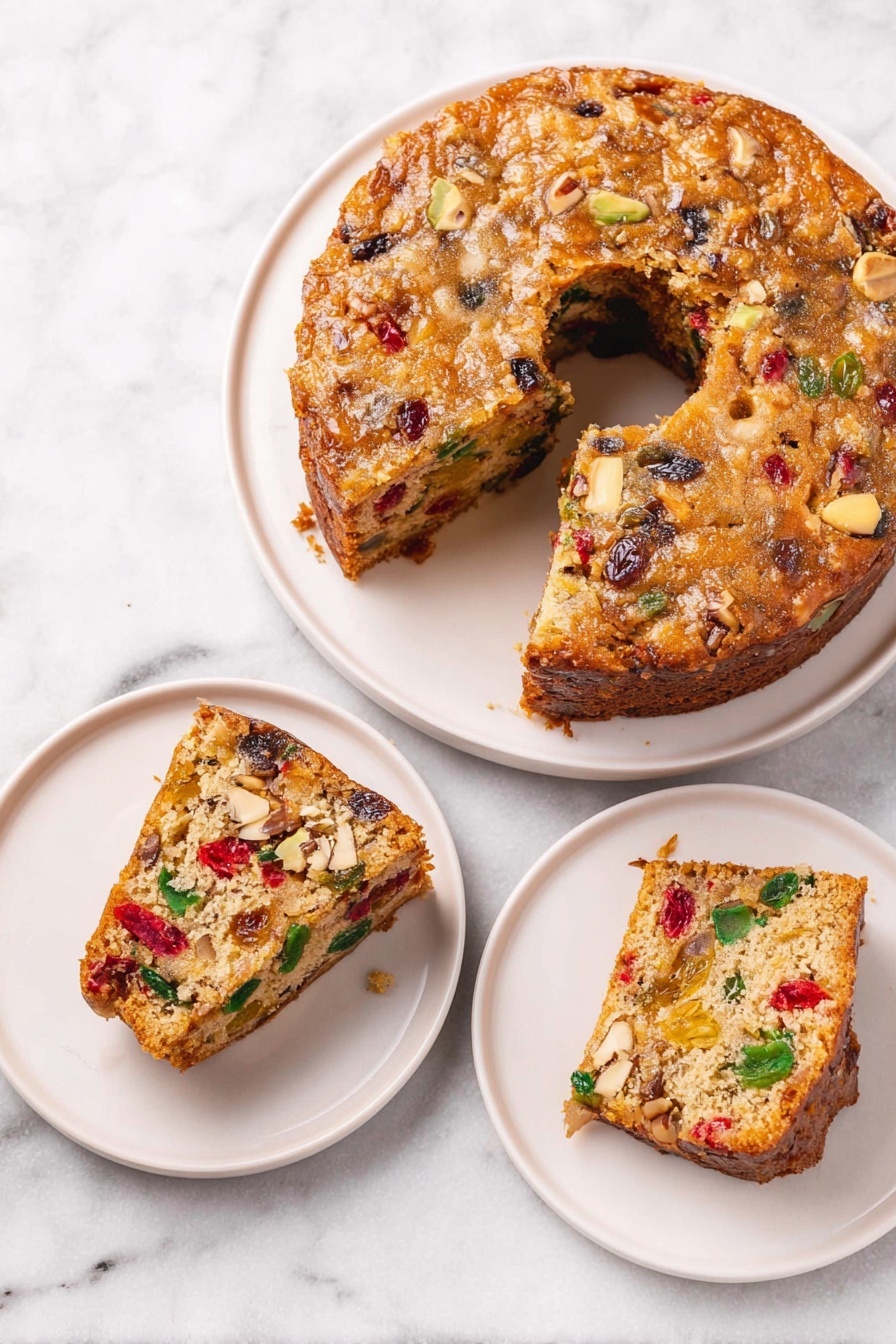
Delicious Candied Fruit Cake Recipe
If you’ve ever wanted to master that classic, flavor-packed holiday staple, you’re in the right place! This Delicious Candied Fruit Cake Recipe is one I’ve perfected over the years, turning out moist, rich, and bursting with colorful chunks of cherries, pineapple, and walnuts. I promise, once you try it, you’ll understand why it’s a fan-freaking-tastic way to impress every guest (or just treat yourself). So let’s dive into how you can make this beautiful cake your new favorite tradition.
Why This Recipe Works
- Perfect Fruit Balance: Using a mix of red and green cherries, plus pineapple, raisins, and walnuts, creates vibrant color and amazing texture contrast.
- Slow, Low Bake: Baking at 300°F for two hours ensures the cake stays moist, tender, and evenly cooked without drying out.
- Room Temperature Eggs: This little detail helps create a smooth batter that traps air for lighter, fluffier texture.
- Simple Yet Robust Flavors: Vanilla and powdered leaveners work quietly to enhance the fruit and nut combo without overpowering the cake.

Ingredients & Why They Work
The magic in a Delicious Candied Fruit Cake Recipe truly comes from the quality and harmony of its ingredients. The mix of candied cherries and pineapple melds sweetness with chewy bursts, while walnuts add a satisfying crunch. Understanding these ingredients helps you pick the right ones for the best outcome.
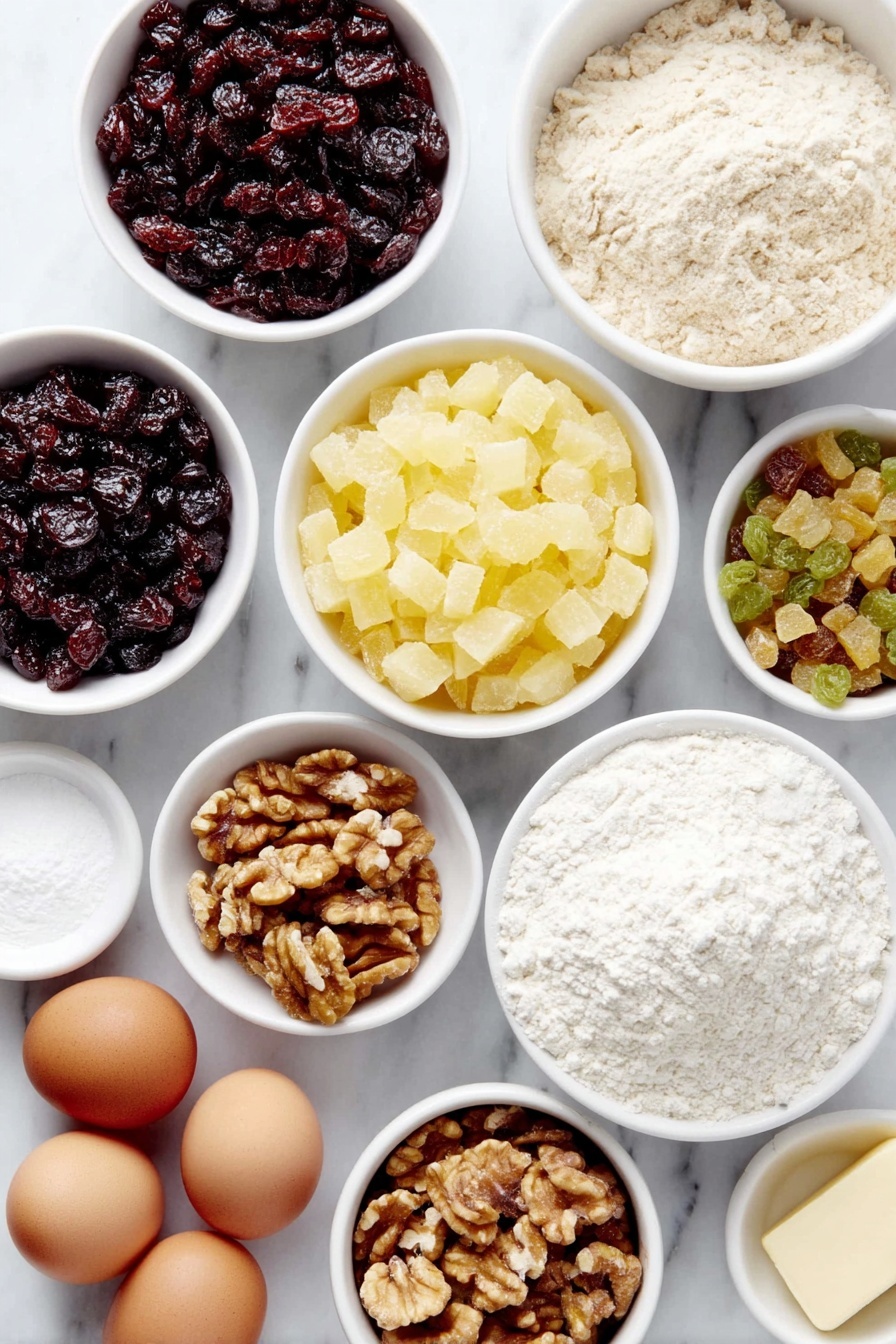
- Candied Red and Green Cherries: Bright, colorful, and sweet – these chunks add festive flavor and stunning look. I always drain them well to avoid sogginess.
- Candied Pineapple: Provides juicy sweetness and a tropical touch that balances out the cherries.
- Golden Raisins: The plump raisins bring an earthy sweetness and chewiness that complements the other fruits perfectly.
- Walnut Halves: Toasted or raw, walnuts add that crunchy texture contrast I love. Toasting deepens the flavor if you have time.
- Shortening: I prefer shortening here for a tender crumb and moist result; butter works too but changes texture slightly.
- Sugar: Classic granulated sugar sweetens without overpowering, balancing the intense fruit flavors.
- Large Eggs (room temperature): They’re key to creating a light, airy batter, so always bring them out early.
- Vanilla Extract: Pure vanilla adds warmth and rounds out the rich flavors of the fruit and nuts.
- All-purpose Flour: Gives the cake structure while keeping it soft.
- Baking Powder: Helps the cake rise gently, which is crucial since the batter is dense with fruits.
- Salt: A pinch enhances all the sweet notes and balances richness.
Tweak to Your Taste
What’s great about this Delicious Candied Fruit Cake Recipe is how easy it is to make it your own. Over time, I’ve shifted the nut types and fruit combos depending on what I have on hand or the season, so feel free to experiment—and I encourage you to do the same.
- Nut Swap: I once replaced walnuts with pecans and loved the richer, buttery depth it added—totally delicious!
- Gluten-Free: Using a gluten-free flour blend works well; just make sure your baking powder is gluten-free too.
- Add Spices: For a festive twist, sprinkle in cinnamon, nutmeg, or allspice—my family adores that warm holiday vibe.
- Alcohol Soak: Some folks soak their dried fruits in brandy or rum overnight before baking—I’ve done it, and it brings out amazing flavor complexity if you’re feeling fancy.
Step-by-Step: How I Make Delicious Candied Fruit Cake Recipe
Step 1: Prep the Fruit and Nuts
Start by tossing together your candied cherries (both red and green), diced candied pineapple, golden raisins, and walnut halves in a large bowl. This way, the fruit and nuts are ready to go before you start the batter. I like to give the candied fruit a quick pat with paper towels to remove any excess syrup—this helps prevent your cake from getting too wet in spots.
Step 2: Cream the Sugar and Shortening
In a separate mixing bowl, beat the shortening and sugar together until it’s light and fluffy—this usually takes about 5 to 7 minutes. Trust me, don’t rush this step! Getting a good cream ensures that your cake texture is tender and airy, even though it’s packed with heavy fruit.
Step 3: Add Eggs and Vanilla
Next, add the eggs one at a time, beating well after each addition. This helps fully incorporate the eggs for a smooth batter. Then pour in the vanilla extract for that warm, inviting aroma that instantly gets you excited about the final result.
Step 4: Combine Dry Ingredients and Mix
In another bowl, whisk together the flour, baking powder, and salt. Slowly add this dry mix into your creamed batter and stir until everything is well combined. The batter will be thick—don’t worry, that’s exactly right! This dense batter supports the fruit so it doesn’t all sink to the bottom of your cake.
Step 5: Fold Fruit and Nut Mixture In
Pour the batter over your fruit and nut mix, then fold gently to coat everything evenly. This step is key since it ensures that every bite has that perfect balance of cake and fruit bursts.
Step 6: Bake Low and Slow
Transfer the entire mixture into a greased and floured 10-inch tube pan (a bundt or angel food pan works well). Bake at 300°F for approximately 2 hours. I always start checking with a toothpick around 1 hour 50 minutes. You want it to come out clean or with just a few moist crumbs—any wet batter means it needs more time.
Step 7: Cool and Store Properly
Once out of the oven, cool the cake in the pan for 10 minutes, then carefully invert onto a wire rack to cool completely. Wrapping it tightly and storing in a cool, dry place is crucial; I usually wrap mine in plastic wrap and a layer of foil to lock in moisture until serving time.
Pro Tips for Making Delicious Candied Fruit Cake Recipe
- Pat Fruits Dry: Removing extra syrup from candied fruits prevents pockets of sogginess in your cake.
- Room Temperature Eggs: Taking your eggs out ahead helps them blend smoothly for a better rise and texture.
- Don’t Rush Baking Time: Low heat and long baking are essential—rushing this results in a denser, less moist cake.
- Use a Serrated Knife: When slicing, this prevents the fruit from pulling out and keeps your cake looking neat.
How to Serve Delicious Candied Fruit Cake Recipe
Garnishes
I like to keep garnishes simple here since the cake is so rich already. A light dusting of powdered sugar adds a pretty snowy effect and a subtle sweet touch. Sometimes, I top slices with a dollop of freshly whipped cream or a smear of cream cheese frosting for extra indulgence—both pair beautifully without overwhelming the cake’s fruity core.
Side Dishes
This fruit cake shines on its own but pairs wonderfully with a hot cup of spiced tea or coffee. For holiday gatherings, I’ve served it alongside a cheese board featuring mild cheeses and nuts, which creates nice savory contrasts. Whipped vanilla yogurt is also a nice light counterpoint if you want something cool and creamy.
Creative Ways to Present
For special occasions, I’ve arranged slices on a rustic wooden platter surrounded by fresh fruits, herbs (like rosemary or mint), and edible flowers. It makes the whole thing feel festive and inviting. You could even serve mini individual portions in decorative paper liners for a charming party dessert table look.
Make Ahead and Storage
Storing Leftovers
This cake stores beautifully wrapped tightly at room temperature for up to two weeks—perfect if you want to make it well ahead of an event. I find storing it slightly cooled but not chilled keeps it moist and tender. If it dries out a bit, a quick brush with a little fruit juice or simple syrup helps revive it.
Freezing
I’ve frozen this candied fruit cake multiple times wrapped securely in plastic wrap and foil, and there’s no noticeable loss in flavor or texture. When you’re ready, thaw it in the fridge overnight, then bring to room temperature before serving to get that soft texture back.
Reheating
If you want to warm a slice, pop it in a low oven (about 275°F) for 10-15 minutes or microwave it very briefly—like 10 seconds—to just take the chill off. Warming it slightly really brings out the sweetness and softens the nuts without drying it, especially if you add a little whipped cream on the side.
FAQs
-
Can I use butter instead of shortening in this Candied Fruit Cake Recipe?
Yes, you can substitute butter for shortening, but the texture might be slightly denser and less tender. Shortening helps achieve a softer crumb here, but butter will add a richer flavor. If you swap, use the same amount and be sure to cream it well with sugar.
-
Do I need to soak the fruits before baking?
This recipe doesn’t require soaking your candied fruits or nuts, as they’re already sweetened and juicy enough. If you’re using dried fruits like raisins or cranberries (instead of candied varieties), soaking in warm juice or alcohol for an hour can improve moisture and flavor.
-
How do I prevent the fruits from sinking to the bottom?
Tossing the fruits and nuts with a bit of flour before mixing them into the batter helps suspend them evenly. This recipe calls for folding the batter over the fruit mixture, which also keeps everything well distributed and avoids sinking.
-
Can I bake this cake in a different pan?
Definitely! A 10-inch bundt or tube pan works best for even baking, but you can use a loaf pan or even a square casserole dish. Just adjust baking time accordingly—expect longer baking for thicker pans and keep an eye on doneness by testing with a toothpick.
-
How long will this cake keep fresh?
When wrapped tightly and stored in a cool, dry place, this delicious candied fruit cake stays moist and flavorful for up to two weeks. Refrigeration isn’t necessary but can extend life by a few extra days if wrapped well.
Final Thoughts
This Delicious Candied Fruit Cake Recipe is one of those comforting, timeless desserts that really brings people together. It’s rich with tradition, layered flavors, and textures that make every bite an experience. Whether you’re baking it for the holidays or a special occasion, I hope you enjoy the process as much as the final slice—trust me, sharing this cake sparks stories, smiles, and happy memories. Now, grab your mixing bowl and go make a cake that you’ll be proud to serve at the next get-together!
Print
Delicious Candied Fruit Cake Recipe
- Prep Time: 20 minutes
- Cook Time: 2 hours
- Total Time: 2 hours 20 minutes
- Yield: 16 servings
- Category: Dessert
- Method: Baking
- Cuisine: American
Description
This classic Fruit Cake is a dense and flavorful holiday treat packed with a colorful variety of candied fruits and walnuts, baked to perfection in a tube pan. The rich texture and warm vanilla-scented batter make it a festive dessert that can be stored and enjoyed over time.
Ingredients
Fruits and Nuts
- 1-1/2 cups whole red candied cherries
- 1-1/2 cups whole green candied cherries
- 3 cups diced candied pineapple
- 10 ounces golden raisins
- 1 pound walnut halves
Batter
- 1 cup shortening
- 1 cup sugar
- 5 large eggs, room temperature
- 4 tablespoons vanilla extract
- 3 cups all-purpose flour
- 3 teaspoons baking powder
- 1 teaspoon salt
Instructions
- Preheat Oven: Preheat your oven to 300 degrees Fahrenheit to ensure an even low temperature for slow baking.
- Combine Fruits and Nuts: In a large mixing bowl, combine the red and green candied cherries, diced candied pineapple, golden raisins, and walnut halves. Set aside.
- Cream Shortening and Sugar: In another large bowl, use an electric mixer to cream together the shortening and sugar until the mixture is light and fluffy, about 5 to 7 minutes.
- Add Eggs and Vanilla: Beat in the eggs one at a time, making sure each egg is fully incorporated before adding the next. Then mix in the vanilla extract.
- Mix Dry Ingredients: In a separate bowl, whisk together the all-purpose flour, baking powder, and salt to ensure even distribution of leavening.
- Combine Batter and Dry Mix: Gradually add the dry ingredients to the creamed mixture and mix well until fully combined.
- Coat Fruit Mixture: Pour the batter over the combined fruit and nut mixture, stirring carefully to coat all the fruits evenly with the batter.
- Prepare Pan: Grease and flour a 10-inch tube pan to prevent sticking.
- Transfer and Bake: Transfer the fruit batter into the prepared tube pan and spread evenly. Bake in the preheated oven for about 2 hours, or until a toothpick inserted into the center comes out clean.
- Cool the Cake: Remove the cake from the oven and let it cool in the pan for 10 minutes. Then remove it from the pan and place on a wire rack to cool completely.
- Store and Serve: Wrap the cooled fruit cake tightly and store in a cool place. Bring to room temperature before slicing with a serrated knife for serving.
Notes
- Allow the cake to rest wrapped for several days for the flavors to meld and intensify.
- Use room temperature eggs to help the batter emulsify better and improve texture.
- Make sure to coat fruits well to avoid them sinking to the bottom during baking.
- If walnut halves are not preferred, substitute with pecans or almonds for a different nutty flavor.
- Use a serrated knife when slicing to prevent crumbling due to the cake’s dense texture.
- Store wrapped fruit cake in a cool, dry place; it can be refrigerated for longer shelf life.
Nutrition
- Serving Size: 1 slice (approx. 100g)
- Calories: 350 kcal
- Sugar: 30 g
- Sodium: 200 mg
- Fat: 18 g
- Saturated Fat: 5 g
- Unsaturated Fat: 12 g
- Trans Fat: 0 g
- Carbohydrates: 45 g
- Fiber: 3 g
- Protein: 5 g
- Cholesterol: 85 mg


