Garlic Parmesan Dinner Rolls Recipe
If you’re craving soft, buttery, and absolutely irresistible bread rolls, then you’re in for a treat. This Garlic Parmesan Dinner Rolls Recipe is one of those gems that I love making whenever I want my kitchen to smell like heaven—and trust me, these rolls vanish faster than you can say “pass me another!” Whether you’re gearing up for a family dinner or just want a cozy snack, these rolls hit all the right notes with that perfect garlicky punch and cheesy goodness. Stick with me because I’m sharing all my little secrets to nail these every single time.
Why This Recipe Works
- Quick Yeast Proofing: The warm water gently wakes the yeast up to rise perfectly fast without any bitterness.
- Fluffy Texture: Minimal kneading paired with a quick rise keeps the rolls soft but resilient enough to hold their shape.
- Flavor Burst: Butter, garlic, parmesan, and parsley make each bite just bursting with savory goodness.
- Ease & Flexibility: This recipe is straightforward enough for beginners but easily customizable for different tastes or dietary tweaks.

Ingredients & Why They Work
Each ingredient in this Garlic Parmesan Dinner Rolls Recipe has a job to do, whether that’s activating the yeast, giving moisture, or layering those rich flavors you’ll love. I’ve learned through trial and error that these little choices can make a huge difference in getting that soft, cheesy, garlicky bite you crave.

- Warm water: Warming it just right (between 95-105°F) helps activate the yeast without killing it, essential for a good rise.
- Granulated sugar: Feeds the yeast to get those fluffy, light rolls with a hint of sweetness.
- Yeast (instant or platinum): I prefer instant yeast for its reliability and no-fuss mixing—platinum is equally great if that’s what you have.
- Canola oil: Adds moisture without heaviness, keeping rolls soft but not greasy.
- Salt: Balances sweetness and enhances all the flavors.
- Large egg: Gives structure and helps bind everything together.
- All-purpose flour: The base that holds the dough; adds chew without toughness.
- Melted butter: Both in the dough brush and for the topping, butter is where the magic of richness starts.
- Granulated garlic: Delivers that bold garlicky punch we all want without overpowering.
- Parmesan cheese: Sharp, savory, and nutty—melts beautifully for a golden crust.
- Parsley: Fresh and bright, a simple herb that perks up the flavor and makes everything look pretty.
Tweak to Your Taste
I’m all about making the recipe your own—these rolls are perfectly adaptable, so I encourage you to play around with additions or swaps to fit your favorite flavors or dietary needs. Sometimes, those little tweaks become the versions you end up loving most!
- Milk instead of water: A fellow reader swapped water for milk plus Greek yogurt in place of the egg, resulting in an even softer, richer roll—definitely worth a try if you want a creamier texture.
- Add fresh herbs: Rosemary or thyme can add a fresh twist if you want to mix up the flavor profile.
- Cheese swaps: Try shredded mozzarella or a sharp cheddar as alternatives to parmesan for a different cheesy vibe.
- Garlic intensity: If you’re a garlic lover like me, feel free to add a bit more granulated garlic or even some roasted garlic on top for a deeper flavor.
Step-by-Step: How I Make Garlic Parmesan Dinner Rolls Recipe
Step 1: Proof the Yeast for That Perfect Rise
Start by warming your water to a cozy 95-105°F. This temp wakes the yeast up gently without killing it. Stir the granulated sugar into the warm water, then sprinkle your yeast on top. Let it sit for about 2 to 5 minutes until it gets bubbly and foamy on top. This tells you the yeast is alive and ready to work its magic.
Step 2: Mix Dough and Let It Do Its Thing
Once your yeast is bubbly, add canola oil, salt, beaten egg, and the flour into the bowl. Mix until a sticky dough forms. If it’s too wet to handle easily, sprinkle a bit more flour, but be careful not to add too much or you’ll get dense rolls.
I usually mix this in a stand mixer, and find that’s enough to develop the gluten needed, but if you’re working by hand, give it about 5 minutes of kneading on a lightly floured surface to get that nice stretchy texture. The dough should be soft and slightly tacky.
Step 3: Shape, Rise, and Prep for Baking
Divide the dough into 16 equal portions. I like to weigh mine for even baking, but eyeballing works if you don’t want the fuss. Roll each piece into a smooth ball, then place them spaced just enough on your lined baking sheet.
Set your rolls somewhere warm—my fireplace hearth works beautifully—and let them rise for about 5-10 minutes, just until they puff up a bit. This step helps make them tender and light.
Step 4: Butter and Flavor Bomb
Brush the rising rolls with melted butter, then sprinkle generously with the granulated garlic, parmesan cheese, and parsley. This combo is what sets these dinner rolls apart from just plain bread. The butter helps the toppings stick and makes the edges crisp up just right.
Step 5: Bake Until Golden and Irresistible
Pop the rolls into a 375ºF oven and bake for about 18-20 minutes until golden brown on top. Keep an eye near the 18-minute mark because ovens can vary—beautiful golden color with a hint of crisp cheese is your target.
Right when they come out, I brush them again with a little extra melted butter to amp up that mouthwatering glossy finish and softness. Serve warm for the absolute best experience.
Pro Tips for Making Garlic Parmesan Dinner Rolls Recipe
- Perfect Water Temperature: I learned the hard way that hotter water kills yeast—stick between 95-105°F for consistent rising success.
- Don’t Overknead: Minimal kneading keeps the rolls soft and tender, but if you’re in a dry climate, a little extra kneading helps develop gluten for fluffiness.
- Use Fresh Parmesan: Freshly grated parmesan melts better and tastes sharper than pre-grated, elevating those rolls from good to amazing.
- Warm Rising Spot: Turning on the fireplace or oven light creates a cozy spot that speeds up the dough rise.
How to Serve Garlic Parmesan Dinner Rolls Recipe

Garnishes
When serving, I love a quick sprinkle of extra fresh parsley or a light dusting of more parmesan to bring back that fresh, savory hit. Sometimes, I add a tiny brush of extra garlic butter right before serving for guests who want their garlic fix turned up a notch.
Side Dishes
These rolls pair wonderfully with tomato-based soups like a rich marinara or creamy tomato bisque. They’re also fantastic alongside roasted chicken, pasta dinners, or even a cheesy lasagna. Honestly, anytime you want some friendly carbs to scoop up sauces or just enjoy as a side, these rolls shine.
Creative Ways to Present
For special occasions, I arrange the garlic parmesan dinner rolls in a circular wreath on a big platter and tuck sprigs of fresh herbs and some roasted garlic cloves throughout for that wow factor. You can also pull them slightly apart into “pull-apart” pieces—sharing rolls just got way more interactive and fun!
Make Ahead and Storage
Storing Leftovers
When I have leftovers (which is rare!), I let the rolls cool completely, then store them in an airtight container or resealable bag on the counter for up to 2 days. This keeps them soft but you will notice a slight loss in that fresh-baked texture after a day or so.
Freezing
These rolls freeze beautifully! I freeze mine individually wrapped in foil, then place them in a freezer-safe bag. When I want some, I just let them thaw overnight in the fridge or at room temp for a few hours. This way, you can always have a stash of warm garlic parmesan goodness ready to go.
Reheating
To get that fresh-baked softness back, I pop the rolls in a 350°F oven wrapped loosely in foil for 10-12 minutes. If you want the crust crisp again, unwrap them for the last 2-3 minutes of baking. Microwave works in a pinch but can make them a bit chewy.
FAQs
-
Can I use milk instead of water in the Garlic Parmesan Dinner Rolls Recipe?
Absolutely! Substituting warm milk for water can give your rolls a richer flavor and softer texture. In fact, one reader swapped the water for milk and replaced the egg with Greek yogurt and got deliciously tender rolls. Just be sure to keep the milk warm (not hot!) to activate the yeast properly.
-
Do I have to knead the dough for this recipe?
This recipe calls for minimal kneading since the stand mixer usually does the job, and the rolls rise quickly. However, if you’re mixing by hand or live in a dry climate, kneading on a lightly floured surface for about 5 minutes helps develop the gluten, resulting in fluffier bread.
-
How long should I let the rolls rise before baking?
For this recipe, a quick rise of 5-10 minutes after shaping the rolls is enough—they’ll puff slightly and become tender. A longer rise can make them fluffier but isn’t necessary here because of the instant yeast and warm rising spot.
-
Can I make the dough ahead of time?
You can prepare the dough ahead and refrigerate it overnight to slow the rise, which will deepen the flavor. Just bring it back to room temperature before shaping into rolls, then proceed with rising and baking as usual.
-
What’s the best way to reheat leftover rolls?
Reheat rolls wrapped loosely in foil in a 350°F oven for 10-12 minutes. To refresh the crust’s crispness, unwrap them for the last few minutes. This keeps them almost as good as fresh!
Final Thoughts
These Garlic Parmesan Dinner Rolls have become a little tradition in my house because they’re quick, flavorful, and just downright comforting. There’s something so satisfying about pulling warm, garlicky rolls fresh from the oven, sharing them with friends or family. If you’ve been holding back on baking bread because it seems intimidating, this recipe is a perfect place to start—it’s forgiving, fast, and will make your kitchen smell incredible. Give it a go and watch these rolls become your new favorite side!
Print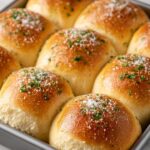
Garlic Parmesan Dinner Rolls Recipe
- Prep Time: 10 minutes
- Cook Time: 20 minutes
- Total Time: 30 minutes
- Yield: 16 rolls
- Category: Bread
- Method: Baking
- Cuisine: American
- Diet: Vegetarian
Description
Delicious and fluffy 30-minute garlic parmesan dinner rolls featuring a soft, buttery texture with a perfect blend of garlic, parmesan cheese, and parsley for a flavorful finish. Perfectly quick to prepare and bake, these rolls are ideal for any dinner table.
Ingredients
Dough
- 1¼ cups warm water (95-105 degrees)
- ¼ cup granulated sugar
- 2 Tbsp. yeast (instant or platinum)
- ⅓ cup canola oil
- 1 tsp. salt
- 1 large egg
- 3½ cups all-purpose flour
Topping
- 4 tbsp melted butter
- 2 tbsp granulated garlic
- ¼ cup parmesan cheese (shredded or grated)
- 2 tsp parsley
Instructions
- Prepare Baking Sheet: Line a baking sheet with parchment paper or a non-stick liner and set it aside.
- Proof Yeast: In a large bowl, combine the yeast with warm water and sugar. Allow the mixture to proof for about 2-5 minutes until it becomes foamy.
- Mix Dough: Add the canola oil, salt, egg, and flour to the yeast mixture. Mix until the dough is combined, adding a little more flour if the dough is too sticky.
- Shape Rolls: Divide the dough into 16 equal-sized pieces and shape each into a roll. If needed, knead lightly on a floured surface to develop gluten for fluffier rolls.
- Rise: Place the rolls on the prepared baking sheet and let them rise in a warm spot for about 5-10 minutes, such as near a fireplace or a warm oven environment.
- Add Toppings: Brush the risen rolls with melted butter, then sprinkle granulated garlic, parmesan cheese, and parsley evenly over them.
- Preheat Oven: Preheat your oven to 375ºF (190ºC).
- Bake: Bake the rolls for 20 minutes or until golden brown and cooked through.
- Finish: Spread additional melted butter on the rolls before serving for a rich, flavorful finish.
Notes
- For a dairy variation, replace the water with milk and the egg with a heaping tablespoon of fat-free Greek yogurt for equally good results.
- While this dough requires minimal kneading, kneading for about 5 minutes on a lightly floured surface can help create a fluffier texture by developing gluten.
- Maintain the ideal yeast proofing temperature between 95-105 degrees Fahrenheit to avoid killing the yeast and ensure proper rising.
- If using a stand mixer, mixing alone may suffice to develop gluten, but adjustments might be needed based on your local climate or elevation.
- For a better idea of shaping and preparation, consider watching video tutorials for similar dinner rolls.
Nutrition
- Serving Size: 1 roll
- Calories: 180 kcal
- Sugar: 3 g
- Sodium: 220 mg
- Fat: 7 g
- Saturated Fat: 2 g
- Unsaturated Fat: 4 g
- Trans Fat: 0 g
- Carbohydrates: 25 g
- Fiber: 1 g
- Protein: 4 g
- Cholesterol: 25 mg

