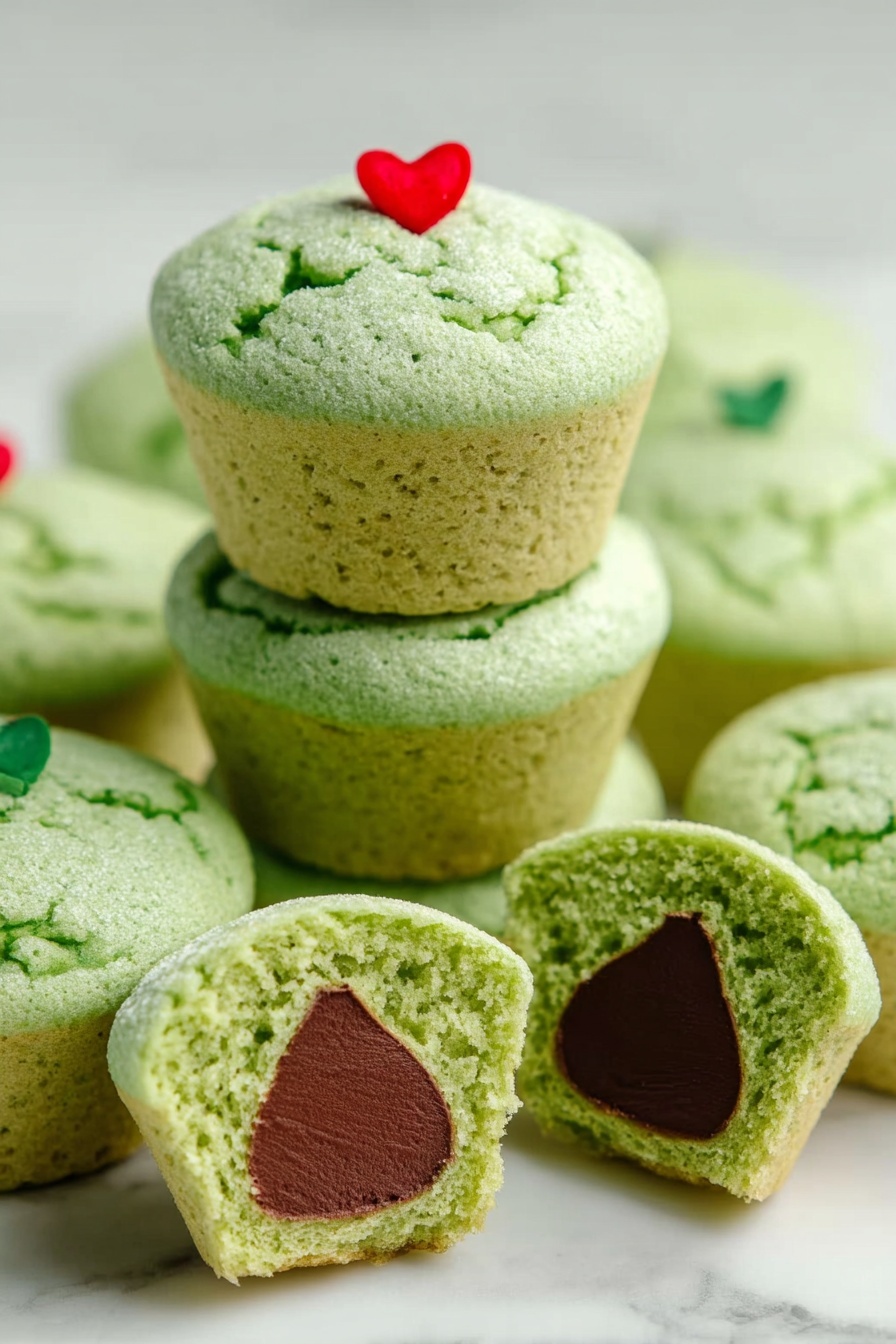
Grinch Cookie Cups with Hershey’s Kisses Recipe
If you’re looking for a festive, fun holiday treat that’s bursting with chocolatey goodness and a pop of cheerful green, then you’re going to love this Grinch Cookie Cups with Hershey’s Kisses Recipe. It’s one of those recipes I’ve come back to year after year because it’s not only delicious but also super easy to whip up. Plus, the surprise Hershey’s Kiss tucked inside makes every bite feel like a little present to yourself. Trust me, once you try these, you’ll want to make them every holiday season!
Why This Recipe Works
- Perfectly Soft and Thick Dough: The combination of sugar cookie mix and extra flour creates a dough that bakes up tender but holds its shape around the Hershey’s Kiss.
- Even Green Color: Mixing the green gel food coloring directly with the egg ensures the color spreads evenly, giving these their iconic Grinch-green hue.
- Surprise Center: Baking the cookie dough right around the Hershey’s Kiss keeps the chocolate intact and melts it to a perfect gooey center.
- Festive Touch: The heart candy sprinkles add a sweet, whimsical finish that really bring the Grinch theme to life.

Ingredients & Why They Work
Every ingredient here plays its part in making these Grinch Cookie Cups a holiday hit. Using a sugar cookie mix saves you time and guarantees a reliable dough texture, while adding a bit of all-purpose flour gives the dough a sturdier consistency ideal for shaping around the Hershey’s Kisses.
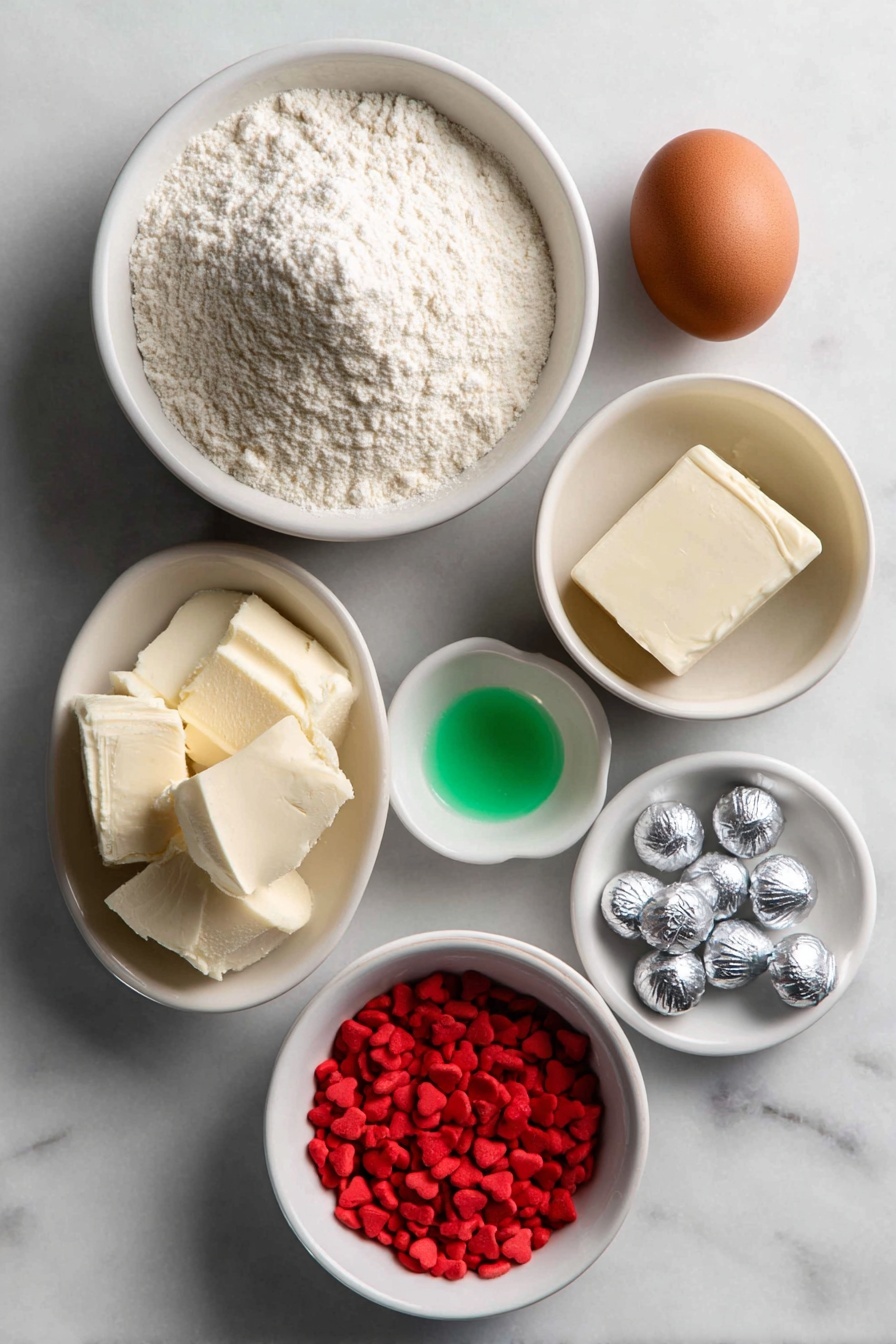
- Sugar Cookie Mix: The base for your dough, it keeps things simple and consistent—perfect for quick prep.
- All-Purpose Flour: Added for extra structure so your cookie cups don’t spread too thin while baking.
- Large Egg: When combined with green gel food coloring, it evenly distributes the color throughout the dough.
- Unsalted Butter: At room temperature, it blends well into the dough, giving your cookies that rich, buttery flavor.
- Green Gel Food Coloring: Use gel for vibrant, vivid green without watering down the dough.
- Hershey’s Kisses (unwrapped): The secret inside—a melty, chocolatey surprise you won’t want to miss.
- Heart Candy Sprinkles: A cute festive embellishment that finishes off your cookie cups with a pop of color.
Tweak to Your Taste
I love that this Grinch Cookie Cups with Hershey’s Kisses Recipe is a perfect canvas for your creativity. Whether you want to make the green color pop even more, swap out the candy, or play with textures, it’s easy to adapt. Let me share some of my favorite tweaks you might enjoy.
- Mint Twist: I once added a drop of peppermint extract to the dough for an extra holiday zing—totally elevated the cookies!
- Different Chocolate: Try using different Hershey’s Kiss varieties like dark chocolate or caramel-filled for a fun surprise.
- Gluten-Free Option: I swapped in a gluten-free sugar cookie mix once and it worked beautifully—just watch the baking time closely.
- Extra Color: Add a little lime zest to brighten up the flavor and add a little textural interest.
Step-by-Step: How I Make Grinch Cookie Cups with Hershey’s Kisses Recipe
Step 1: Prep and Color Your Egg Mixture
First things first, preheat your oven to 375°F and lightly grease a mini muffin pan or line it with mini paper liners. Now, here’s a little trick I learned: whisk the green gel food coloring right into your beaten egg. This way, the green is evenly distributed, avoiding those patchy spots in your dough. It worked like a charm every time I made these!
Step 2: Mix Your Dough Until Perfectly Thick
Grab a large bowl and use a handheld mixer on low speed to blend the sugar cookie mix, all-purpose flour, softened butter, and your vibrant green egg mixture. Mix it for about 2 to 3 minutes until it comes together into a thick dough. It’ll feel dense, which is exactly how it should be so your cookies hold their shape when baking.
Step 3: Shape Around the Hershey’s Kisses
Here’s the fun part! Using a 1½ tablespoon scoop, scoop dough balls and flatten each into about a 3-inch round disc in your hand. Place a Hershey’s Kiss right in the center, keeping it upright (this is key to keeping the chocolate intact). Gently pull the dough up and around the chocolate, sealing it into a smooth ball. Place each ball in your prepared mini muffin pan with the Hershey’s Kiss standing straight up.
Step 4: Bake Until Just No Longer Raw
Bake the cookie cups for 10 to 12 minutes. Keep a close eye here—the cookie edges shouldn’t brown; you want the centers fully set but still soft. Overbaking will dry them out, and you want that tender chewiness that melts in your mouth. Once out of the oven, top each cookie cup with a heart candy sprinkle, offset slightly to the right of center for that cute Grinchy touch.
Step 5: Cool and Enjoy!
Let the cookie cups cool in the tin for at least 10 minutes—that helps them firm up so you can remove them without any breakage. Then transfer them to a wire rack to cool completely. I love sneaking a warm one right out of the oven sometimes but giving them that proper cool ensures the perfect texture and presentation.
Pro Tips for Making Grinch Cookie Cups with Hershey’s Kisses Recipe
- Use Room Temperature Butter: Soft butter blends more evenly and leads to smoother dough that’s easier to handle.
- Keep Hershey’s Kisses Upright: I learned this the hard way—laying them sideways causes the chocolate to melt unevenly and leak out.
- Do Not Overbake: Watch the clocks closely; even a minute or two too long can change the texture drastically.
- Offset Heart Sprinkles: Adding the heart candy slightly off-center makes the cookies look whimsical and more like the Grinch’s quirky style.
How to Serve Grinch Cookie Cups with Hershey’s Kisses Recipe
Garnishes
I usually keep garnishes simple because these cookie cups are already so festive. The heart candy sprinkles are perfect, but sometimes I add a tiny dusting of edible shimmer or a few green sugar crystals before baking for a little sparkle. If I’m feeling fancy, a small drizzle of white chocolate after they’ve cooled adds a neat contrast and extra sweetness.
Side Dishes
These Grinch Cookie Cups pair wonderfully with a warm cup of cocoa or peppermint hot chocolate. If you’re hosting a holiday party, serve them alongside a cheese platter or fresh fruit for a balanced spread. They also make a fun sweet ending to a holiday dinner without competing with heavier desserts.
Creative Ways to Present
For holiday gatherings, I like arranging these cookie cups on a tiered dessert tray surrounded by mini candy canes and pine sprigs for a festive vibe. Wrapping a small stack with clear cello and a red ribbon also makes a charming edible gift. I’ve even seen folks add tiny “Grinch” tags or use green cupcake liners to really play up the theme—it’s such a crowd-pleaser!
Make Ahead and Storage
Storing Leftovers
If you have leftovers (and trust me, that’s rare!), store them in an airtight container at room temperature. They stay fresh and chewy for about 3 to 4 days—just make sure they don’t get squished. I often layer parchment paper between the cookies to keep them pristine.
Freezing
I’ve frozen unbaked cookie balls wrapped tightly in plastic wrap and then in a freezer-safe bag for up to 3 months. When I’m ready, I let them thaw slightly, then bake as usual. You can also freeze baked cookie cups in a single layer on a baking sheet before transferring them to a container to avoid them sticking together.
Reheating
To revive leftovers, I pop a cookie cup in the microwave for about 10 seconds to soften the chocolate center. If reheating multiple, warming in a low oven (around 300°F) for 5 minutes works nicely and avoids drying them out. Just be sure to watch closely!
FAQs
-
Can I use homemade sugar cookie dough instead of a mix?
Absolutely! If you use your own sugar cookie recipe, just make sure it’s on the thicker side so it can hold the shape around the Hershey’s Kiss. You might need to add a bit more flour if the dough feels very soft.
-
What’s the best way to keep the Hershey’s Kiss upright during baking?
When placing the dough balls in the mini muffin pan, gently press the Hershey’s Kiss down just enough so it’s stabilized upright, but not buried too deep. Using a mini muffin pan really helps the dough hug the chocolate and keep it vertical.
-
Can I make these without green food coloring?
Yes, though the classic Grinch look relies on that vibrant green. If you prefer, you could dye the dough a different festive color or leave it natural—these cookies still taste delicious either way!
-
Why do you add extra flour to the sugar cookie mix?
Adding all-purpose flour helps the dough hold its shape better in the mini muffin tin, preventing it from spreading too thin and ensuring that the cookie cups keep that tall, cup-like form around the Hershey’s Kiss.
Final Thoughts
This Grinch Cookie Cups with Hershey’s Kisses Recipe holds a special place in my heart because it’s both playful and effortlessly satisfying. Whether you’re baking with kids, making holiday treats for friends, or just want a quirky twist on classic cookies, this recipe delivers. Once you make them, you’ll understand why these little green cups of joy vanish so quickly from the cookie tray. I hope you have as much fun making (and eating!) them as I always do—happy baking!
Print
Grinch Cookie Cups with Hershey’s Kisses Recipe
- Prep Time: 5 minutes
- Cook Time: 12 minutes
- Total Time: 17 minutes
- Yield: 18 servings
- Category: Dessert
- Method: Baking
- Cuisine: American
- Diet: Vegetarian
Description
Delightfully festive Grinch Cookies feature green-tinted sugar cookie dough wrapped around a Hershey’s Kiss, baked into mini muffin tins and topped with heart candy sprinkles for a fun holiday treat.
Ingredients
Main Ingredients
- 18 Hershey’s kisses, unwrapped
- 17.5 ounces sugar cookie mix
- ¼ cup all-purpose flour
- 1 large egg
- ½ cup unsalted butter, room temperature
- ¾ teaspoon green gel food coloring
- 18 large heart candy sprinkles
Instructions
- Preheat Oven: Preheat your oven to 375°F. Lightly spray a mini muffin pan with baker’s spray or line it with paper cups, then set aside.
- Mix Egg and Food Coloring: In a small bowl, whisk together the egg and green gel food coloring thoroughly until well combined.
- Combine Dough Ingredients: In a large mixing bowl, use a handheld mixer on low speed to blend the sugar cookie mix, all-purpose flour, unsalted butter, and egg mixture for 2 to 3 minutes until the dough is very thick and thoroughly combined.
- Form Cookie Dough Balls: Using a 1½ tablespoon cookie scoop, scoop a ball of dough and flatten it into a 3-inch disc in your hand. Place a Hershey’s Kiss in the center and carefully pull the dough sides up to cover the candy, forming a ball. Keep the Hershey’s Kiss candy upright.
- Arrange and Bake: Place each dough ball into the prepared mini muffin tin, ensuring the Hershey’s Kiss stays upright. Bake for 12 minutes until cookies are baked through but not browned.
- Add Sprinkles and Cool: When removed from the oven, immediately place one heart candy sprinkle offset to the right from the center on each cookie cup. Let them cool in the pan for at least 10 minutes before transferring to a wire rack to cool completely.
Notes
- Whisking the food coloring with the egg ensures even distribution of the green color in the dough.
- Keeping the Hershey’s Kiss upright while baking prevents the candy from melting unevenly and helps maintain the festive shape.
- Do not overbake to avoid browning; aim for just cooked centers.
- Use room temperature butter for easier mixing and better dough consistency.
Nutrition
- Serving Size: 1 cookie
- Calories: 150 kcal
- Sugar: 12 g
- Sodium: 90 mg
- Fat: 8 g
- Saturated Fat: 5 g
- Unsaturated Fat: 2 g
- Trans Fat: 0 g
- Carbohydrates: 18 g
- Fiber: 0.5 g
- Protein: 1 g
- Cholesterol: 20 mg

