Halloween Brownies Recipe
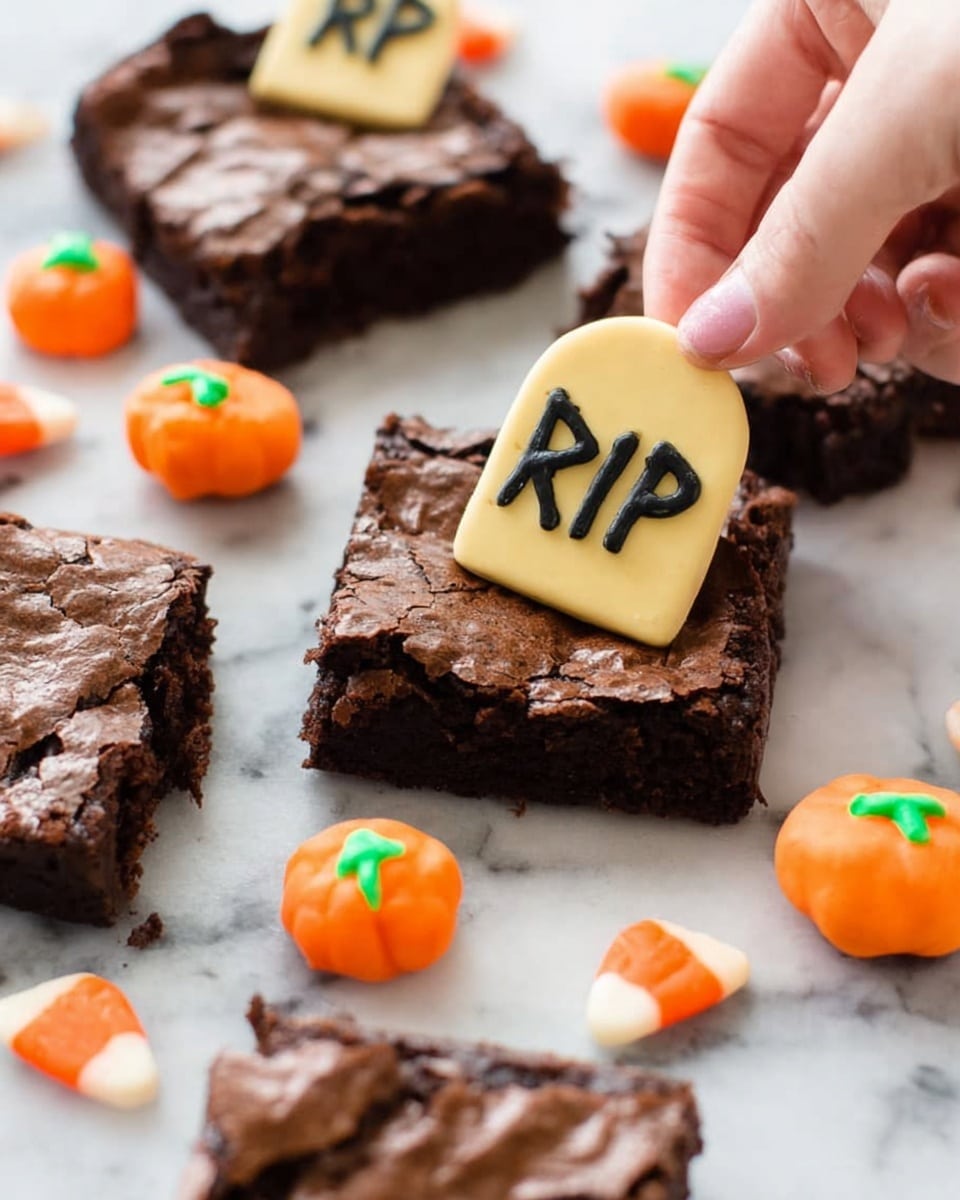
If you’re looking to bring a little spooky fun to your Halloween celebrations, you’ve got to try this Halloween Brownies Recipe. These aren’t just any brownies—they’re festively decorated with cookie “headstones,” candy pumpkins, and a touch of green buttercream frosting that looks like eerie grass. Trust me, once you dive into making these, you’ll want to whip them up every October. They’re not only super cute but also ridiculously delicious and perfect for sharing.
Why This Recipe Works
- Simple Yet Stunning: Minimal ingredients come together to create a fun, eye-catching dessert.
- Perfect Texture: The brownies stay moist but firm enough to hold the cookie “headstones” without crumbling.
- Easily Customizable: You can adjust frosting color or candy toppers to match your Halloween vibe.
- Kid-Friendly and Crowd-Pleasing: These brownies are super fun for parties and simple enough for bakers of all levels.

Ingredients & Why They Work
Every ingredient in this Halloween Brownies Recipe plays a role. From the fudgy brownie base to the Milano cookie “headstones,” these components combine textures and flavors that balance sweet, chocolatey, and festive. I always recommend using quality brownies—either homemade or a trusted box mix—to make sure your base is as delicious as the decorations.
- Prepared brownie batter for an 8” pan: A rich, chocolatey base is key; homemade or your favorite boxed mix works fine.
- Milano cookies: Firm enough to stand as “headstones,” plus they add a delightful crunch and flavor contrast.
- Black decorating gel: Perfect for writing spooky “RIP” messages on cookies; easy to find near birthday supplies.
- Candy pumpkins: Tiny, colorful pumpkins add that classic Halloween charm and a pop of sweetness.
- Powdered sugar: For silky, smooth frosting that’s not too sweet, providing the right amount of “grass” texture.
- Butter (salted or unsalted): Adds creaminess and richness to the frosting.
- Milk: Adjusts frosting consistency—in case you want it thicker or more spreadable.
- Green food coloring: Just a few drops bring that perfect eerie grass look to life.
Tweak to Your Taste
I love to personalize this Halloween Brownies Recipe depending on who’s eating! Sometimes I swap candy pumpkins for gummy worms for a creepier effect, or I add a drop of orange food coloring to the frosting instead. It’s fun and totally fine to make the recipe your own.
- Variation: One Halloween, I added mini marshmallows and used a white chocolate drizzle on top, which was a big hit with the kids.
- Dietary tweaks: Use dairy-free butter and milk substitutes to make the frosting vegan-friendly.
- Flavor shifts: Stir a pinch of cinnamon or pumpkin pie spice into the brownie batter for an autumn twist.
Step-by-Step: How I Make Halloween Brownies Recipe
Step 1: Prepare and Bake Your Brownies Right
First things first, line your 8-inch pan with parchment paper, leaving a nice overhang. This trick is a game-changer because once your brownies are baked and cooled, you’ll just lift them out with the paper, no messy scraping required. Pour your brownie batter in, smooth it evenly, and bake following the recipe instructions or package directions. Patience is key here — wait until they’re completely cooled before moving on, or you’ll end up with ruined frosting and cookies sliding off.
Step 2: Frost the “Grass” Like a Pro
Mix your powdered sugar, softened butter, and milk for about 2 minutes until fluffy and smooth. I always check the thickness at this point — if it’s too runny, add powdered sugar; if too stiff, a splash more milk. Then add just a few drops of green food coloring to get that spooky grass shade. This frosting’s consistency will make it easy to dollop near the cookie “headstones” later without dripping everywhere.
Step 3: Make Your Ghostly “Headstones”
Grab those Milano cookies and take your black decorating gel. Carefully write “R-I-P” on each cookie. If you want to get fancy like I sometimes do, trim the bottom edge slightly to create shorter headstones — it adds a subtle “gravestone” dimension. Don’t worry about being perfect; these little imperfections give them character!
Step 4: Assemble Your Spooky Brownie Graveyard
Once your brownies are cooled and cut into rectangles (I go for 12 pieces, 4 by 3), gently press a decorated Milano cookie into the top of each brownie piece, standing it upright like a headstone. Then spoon a little green buttercream “grass” around the base of each cookie and top that with a candy pumpkin. I like to place the pumpkins right on the frosting so they stick nicely, adding just the right pop of color and whimsy to the scene.
Pro Tips for Making Halloween Brownies Recipe
- Use parchment paper overhang: Lifting your brownies out is way easier and cleaner, especially when decorating.
- Cool brownies completely: Decorating too soon will cause frosting to melt or cookies to slide.
- Adjust frosting consistency thoughtfully: This ensures it sticks without dripping or looking flat.
- Be gentle when inserting cookies: Pressing too hard can crack brownies, so treat them like fragile little ghosts.
How to Serve Halloween Brownies Recipe
Garnishes
I love topping the brownies with a few extra candy pumpkins or edible glitter for a magical touch. Sometimes I even add a sprinkle of crushed Oreo “dirt” around each cookie for a little extra texture and that classic cemetery vibe. If you want to be really extra, a few candy eyeballs scattered on the plate bring an extra spook factor.
Side Dishes
These brownies are perfect on their own but pair wonderfully with a scoop of vanilla ice cream or a dollop of whipped cream. For a fun Halloween party, I like serving them alongside a hot apple cider or even a spooky, green punch to keep the theme going.
Creative Ways to Present
Try arranging your brownies on a black platter dusted lightly with powdered sugar to mimic “fog.” Another fun idea is to place each brownie in a mini cupcake liner, which keeps everything tidy for parties. I once made a brownie “graveyard” centerpiece using cookie crumbles as “dirt,” and it was a huge conversation starter!
Make Ahead and Storage
Storing Leftovers
I store leftover Halloween brownies in an airtight container at room temperature for up to 3 days. If you’re storing for longer, refrigerate them, but bring them back to room temperature before serving so they’re soft and tasty again.
Freezing
These brownies freeze really well. I recommend freezing them before adding the cookies and frosting decorations to preserve freshness. Wrap brownies tightly in plastic wrap and foil, freeze up to 3 months, then thaw overnight in the fridge before decorating.
Reheating
If you want to warm a brownie, pop it in the microwave for 10-15 seconds—just enough to soften it without melting the frosting and decorations. I usually avoid reheating decorated brownies to keep the look intact.
FAQs
-
Can I use boxed brownie mix for this Halloween Brownies Recipe?
Absolutely! I often use Ghirardelli boxed brownie mix because it bakes up dense and fudgy, which is perfect for holding the cookie “headstones” without crumbling. Just be sure to follow the package directions closely.
-
What if I can’t find black decorating gel?
No worries. You can use black food coloring mixed with a little bit of corn syrup as a homemade gel alternative or even write the “RIP” with melted dark chocolate using a fine piping tip.
-
Can I make this recipe vegan?
For a vegan version, use a dairy-free brownie recipe or box mix, substitute vegan butter in the frosting, and pick vegan-friendly candy pumpkins. Just make sure the black decorating gel is vegan too!
-
How do I keep the frosting from melting on warm days?
Keep your brownies refrigerated if it’s humid or hot, and only frost them right before serving. Also, making frosting with a slightly thicker consistency helps reduce melting.
-
Can I use other cookies instead of Milano for the headstones?
You can, but make sure they’re firm and sturdy enough to stand in the brownies. Rectangle-shaped cookies are ideal, but any cookie that holds up and can be decorated works.
Final Thoughts
This Halloween Brownies Recipe always gets me excited for the season — it’s a little spooky, a lot delicious, and perfect for sharing with friends and family. Whether you’re throwing a party or just want a festive homemade treat, these brownies really hit the sweet spot between fun and flavor. I hope you enjoy making (and eating) them as much as I do—because there’s nothing quite like biting into a soft, chocolatey brownie topped with a sweet “graveyard” just in time for Halloween!
Print
Halloween Brownies Recipe
- Prep Time: 10 minutes
- Cook Time: 30 minutes
- Total Time: 40 minutes
- Yield: 12 servings
- Category: Dessert
- Method: Baking
- Cuisine: American
Description
These Halloween Brownies are a festive treat featuring moist chocolate brownies topped with green buttercream frosting, Milano cookie ‘headstones’ decorated with RIP in black gel, and candy pumpkins for a spooky graveyard effect. Perfect for Halloween parties or seasonal desserts.
Ingredients
Brownies
- Prepared brownie batter for an 8 inch pan
- 12 Milano cookies
- Black decorating gel
- 12 candy pumpkins
Green Buttercream Frosting
- 1 cup powdered sugar
- 1/4 cup butter (salted or unsalted), softened
- 2 teaspoons milk
- A few drops green food coloring
Instructions
- Prepare Pan and Batter: Line an 8 inch baking pan with parchment paper, leaving some overhang on the sides to easily lift the brownies out. Pour the prepared brownie batter into the pan and smooth into an even layer.
- Bake Brownies: Bake the batter according to the original recipe’s instructions, approximately 30 minutes or until a toothpick comes out clean. Allow brownies to cool completely in the pan.
- Cut Brownies: Once cooled, use the parchment paper to lift the brownies out onto a flat surface. Cut into 12 rectangles, four rows by three columns.
- Make Frosting: In a bowl, mix powdered sugar, softened butter, milk, and green food coloring. Beat for 2 minutes until light and fluffy. Adjust consistency by adding more powdered sugar if thicker or milk if thinner. Set aside.
- Decorate Cookies: Use the black edible decorating gel to write “R-I-P” on each Milano cookie. Optionally, trim the very bottom edge off cookies to make shorter headstones.
- Assemble Graveyard Brownies: Press each decorated Milano cookie headstone upright into the top of the brownie rectangles. Spoon a small amount of green buttercream near the cookie on each brownie and place one candy pumpkin on top of the frosting to resemble a grave decoration.
Notes
- Use a homemade chocolate brownie recipe scaled to fit an 8×8 inch pan or use a boxed mix like Ghirardelli for convenience.
- For larger batches using a 9×13 inch pan, double the quantity of cookies, candy pumpkins, and frosting ingredients.
- Black decorating gel can typically be found in the baking aisle near birthday candles or at Walmart.
- Cutting the bottoms off Milano cookies is optional but helps them stand better as headstones.
Nutrition
- Serving Size: 1 brownie (approximate)
- Calories: 250 kcal
- Sugar: 22 g
- Sodium: 150 mg
- Fat: 12 g
- Saturated Fat: 7 g
- Unsaturated Fat: 4 g
- Trans Fat: 0 g
- Carbohydrates: 33 g
- Fiber: 2 g
- Protein: 2 g
- Cholesterol: 30 mg

