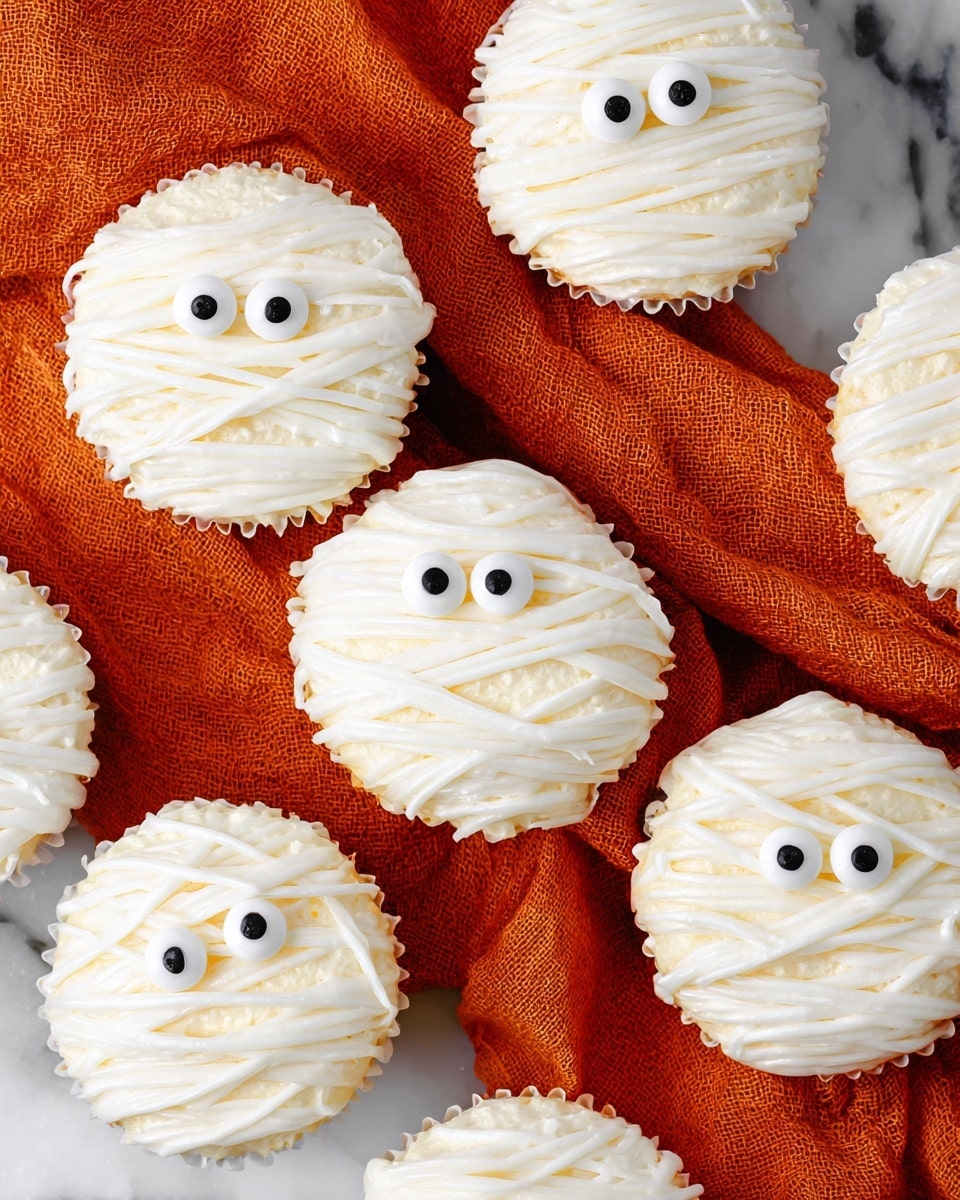
Halloween Mummy Cupcakes Recipe
If you’re looking for a super fun and spooky treat to wow your guests this season, you’ve got to try my Halloween Mummy Cupcakes Recipe. These little mummies are not only adorable but ridiculously easy to whip up, making them perfect for last-minute Halloween parties or a sweet surprise for the kids. Trust me, once you try this recipe, you’ll see why it’s become a seasonal favorite in my kitchen!
Why This Recipe Works
- Simplicity: Uses basic cupcake and frosting techniques that anyone can master, making it perfect for bakers of all levels.
- Visual Impact: The basketweave piping technique gives your cupcakes that authentic mummy wrap look without needing advanced decorating skills.
- Customizable: You can easily swap in your favorite cupcake flavors or frosting for a personal twist on this classic Halloween treat.
- Kid-Friendly Fun: Decorating these cupcakes is a great activity to do with kids, helping them practice piping while creating festive treats.

Ingredients & Why They Work
Let’s chat about the ingredients that make these Halloween Mummy Cupcakes so fantastic. I usually stick with a tried-and-true vanilla cupcake base because it pairs perfectly with the sweet vanilla buttercream and lets the mummy design really shine. The royal icing eyes add just the right spooky touch without compromising flavor or texture.
- Your favorite cupcake recipe: Starting with a cupcake base you know and love means the foundation is solid, whether you prefer chocolate, vanilla, or a fun seasonal flavor.
- Vanilla buttercream: This frosting holds up well for piping and provides the ideal smooth canvas for the mummy wraps.
- Royal icing eyes: These pre-made decorations are a lifesaver. They keep their shape on the frosting and bring that hauntingly cute look to life instantly.
Tweak to Your Taste
One of the best things about this Halloween Mummy Cupcakes Recipe is how easy it is to customize. I like to switch up the cupcake flavors or even tint my buttercream for a little extra Halloween flair. Don’t be afraid to get creative – the decorating technique is forgiving and fun!
- Flavor variation: I once made chocolate cupcakes with orange-tinted buttercream, and it was a huge hit. The kids loved the bright color paired with spooky eyes!
- Dietary modifications: You can definitely use gluten-free or vegan cupcake mixes and frosting—just make sure the frosting is thick enough to pipe neatly.
- Frosting alternatives: If you’re not a buttercream fan, cream cheese frosting can also work but may be trickier to pipe with the basketweave tip.
Step-by-Step: How I Make Halloween Mummy Cupcakes Recipe
Step 1: Frost Your Cupcakes Smoothly
After baking your cupcakes and letting them cool completely, grab a small knife or a straight spatula and apply a thin, even layer of vanilla buttercream on the top of each cupcake. This base layer helps the mummy ribbons stick better. I always remind myself not to go too thick here, or the ribbons will slip—you want just enough frosting to get that “sticky” feel.
Step 2: Add Those Spooky Eyes
Once your cupcakes are nice and frosted, gently press the royal icing eyes into the frosting, positioning them where you want your mummy’s eyes to peek through. This is such a quick step, but oh, the impact! These eyes are what give your cupcakes their spooky personality, so take a moment to space them evenly.
Step 3: Pipe the Mummy Wrappings
This step is the heart of the Halloween Mummy Cupcakes Recipe. Fit a piping bag with a no. 44 basketweave decorating tip and fill it with your vanilla buttercream. Carefully pipe flat ribbons across the cupcake horizontally, crisscrossing as you go to mimic wrapped bandages. Don’t worry about perfection—some unevenness actually makes the mummy look more realistic. I find that a gentle and steady pressure gives me the best control. Take breaks if your hand gets tired; it’s a marathon, not a sprint!
Step 4: Admire and Enjoy!
Step back and admire your work—those little mummies are ready to creep crawl their way onto your dessert table. The best part is digging in afterward. These cupcakes are soft, sweet, and just the right amount of festive. I love sharing these with friends because they always get a laugh and then disappear super fast.
Pro Tips for Making Halloween Mummy Cupcakes Recipe
- Use Room Temperature Buttercream: This makes piping smoother and helps the ribbons lay flat without tearing.
- Don’t Overfill the Bag: Fill the piping bag halfway to maintain better control and avoid frosting oozing everywhere.
- Practice Basketweave Piping First: If you’re new to this technique, practice on parchment before tackling your cupcakes.
- Keep Cupcakes Cool After Decorating: Store in the fridge to keep the frosting firm, especially if your home is warm.
How to Serve Halloween Mummy Cupcakes Recipe
Garnishes
While the royal icing eyes steal the show, I sometimes sprinkle a little edible glitter or orange sanding sugar over the top to give my mummies a subtle shimmer under party lights. I also like to carefully place tiny candy spiders or Halloween sprinkles alongside for an extra creepy crawly effect that kids love.
Side Dishes
Pair these cupcakes with a chilled glass of spiced apple cider or a black cherry punch to keep the vibe festive. For a savory counterpoint, try serving with mini sliders or a tangy pumpkin soup to round out your Halloween spread.
Creative Ways to Present
I once arranged my Halloween Mummy Cupcakes Recipe on a tiered stand, draping fake cobwebs and plastic bats around them for an extra spooky display. Another time, I placed each cupcake in a mini “tombstone” wrapper, which made a fun graveyard effect that totally wowed guests at a themed event. Presentation really amps up the holiday spirit.
Make Ahead and Storage
Storing Leftovers
If you have leftovers (lucky you!), I recommend storing your Halloween Mummy Cupcakes in an airtight container in the fridge. This keeps the buttercream firm and prevents the royal icing eyes from getting sticky. I usually eat mine within 3 days for the best fresh taste.
Freezing
These cupcakes freeze surprisingly well! Just wrap each one individually in plastic wrap and pop them in an airtight container or freezer bag. When ready to enjoy, thaw overnight in the fridge to keep the frosting intact. I’ve done this for parties and it works beautifully without sacrificing taste or appearance.
Reheating
I don’t recommend reheating cupcakes with piped buttercream since heat can melt the decorations. Instead, I let them come to room temperature for about 20 minutes to bring back softness without losing the design’s charm.
FAQs
-
Can I use store-bought cupcakes for this Halloween Mummy Cupcakes Recipe?
Absolutely! Store-bought cupcakes work perfectly if you’re short on time. Just make sure they’re completely cooled before applying the buttercream and decorating.
-
What if I don’t have a basketweave tip for the frosting?
No worries—the basketweave tip creates the flat ribbon effect, but you can use a small flat or petal tip to pipe similar ribbons. It might look a bit different but still adorable!
-
How do I make my frosting ribbons look flat and not thick?
The key is to apply steady, even pressure while moving the piping bag smoothly across the cupcake top. Using room temperature frosting also helps the ribbons settle flat.
-
Can I substitute the royal icing eyes with something else?
You sure can! Mini chocolate chips, edible candy eyes, or even small round candies like M&Ms work great as alternatives.
Final Thoughts
This Halloween Mummy Cupcakes Recipe holds a special place in my heart because it brings together simple baking and creative decorating in such a delightful way. I love how easy it is to make these cupcakes look so impressive, and I always get a kick out of watching everyone’s reactions when they spot those wide, candy eyes on each spooky little mummy. If you’re on the fence, give this recipe a try—you’ll have a blast making them and an even bigger treat eating them!
Print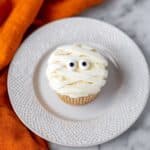
Halloween Mummy Cupcakes Recipe
- Prep Time: 15 minutes
- Cook Time: 20 minutes
- Total Time: 35 minutes
- Yield: 12 servings
- Category: Dessert
- Method: Baking
- Cuisine: American
- Diet: Vegetarian
Description
These Halloween Mummy Cupcakes are a fun and festive treat perfect for celebrating the spooky season. Decorated with vanilla buttercream and royal icing eyes, they resemble adorable mummies wrapped in frosting ribbons. Easy to make using your favorite cupcake base, they’re sure to delight kids and adults alike.
Ingredients
Cupcakes
- 1 batch your favorite cupcake recipe (approximately 12 cupcakes)
Frosting
- 2 cups vanilla buttercream
Decorations
- Royal icing eyes (approximately 24 eyes, 2 per cupcake)
Instructions
- Frost the Cupcakes: Using a knife or straight spatula, frost each cooled cupcake by covering the entire top surface evenly with vanilla buttercream to create the mummy base.
- Add Royal Icing Eyes: Place two royal icing eyes onto the frosted cupcake, positioning them near the top center to resemble the mummy’s eyes.
- Pipe Frosting Ribbons: Fit a piping bag with a number 44 basketweave decorating tip and fill it with vanilla buttercream. Pipe flat frosting ribbons crisscrossing over the entire cupcake surface to mimic mummy bandages. Continue layering ribbons until the desired mummy effect is achieved.
- Serve and Enjoy: Allow the frosting to set slightly, then serve your Halloween mummy cupcakes to delighted guests.
Notes
- Use cupcakes cooled completely before frosting for best results.
- Royal icing eyes can be store-bought or homemade ahead of time.
- If you don’t have a basketweave tip, a small flat tip can be used to pipe the ribbons.
- Vanilla buttercream can be colored slightly with food coloring to enhance the mummy look if desired.
- Store cupcakes at room temperature if serving within a day, or refrigerate and bring to room temperature before serving.
Nutrition
- Serving Size: 1 cupcake
- Calories: 250 kcal
- Sugar: 20 g
- Sodium: 150 mg
- Fat: 12 g
- Saturated Fat: 7 g
- Unsaturated Fat: 4 g
- Trans Fat: 0 g
- Carbohydrates: 30 g
- Fiber: 1 g
- Protein: 2 g
- Cholesterol: 35 mg