Italian Sub Sliders Recipe
If you’re craving something that’s bursting with flavor but easy enough to whip up for a crowd or casual get-together, you’re going to love this Italian Sub Sliders Recipe. Imagine layers of savory ham, spicy pepperoni, and tangy pickled peppers nestled into soft, buttery rolls, all toasted to melty, golden perfection. Trust me, whether it’s game day or just a snack fix, these sliders hit the spot every single time.
Why This Recipe Works
- Perfect Flavor Balance: The combo of salty meats, melty cheese, and tangy peppers creates layers of flavor you won’t get with any other sliders.
- Easy Assembly: Using pre-sliced deli meats and Hawaiian rolls means you’re just minutes away from dinner, no complicated prep.
- Buttery Garlic Crunch: Brushing melted butter with fresh garlic and Italian seasoning on top gives a golden, irresistible crust.
- Make-Ahead Friendly: Assemble ahead and bake just before serving, perfect for parties or weeknight dinners.

Ingredients & Why They Work
Every ingredient in this Italian Sub Sliders Recipe plays a role in making these sliders irresistible. Using quality deli meats ensures each bite is meaty and satisfying, while the Hawaiian rolls add just the right amount of sweetness and softness to balance the spices and saltiness.
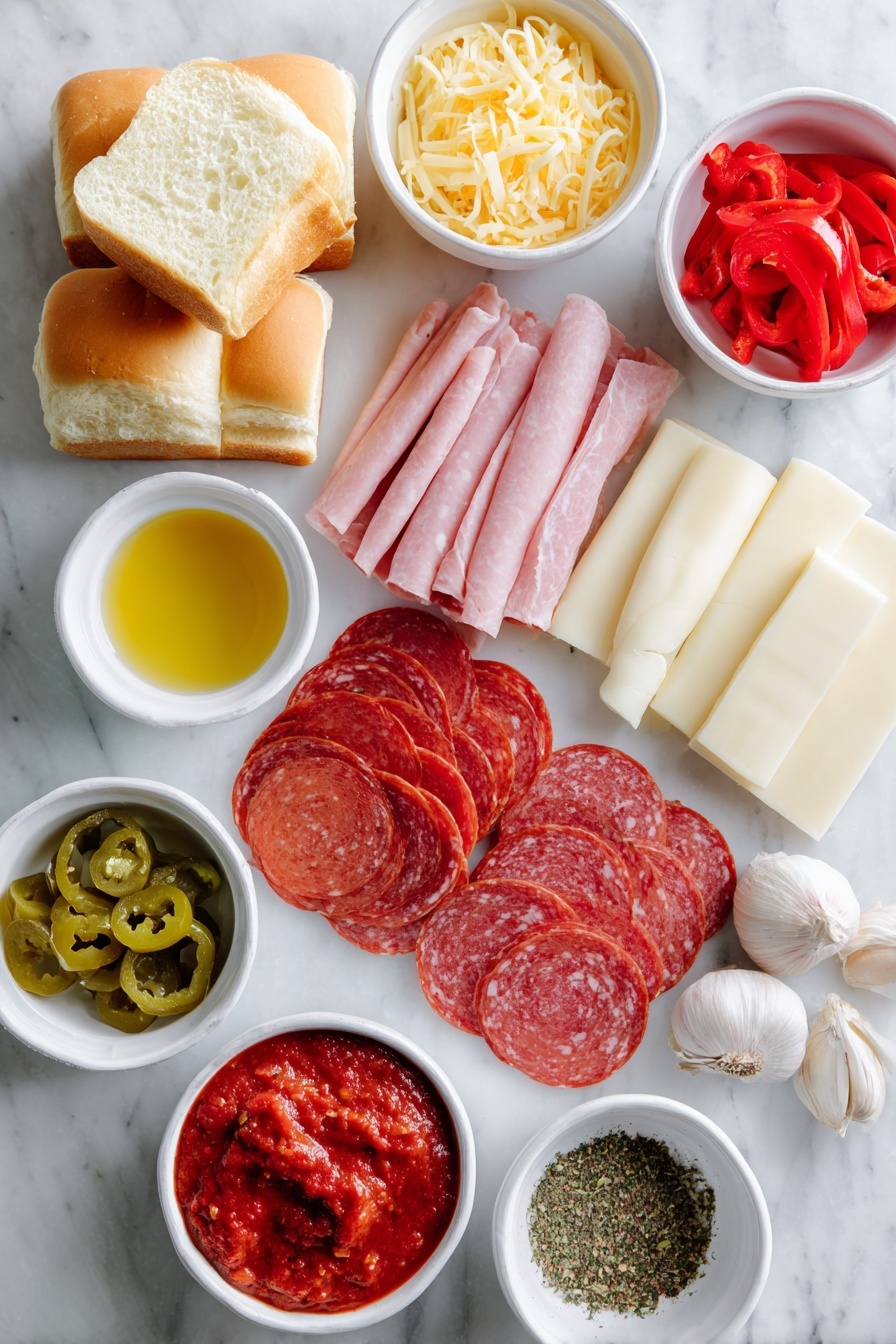
- Kings Hawaiian rolls: Their soft texture and slightly sweet flavor complement the savory fillings perfectly, plus they’re just the right size for sliders.
- Ham: Adds a mild, smoky layer that’s less overpowering than other meats, balancing the pepperoni and salami.
- Salami: Brings in that classic Italian cured meat flavor with a little zing.
- Pepperoni: Adds spice and a touch of grease that keeps these sliders juicy.
- Provolone cheese: Melts beautifully, mellowing out the spice with creamy richness.
- Pepperoncini: Their mild tangy heat cuts through the richness and adds crunch.
- Pickled hot cherry peppers: For an extra punch of heat and brightness.
- Butter: Gives the top a golden, flavorful finish once mixed with garlic and Italian seasoning.
- Italian seasoning: Brings herbal notes like oregano and basil to tie everything together.
- Fresh garlic: Always better than jarred here for punching up the butter’s flavor.
Tweak to Your Taste
I love giving this Italian Sub Sliders Recipe a little spin depending on who’s coming over or what I have on hand. The beauty is in the layers, so don’t be shy about swapping in your favorite deli meats or even adding extra veggies if you want.
- Variation: Once, I swapped the pepperoni for spicy chorizo to give the sliders a smoky, fiery kick that was a big hit with friends who like heat.
- Vegetarian Option: You can easily swap out the meats for grilled eggplant, roasted red peppers, and extra cheese for a satisfying veggie slider alternative.
- Cheese Swaps: Mozzarella or fontina melt well and bring a different flavor profile if you prefer something milder or creamier.
- Extra Veggies: Try layering in roasted red peppers or olives for even more Mediterranean flair.
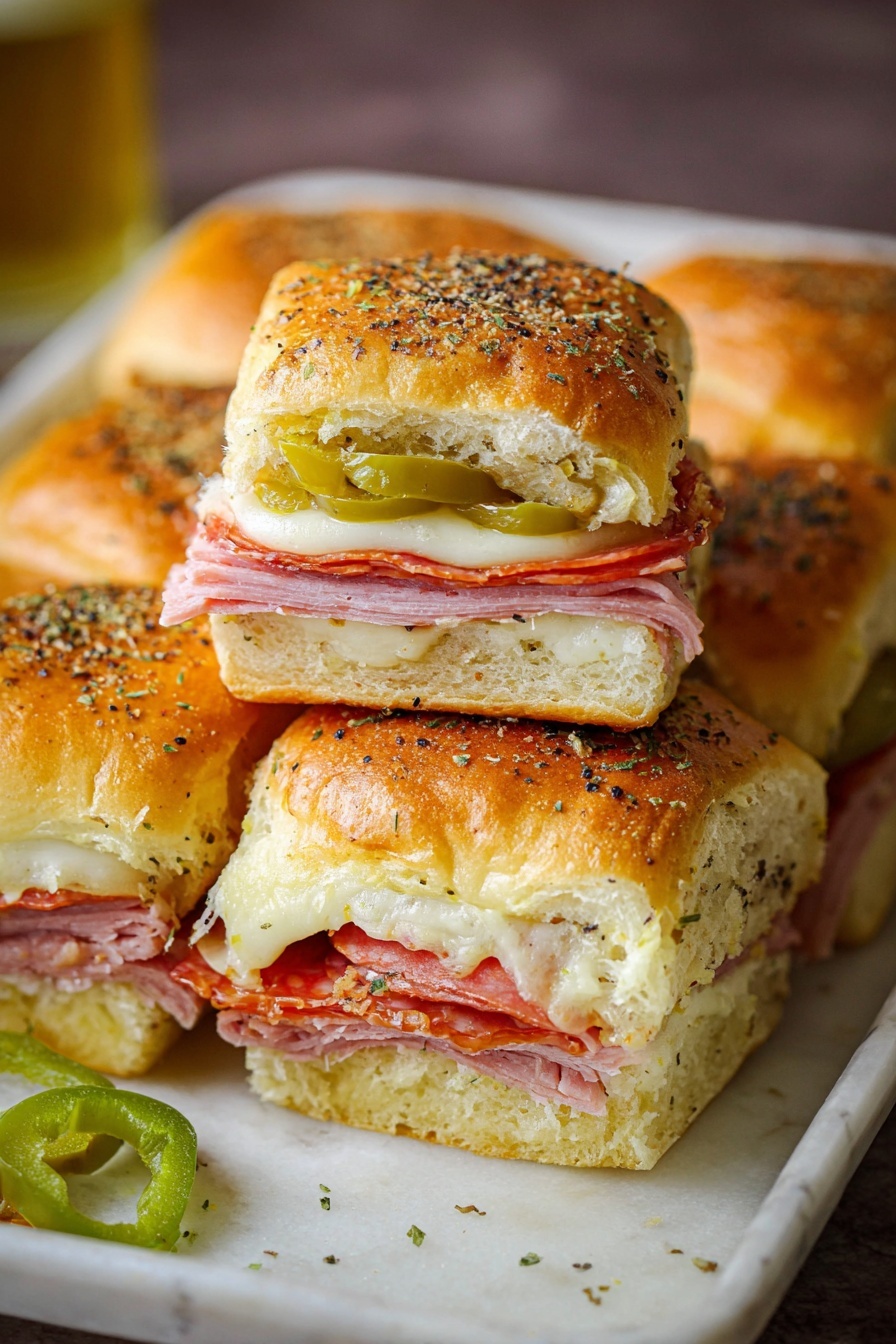
Step-by-Step: How I Make Italian Sub Sliders Recipe
Step 1: Prep and Layer With Love
Start by preheating your oven to 350°F. Then, take those Hawaiian rolls and slice them in half lengthwise—this is the base that holds all our delicious layers. On the bottom half, layer your ham first. I find this helps keep the other slices from sliding around. Next up, add salami, pepperoni, and provolone cheese in even layers—you want every bite to have a bit of everything. Finally, scatter on the sliced pepperoncini and pickled hot cherry peppers for that signature tangy pop. Top it all with the other half of the rolls. Don’t rush; layering thoughtfully really makes the difference in taste and structure.
Step 2: Garlic Butter Brushing Magic
In a small bowl, mix the melted butter with Italian seasoning and freshly crushed garlic. Trust me, fresh garlic here makes all the difference—nothing beats that fragrant punch. Get a pastry brush and coat the tops of the sliders generously with this mixture, making sure to get into all the little gaps and edges. This step is where the sliders get that irresistible golden crust and garlicky aroma.
Step 3: Bake and Brown to Perfection
Cover your sliders with foil to keep everything moist, then bake for about 30 minutes. You’re looking for the tops to turn a gorgeous golden brown and all that cheese inside to get nice and melty. If you want an even crispier top, you can uncover for the last 5 minutes, but be careful not to dry them out.
Step 4: Slice, Serve, and Enjoy
Once you take the sliders out of the oven, let them rest for a couple of minutes so everything settles. Then slice them up between the rolls. I always serve mine with a bowl of marinara on the side for dunking—it makes the whole experience feel like a true Italian feast.
Pro Tips for Making Italian Sub Sliders Recipe
- Use Fresh Garlic: The bite and aroma of fresh garlic in the butter elevates these sliders far beyond store-bought garlic spreads.
- Don’t Skip the Foil: Covering while baking traps moisture, keeping the sliders soft and melty inside.
- Layer Meats Evenly: Distribute ham, salami, and pepperoni evenly to get balanced flavors in every bite.
- Warm Rolls Slightly: If you like, warm the rolls in the oven for a few minutes before assembling to add extra softness.
How to Serve Italian Sub Sliders Recipe
Garnishes
I often top my sliders with a few fresh basil leaves or even a sprinkle of shaved Parmesan just before serving for a fresh, savory hit. If I’m feeling a little extra, a drizzle of good-quality extra virgin olive oil or balsamic glaze adds a lovely finishing touch.
Side Dishes
These sliders pair wonderfully with simple sides like a crisp green salad, homemade potato chips, or roasted veggies. And of course, a bowl of warm marinara sauce for dipping is a must in my book — it totally amps up the sandwich experience.
Creative Ways to Present
For parties, I’ve laid out the sliders on a big wooden board and scattered colorful pepperoncini and olives all around. It looks festive and makes it easy for guests to grab. Another fun idea is to serve mini cups of marinara alongside each slider wrapped in parchment—super cute and practical for dipping mess-free!
Make Ahead and Storage
Storing Leftovers
I wrap leftover sliders tightly in foil or plastic wrap and store them in an airtight container in the fridge. They’ll keep great for 2-3 days, perfect for quick lunches or snacks. Just remember to keep the bread wrapped well to avoid drying out.
Freezing
If you want to prep ahead even further, these sliders freeze beautifully. I recommend assembling them without baking, wrapping tightly in foil and freezing. When ready, bake from frozen (adding a few extra minutes) until golden and melty. This trick has saved me more than once when unexpected guests showed up!
Reheating
To reheat leftovers, I pop a few sliders in a 350°F oven for about 10 minutes, uncovered. This refreshes the bread’s crunch and melts the cheese again without turning soggy like a microwave might. For quickies, a toaster oven works just as well.
FAQs
-
Can I make the Italian Sub Sliders Recipe ahead of time?
Yes! You can assemble the sliders a few hours or even the day before. Just cover them tightly with foil and refrigerate. When you’re ready, brush on the garlic butter and bake as directed. This makes entertaining super easy.
-
What type of rolls work best for these sliders?
I recommend sweet, soft rolls like King’s Hawaiian because they balance the savory meat and spicy peppers beautifully. But you can use any soft dinner rolls that hold up well to a good layer of fillings.
-
Can I customize the pepper varieties?
Absolutely! Pepperoncini and pickled hot cherry peppers add great tang and spice, but feel free to swap in banana peppers, jalapeños, or your favorite pickled peppers to suit your heat preference.
-
Is there a vegetarian version of this recipe?
Definitely! Replace the meats with grilled or roasted veggies such as eggplant, zucchini, and mushrooms, then layer on extra provolone or mozzarella cheese. It’s just as satisfying and perfect for veggie lovers.
Final Thoughts
This Italian Sub Sliders Recipe is one of my all-time favorites for so many reasons—it’s simple, flexible, and packed with flavor. Whether you’re feeding a hungry crowd or just treating yourself, these sliders never disappoint. Give them a try next time you want a cozy, comforting meal that feels just a little special. I’m confident you’ll end up making them again and again, just like I do!
Print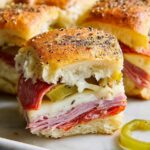
Italian Sub Sliders Recipe
- Prep Time: 5 minutes
- Cook Time: 30 minutes
- Total Time: 35 minutes
- Yield: 12 sliders
- Category: Appetizer
- Method: Baking
- Cuisine: Italian-American
Description
These Hot Italian Sub Sliders are a delicious and easy-to-make appetizer or snack featuring a combination of ham, salami, pepperoni, provolone cheese, and tangy peppers, all baked on soft Hawaiian rolls and brushed with garlic Italian butter for extra flavor. Perfect for parties or game day gatherings.
Ingredients
Main Ingredients
- 12 pack rolls, halved lengthwise (I recommend Kings Hawaiian rolls)
- 6 oz package of ham, thinly sliced
- 5 oz package of salami, thinly sliced
- 5 oz package of pepperoni, thinly sliced
- 9 slices provolone cheese
- ⅓ cup pepperoncini, sliced
- ⅓ cup pickled hot cherry peppers, sliced
Butter Mixture
- ¼ cup salted butter, melted
- 1 teaspoon Italian seasoning
- 2 cloves garlic, crushed (fresh recommended)
To Serve (optional)
- 1 cup marinara sauce
Instructions
- Preheat the oven: Preheat your oven to 350 degrees F to prepare for baking the sliders.
- Assemble the sliders: Lay the bottom halves of the rolls on a baking sheet or pan. Layer on the ham slices, followed by the salami, then pepperoni. Add a layer of provolone cheese, then top with sliced hot cherry peppers and pepperoncini. Place the top halves of the rolls back on.
- Prepare the butter mixture: In a small bowl, combine the melted butter, Italian seasoning, and crushed garlic. Stir to thoroughly blend the flavors.
- Brush sliders with butter mixture: Generously brush the seasoned butter over the tops of the sliders, making sure to coat all the nooks and crannies for maximum flavor.
- Cover and bake: Cover the sliders loosely with foil and bake in the preheated oven at 350 degrees F for 30 minutes until the rolls are golden brown and the cheese has melted.
- Serve: Remove the sliders from the oven, slice them apart, and serve warm. Optionally, provide marinara sauce on the side for dipping.
Notes
- Using fresh garlic rather than jarred offers a more vibrant flavor.
- Kings Hawaiian rolls are recommended for their sweetness and soft texture, but any soft slider roll will work.
- You can adjust the amount of hot peppers depending on your preferred spice level.
- Covering the sliders with foil during baking keeps them moist and melted without over-browning.
- Serve immediately after baking for best taste and texture.
Nutrition
- Serving Size: 1 slider
- Calories: 310 kcal
- Sugar: 4 g
- Sodium: 720 mg
- Fat: 18 g
- Saturated Fat: 7 g
- Unsaturated Fat: 9 g
- Trans Fat: 0 g
- Carbohydrates: 22 g
- Fiber: 1.5 g
- Protein: 14 g
- Cholesterol: 40 mg


