Loaf Pan Basque Cheesecake Recipe
If you’ve ever wanted to impress your friends with a cheesecake that’s both elegantly rustic and irresistibly creamy, then this Loaf Pan Basque Cheesecake Recipe is exactly what you need in your baking arsenal. It’s the perfect blend of caramelized, golden top and melt-in-your-mouth interior, all baked conveniently in a loaf pan. Trust me, once you try this, you’ll be hooked—and your kitchen will smell like a dreamy bakery every time you make it!
Why This Recipe Works
- Simple Ingredients, Big Flavor: Using just cream cheese, eggs, cream, and a touch of flour creates rich, creamy texture with that signature Basque burnt top.
- Loaf Pan Convenience: Baking in a loaf pan makes portioning easy and gives this traditionally round cheesecake a charming, rustic loaf shape.
- Rustic and Forgiving: A dark caramelized top and slight cracks are actually part of the charm, letting you relax about perfect presentation.
- No Crust Needed: Skipping the crust means less fuss and more buttery creamy cheesecake in every bite.

Ingredients & Why They Work
This Loaf Pan Basque Cheesecake Recipe shines because of its simple ingredient lineup, each playing a key role in achieving that creamy yet slightly jiggly texture, balanced sweetness, and the iconic burnt top. Here’s why I love these ingredients and what to look for when you shop:
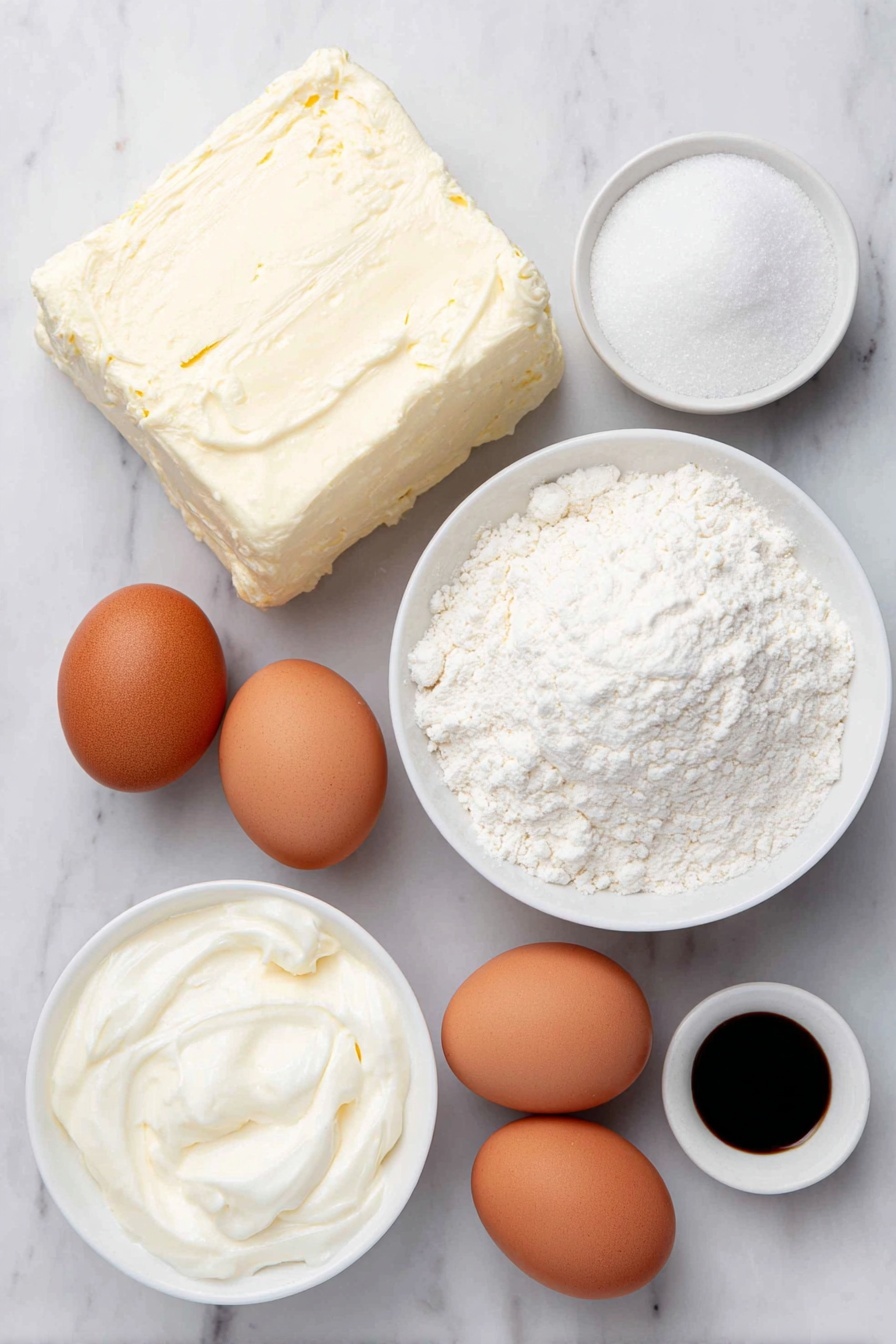
- Cream Cheese: Full-fat is a must here for that rich, dense creaminess. Softened cream cheese blends smoothly to avoid lumps.
- Granulated Sugar: Sweetens just enough without overpowering the tang of the cream cheese.
- Eggs: Provide structure and add silkiness to the batter.
- Heavy Cream: Key to keeping the cheesecake luscious and not too dense.
- Vanilla Extract (optional): Adds a subtle aroma and warms the flavor, but feel free to skip if you don’t have it on hand.
- Salt: Just a pinch enhances the sweetness and balances flavors.
- All-purpose Flour: A little flour keeps the cheesecake from being too runny while maintaining that signature jiggle.
Tweak to Your Taste
This is one of those recipes I love not just for its delicious outcome but also for how easy it is to make your own with minor tweaks. I’ve played around with a few variations and every time, it’s delightful.
- Flavor Boost: I sometimes swap vanilla extract for a teaspoon of lemon zest—adds a fresh zing that pairs beautifully with the richness.
- Dairy Swap: If you want something lighter, try half-and-half instead of heavy cream—though texture is less silky.
- Sweetness Level: Feel free to reduce sugar by a couple of tablespoons if you prefer a less sweet dessert.
- Alcohol Infusion: Adding a tablespoon of aged rum or brandy creates a grown-up twist that’s perfect for special occasions.
Step-by-Step: How I Make Loaf Pan Basque Cheesecake Recipe
Step 1: Prepare Your Loaf Pan Like a Pro
Before mixing, I always preheat my oven to a blazing 400°F. Then, I butter the inside of my 9×5-inch loaf pan lightly. This step is a game changer because it helps the parchment paper stick perfectly into all the corners—no annoying bubbling or slipping later when pouring the batter. I lay a strip of parchment paper along the length, pressing it down firmly, then trim so you have about 2 inches of overhang all around. You’ll thank yourself for this when you lift the cheesecake out easily after baking.
Step 2: Mix Cream Cheese and Sugar Until Silky Smooth
Softened cream cheese is where this cheesecake begins its magic. Using a handheld or stand mixer, I beat the cream cheese and sugar on low to medium speed for at least 5 minutes. Patience here is key—you want it silky smooth with no lumps visible. This sets a great base for the eggs to incorporate nicely without curdling.
Step 3: Add Eggs One at a Time
To keep the batter from splitting, I add the eggs one by one, mixing fully after each addition. This gradual approach ensures the mixture stays creamy and well combined. Remember, no rush—take your time on this step!
Step 4: Stir in Cream, Vanilla, and Salt
Pour in the heavy cream, vanilla extract (if using), and a pinch of salt next. I switch to a whisk here for gentle folding, which helps preserve airiness in the mix. The batter will start looking luscious and thick.
Step 5: Sift and Fold in the Flour
Instead of dumping in all the flour at once, I sift it in gently in small batches, whisking lightly between additions. This careful technique avoids lumps and keeps the batter perfectly smooth, which is crucial for the right cake texture.
Step 6: Bake Until Beautifully Burnt & Jiggly
Pour your velvety batter into the prepped loaf pan and slide it into the oven for 40 to 45 minutes. The top will darken to a deep golden, almost burnt color—don’t fret, this is Basque cheesecake’s signature. The trick: the center should still be a little wobbly when you gently shake the pan. It sets more as it cools. If you notice your loaf pan filling all the way to the brim, place it on a baking sheet just in case of overflow.
Step 7: Cool Fully and Refrigerate
Once out of the oven, let it cool completely right on the counter. This step is where the cheesecake develops its luscious texture—patience pays off. Afterward, cover it and chill in the fridge for at least 2 to 4 hours, or ideally overnight, before slicing and serving.
Pro Tips for Making Loaf Pan Basque Cheesecake Recipe
- Butter Before Parchment: Don’t skip buttering the pan first; it helps the parchment seal tight and makes clean-up a breeze.
- Don’t Fret the Dark Top: The burnt top might intimidate you, but that caramelized flavor is the hallmark of Basque cheesecake—embrace it!
- Gentle Flour Folding: Add flour gradually and fold gently to avoid lumps and overworking the batter.
- Watch Your Oven: Oven sizes vary—keep an eye near the end of baking to pull out the cheesecake when it’s just right.
How to Serve Loaf Pan Basque Cheesecake Recipe

Garnishes
I like to keep garnishes simple so the cheesecake shines. A dusting of powdered sugar or a few fresh berries on top add a pop of color and natural sweetness. Sometimes I drizzle a little honey or scatter toasted nuts for crunch. Those rustic cracks on the surface make a lovely backdrop for these touches.
Side Dishes
When serving, I love pairing this cheesecake with a light fruit compote—especially blueberry or strawberry. It balances the richness perfectly. A cup of strong coffee or a glass of dessert wine elevates the whole experience to next-level indulgence.
Creative Ways to Present
For special occasions, I’ve wrapped the cooled, sliced cheesecake pieces in parchment paper tied with twine for charming, rustic desserts at dinner parties. Another fun idea is layering thin slices with a berry jam for mini cheesecake sandwiches. It’s perfect for sharing and looks so cute on a dessert platter!
Make Ahead and Storage
Storing Leftovers
I always cover the chilled cheesecake tightly with plastic wrap or store slices in an airtight container in the fridge. It keeps beautifully for up to 4 days and the flavors actually meld better after a day in the fridge.
Freezing
I’ve frozen leftover cheesecake slices wrapped snugly in plastic and foil. When ready to enjoy, I thaw overnight in the fridge. The texture after freezing is nearly as good as fresh, making it a great make-ahead treat for busy weeks.
Reheating
If you like your cheesecake a little warmer, reheat a slice in the microwave for about 15-20 seconds. It takes the chill off without melting the creamy texture. Just don’t overdo it or you’ll lose that signature silky feel.
FAQs
-
Can I use a different pan instead of a loaf pan for this Basque cheesecake recipe?
Absolutely! While this recipe is tailored for a 9×5-inch loaf pan, you can use other pans like a round 8-inch cake pan or even a springform pan. Just keep an eye on baking time and the batter level—the cheesecake should be about 2/3 full, and you’ll want to pull it out when the top is nicely darkened and the center slightly jiggly.
-
Why does the top of my Basque cheesecake get dark so quickly?
The characteristic deeply browned top comes from baking at a high temperature, which caramelizes the sugars for that unique flavor and rustic look. Even if it feels dark or burnt, as long as it’s not blackened or bitter, it’s exactly how it should be!
-
Can I make this cheesecake ahead for a party?
Yes! In fact, the flavor improves after sitting overnight in the fridge. It’s a great make-ahead dessert that you can bake a day or two before your event, then slice and serve chilled or slightly warmed.
-
Do I need to use vanilla extract?
Vanilla extract is optional but recommended if you have it on hand. It adds a subtle layer of warmth and complexity to the cheesecake’s flavor. However, if you don’t, the recipe still works wonderfully without it.
-
Why does Basque cheesecake often have cracks on top?
Cracks are part of the rustic charm of a Basque cheesecake. As the hot cheesecake cools, it contracts slightly which can cause cracking. Don’t worry—these cracks don’t affect taste, and many people love the homemade, artisanal look they give.
Final Thoughts
This Loaf Pan Basque Cheesecake Recipe has become such a favorite of mine because it’s approachable, comforting, and just the right kind of fancy for any occasion. Whether you’re baking for a loved one or treating yourself after a long week, it delivers buttery lushness and that signature caramelized top we all swoon over. Trust me when I say, once you master this, you’ll find yourself craving it again and again—so cozy up and enjoy every sweet, creamy bite!
Print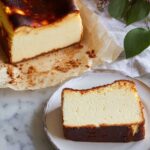
Loaf Pan Basque Cheesecake Recipe
- Prep Time: 15 minutes
- Cook Time: 45 minutes
- Total Time: 1 hour
- Yield: 12 servings
- Category: Dessert
- Method: Baking
- Cuisine: Basque
- Diet: Vegetarian
Description
This Loaf Pan Basque Cheesecake recipe offers a creamy, rich dessert with a beautifully caramelized top and soft center. It’s made with full-fat cream cheese, sugar, eggs, heavy cream, and a touch of flour, baked in a loaf pan for a rustic yet elegant presentation. The cheesecake is delicious served chilled after resting and refrigeration.
Ingredients
Main Ingredients
- 1¾ lb full fat cream cheese bars (or 1 lb 12 oz), softened
- 1 cup granulated sugar
- 4 large eggs
- 1⅔ cup heavy cream
- 1 teaspoon vanilla extract (optional)
- ¼ teaspoon salt
- ¼ cup all-purpose flour
Instructions
- Preheat Oven: Preheat your oven to 400°F to prepare for baking.
- Prepare Loaf Pan: Lightly butter a 9×5-inch loaf pan. Line it with parchment paper by placing one long strip and pressing into the corners, leaving at least 2 inches of overhang all around. Trim excess parchment beyond 2 inches.
- Mix Cream Cheese and Sugar: In a large bowl, beat the softened cream cheese and granulated sugar together using a handheld mixer or stand mixer at low to medium speed for 5 minutes until smooth and creamy.
- Add Eggs: Add the eggs one at a time, mixing well after each addition until fully incorporated.
- Add Cream and Flavorings: Whisk in the heavy cream, optional vanilla extract, and salt until combined.
- Incorporate Flour: Sift the flour in gradually and gently stir to combine evenly without lumps.
- Pour and Bake: Pour the batter into the prepared loaf pan. Bake for 45 minutes until the top is dark brown around the edges and lighter but still soft and wiggly in the center.
- Cool and Refrigerate: Allow the cheesecake to cool fully at room temperature, then cover and refrigerate for 2 to 4 hours or overnight for best flavor and texture.
Notes
- Vanilla Extract: Optional but recommended for subtle creamy flavor; consider buying in bulk if you bake often to save money.
- Sifting Flour: Add flour gradually in small dustings to prevent lumps and ensure even mixing.
- Loaf Pan Prep: Buttering helps parchment paper stick and prevents sticking of the cheesecake.
- Use Only Parchment Paper: Do not substitute wax paper as it will melt in the oven.
- Baking Appearance: The top should be dark and caramelized; don’t worry if it looks very dark as this is typical of Basque cheesecake.
- Loaf Pan Size Variation: If your pan is smaller or taller, fill it leaving ½ inch space on top and adjust baking time as needed, watching for the distinctive color cues.
- Overflow Prevention: Place the loaf pan on a baking sheet to catch any batter overflow during baking, especially for full pans.
- Cracks Are Normal: Rustic cracks add charm and will become less noticeable after cooling.
Nutrition
- Serving Size: 1 slice (based on 12 servings)
- Calories: 350 kcal
- Sugar: 24 g
- Sodium: 200 mg
- Fat: 28 g
- Saturated Fat: 17 g
- Unsaturated Fat: 9 g
- Trans Fat: 0 g
- Carbohydrates: 18 g
- Fiber: 0 g
- Protein: 6 g
- Cholesterol: 130 mg

