Marshmallow Swirl Fudge Recipe
If you’ve ever wanted to impress friends or just treat yourself to something delightfully sweet, you’re going to adore this Marshmallow Swirl Fudge Recipe. It’s one of those simple-yet-special desserts that strikes the perfect balance between rich, creamy chocolate and that nostalgic, fluffy marshmallow swirl. I promise, every bite is a warm hug of sweetness, and the best part? It’s super easy to make at home — no fancy gadgets or hours of fuss. Stick with me here, and I’ll walk you through everything to get that smooth, melt-in-your-mouth texture every single time.
Why This Recipe Works
- Perfect Texture: The sweetened condensed milk makes this fudge silky and soft, avoiding that crumbly or grainy feel.
- Marshmallow Magic: Folding in mini marshmallows last keeps them fluffy for that beautiful swirl and little gooey pockets.
- Simple, Honest Ingredients: Using classic chocolate chips and butter means you’re never left guessing – just pure, rich flavor.
- Easy Cleanup & Cutting: Parchment paper in your pan and a buttered knife for slicing make the finish as smooth as the fudge.

Ingredients & Why They Work
Each ingredient in this Marshmallow Swirl Fudge Recipe plays a starring role. Together they create a luscious, creamy texture with just the right amount of sweetness — and a fun, marshmallow twist. Look for good-quality semi-sweet chocolate chips for best results, and grab mini marshmallows for that charming swirl.

- Semi-sweet chocolate chips: They melt down beautifully, providing rich chocolate flavor without overwhelming sweetness.
- Sweetened condensed milk: Adds creaminess and acts like a natural sweetener, keeping fudge soft and smooth.
- Unsalted butter: Enhances the creamy texture and gives the fudge a slight buttery richness.
- Vanilla extract: Brings out the chocolate flavor and rounds out the sweetness.
- Salt: Just a pinch balances all the sweetness and cuts through the richness.
- Mini marshmallows: Provide a fluffy, chewy contrast and those signature swirls you’re after.
Tweak to Your Taste
I love making this Marshmallow Swirl Fudge Recipe my own, and you can too. Once you get the basic technique down, feel free to experiment a bit! Everyone’s taste buds are a little different, so why not add your favorite mix-ins or try it with a twist?
- Minty Peppermint: I once added crushed peppermint candies during the swirling step — it gave a refreshing zing and gorgeous holiday vibes.
- Nutty Crunch: Chopped walnuts or pecans add a delightful crunch that pairs perfectly with the chewy marshmallows.
- Chocolate Variety: Swap semi-sweet for dark or milk chocolate chips if you want a richer or creamier profile.
- Dairy-Free Version: Use vegan condensed milk and vegan chocolate chips to make a delicious dairy-free variation.
Step-by-Step: How I Make Marshmallow Swirl Fudge Recipe
Step 1: Prep Your Pan
I always start by lining my 8×8-inch baking pan with parchment paper. I like to leave an overhang on the sides because it makes removing the fudge a breeze later on. Trust me, this small step saves frustration and keeps your squares nice and neat.
Step 2: Melt Everything Slowly
In a medium saucepan set to low heat, I put in the chocolate chips, sweetened condensed milk, butter, and a pinch of salt. Stir constantly with a silicone spatula — patience here is key! The chocolate must melt gently to avoid seizing or getting grainy. Keep the heat low and keep stirring until the mixture is completely smooth and glossy.
Step 3: Stir in Vanilla Off Heat
Once the chocolate is perfectly melted, I remove the pan from the heat and stir in the vanilla extract. This locks in the flavor and prevents the vanilla from cooking off — making your fudge taste irresistible.
Step 4: Fold in Those Marshmallows
Now the fun part — add the mini marshmallows and fold them in gently with your spatula. Don’t over-stir because the marshmallows should keep their shape to create those pretty swirls. This step gives your fudge charm, texture, and that signature ooey-gooey feel deep inside.
Step 5: Pour, Swirl, and Chill
Pour the fudge mixture into your prepared pan. Use the spatula to swirl the top lightly so that marshmallow bits peek through the surface. Let it cool at room temperature for about 10 minutes (don’t skip this!) before transferring to the fridge. Chill for at least 2 hours to let the fudge set beautifully firm yet creamy.
Step 6: Slice and Enjoy
Once your fudge is fully set, use the parchment edges to lift it out gently. Then grab a buttered knife — seriously, butter your blade to get the cleanest, smoothest cuts without sticking. Slice into 16 squares and savor each delicious bite.
Pro Tips for Making Marshmallow Swirl Fudge Recipe
- Low and Slow Melting: Heating the chocolate mixture gently and stirring constantly prevents burning or seizing — I’ve made this mistake and it’s not pretty!
- Marshmallow Timing: Add marshmallows off the heat and fold quickly so they keep their shape and melt slightly for that perfect swirl.
- Use Parchment Paper: Trust me, it makes removing and cutting fudge a total breeze—no sticky pan struggles.
- Butter Your Cutting Knife: Slipping a little butter on your knife before slicing avoids ragged edges and keeps the fudge squares looking neat.
How to Serve Marshmallow Swirl Fudge Recipe

Garnishes
I like to sprinkle just a touch of crushed peppermint on top during the swirl step in winter; it looks festive and tastes refreshing. For everyday indulgence, a tiny pinch of flaky sea salt on the finished fudge takes it over the top — balancing sweet with subtle saltiness. Simple and stunning.
Side Dishes
Serve this fudge alongside a steaming cup of coffee or herbal tea for a cozy snack. A tall glass of cold milk is a classic pairing — I always keep some chilled in the fridge. If you want to get fancy, whipped cream on the side complements the rich fudge beautifully.
Creative Ways to Present
I love arranging these fudge squares on a pretty platter layered between wax paper for parties. For gift-giving, wrapping each square in parchment and tying with a ribbon makes it feel extra special. You can also layer with crushed candy canes or nuts in the pan before chilling for a delightful surprise inside.
Make Ahead and Storage
Storing Leftovers
I store leftover fudge in an airtight container in the fridge to keep it fresh and soft for up to a week. If stacking pieces, I place parchment paper between layers so they don’t stick together — makes serving easier later on.
Freezing
Freezing fudge is a game changer! I cut mine into squares, layer them with parchment paper, and seal tight in an airtight container. It freezes well for up to three months. When ready to enjoy, just thaw overnight in the refrigerator for best texture.
Reheating
If your fudge feels too firm after chilling, let it come to room temperature before serving. I avoid microwaving because it softens unevenly. Warming a bit in the fridge or leaving on the counter for 10-15 minutes works perfectly to soften without losing the swirl effect.
FAQs
-
Can I use regular marshmallows instead of mini marshmallows in this fudge?
You can, but mini marshmallows are ideal because they fold in and create swirls without dissolving completely. Larger marshmallows might melt more and not give you the same texture contrast. If you only have regular ones, chopping them into smaller pieces helps mimic the effect.
-
Why does my fudge sometimes turn grainy?
Grainy fudge usually happens when chocolate overheats or the sugar crystallizes. To avoid this, always melt over low heat and stir constantly. Using sweetened condensed milk helps maintain smoothness. Also, avoid stirring once you pour it into the pan.
-
Can I substitute the semi-sweet chocolate chips with milk chocolate?
Absolutely! Milk chocolate will make your fudge sweeter and creamier. Just keep in mind it’s softer, so your fudge might set slightly softer and sweeter than with semi-sweet. It’s a lovely variation if you prefer milder chocolate.
-
How long does this fudge keep?
When stored in an airtight container in the fridge, this fudge stays fresh for up to 7 days. For longer storage, freezing is your best bet — it keeps well for up to 3 months when properly wrapped.
-
Do I need to use parchment paper in the pan?
While not absolutely necessary, parchment paper makes your life way easier. It allows you to lift the fudge out of the pan in one piece and makes cutting cleaner. Trust me, this step saves lots of frustration!
Final Thoughts
I’ve made this Marshmallow Swirl Fudge Recipe countless times for friends, family, and yes, even just myself on a quiet weekend afternoon, and it never fails to deliver that perfect bite of chocolatey happiness. What I love most is how approachable it is — such a sweet reward for just a little stirring and waiting. Give it a try, and soon you’ll have your own batch of fudge magic to share or savor whenever the craving strikes. Trust me, once you taste that marshmallow swirl melting into rich fudge, it’s a keeper in your recipe box!
Print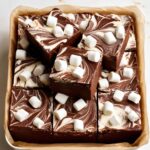
Marshmallow Swirl Fudge Recipe
- Prep Time: 10 minutes
- Cook Time: 10 minutes
- Total Time: 2 hours 20 minutes
- Yield: 16 servings
- Category: Dessert
- Method: Stovetop
- Cuisine: American
Description
This Marshmallow Swirl Fudge is a rich and creamy treat combining smooth semi-sweet chocolate with sweetened condensed milk and soft mini marshmallows. Perfectly swirled to retain little bursts of marshmallow texture, this fudge is easy to prepare and ideal for gifting or special occasions.
Ingredients
Main Ingredients
- 3 cups semi-sweet chocolate chips
- 1 (14 oz) can sweetened condensed milk
- 2 tbsp unsalted butter
- 1/8 tsp salt
- 1 tsp vanilla extract
- 1 1/4 cups mini marshmallows
Instructions
- Prep Your Pan: Line an 8×8-inch square baking pan with parchment paper, leaving a little overhang on the sides for easy removal.
- Melt Chocolate Mixture: In a medium saucepan over low heat, combine semi-sweet chocolate chips, sweetened condensed milk, unsalted butter, and salt. Stir constantly until fully melted and smooth to avoid seizing the chocolate.
- Add Vanilla: Remove the pan from heat and stir in vanilla extract until well combined.
- Fold in Marshmallows: Quickly fold in the mini marshmallows gently with a spatula to create swirls without melting them completely.
- Transfer to Pan and Swirl: Pour the mixture into the prepared baking pan. Use the spatula to gently swirl the top so some marshmallows peek through.
- Chill and Set: Let the fudge cool at room temperature for 10 minutes, then refrigerate for at least 2 hours until fully set.
- Slice and Serve: Use the parchment overhang to lift the fudge out of the pan, then cut into 16 squares with a buttered knife for clean cuts.
Notes
- Don’t overheat the chocolate; stir constantly on low heat to prevent seizing.
- Add marshmallows last and fold gently to keep them from fully melting and preserve the swirl effect.
- Use parchment paper in the pan for easy lifting and cleaner cutting.
- A buttered knife helps achieve smooth, clean fudge cuts.
- Store in an airtight container to prevent dryness.
- Substitute semi-sweet chips with dark or milk chocolate based on preference.
- Use marshmallow fluff if mini marshmallows are unavailable.
- Add crushed peppermint or chopped nuts to vary texture and flavor.
- Mix in peanut butter chips for a tasty twist.
- For a dairy-free version, swap with vegan condensed milk and chocolate chips.
- Make up to 5 days in advance and store in the fridge or freeze for up to 3 months with parchment between layers.
Nutrition
- Serving Size: 1 square
- Calories: 165 kcal
- Sugar: 21 g
- Sodium: 35 mg
- Fat: 7 g
- Saturated Fat: 4 g
- Unsaturated Fat: 3 g
- Trans Fat: 0 g
- Carbohydrates: 25 g
- Fiber: 1 g
- Protein: 1 g
- Cholesterol: 10 mg

