Melt-in-Your-Mouth Danish Butter Cookies Recipe
If you’re on the hunt for the ultimate buttery treat, you’re going to love this Melt-in-Your-Mouth Danish Butter Cookies Recipe. These cookies are exactly what their name promises—delicate, tender, and perfectly crisp right at the edges. I’ve made them countless times, and every batch fills the kitchen with that distinct, warm vanilla and butter aroma that just screams comfort. Trust me, whether you’re baking for the holidays, a cozy afternoon tea, or just because, these cookies will quickly become your go-to.
Why This Recipe Works
- Perfect Butter to Flour Ratio: It creates a cookie that’s tender yet holds its shape beautifully when piped.
- Chilling the Dough: This simple step stops cookies from spreading too much, keeping those signature shapes crisp.
- Combination of Flours: Using cake flour along with all-purpose flour gives you a crisp exterior and melt-in-the-mouth texture.
- Easy to Customize: Whether you want to add sprinkles or dip in chocolate, this dough is forgiving and versatile.

Ingredients & Why They Work
Every ingredient in this Melt-in-Your-Mouth Danish Butter Cookies Recipe plays a crucial role in crafting those iconic buttery bites you remember from your childhood. I recommend using high-quality European butter for richness and to ensure that soft, delicate crumb.

- European salted butter: Choose this for its higher fat content and a subtle salty kick that balances the sweetness.
- Granulated sugar: Gives a clean, straightforward sweetness and aids in that pretty crisp edge.
- Salt: A tiny pinch that enhances all the other flavors.
- Egg yolks: They enrich the dough, making the cookies tender and giving a lovely yellow hue.
- Vanilla extract: Adds warmth and depth—don’t skip it!
- Whole milk: Just enough to soften the batter for piping, so the cookies don’t crack.
- All-purpose flour: Provides structure and chewiness.
- Cake flour: Lightens the dough, making each cookie deliciously tender and crumbly.
- Coarse sugar for decorating: Optional, but it gives a delightful crunch and sparkle on top.
Tweak to Your Taste
I love that this Melt-in-Your-Mouth Danish Butter Cookies Recipe is so flexible. Over the years, I’ve played around with adding a little twist here and there, and you absolutely can to match your flavor mood or dietary needs.
- Variation: Sprinkling a little cinnamon or cardamom into the dough gives a cozy spice note that’s perfect for winter baking in my experience.
- Dietary Mods: For a dairy-free version, try substituting the butter for a good-quality vegan butter, though textures can differ slightly.
- Flavor Add-Ins: A handful of finely chopped nuts or finely grated lemon zest can add a fresh zing or crunch that works surprisingly well.
Step-by-Step: How I Make Melt-in-Your-Mouth Danish Butter Cookies Recipe
Step 1: Prep with Patience
Start by making room in your refrigerator because chilling those shaped cookies is key. I lay out two baking sheets lined with parchment paper or silicone mats. Without chilling, the piped cookies like rosettes or pretzels tend to lose their shape and spread too thin. Trust me on this one—I learned the hard way!
Step 2: Cream the Butter and Sugar to Perfection
In your stand mixer fitted with the paddle attachment, cream the room temperature European salted butter on medium speed until it’s smooth and soft. Then, with the mixer on low, slowly add sugar and salt, upping speed to medium. You’ll want it light and fluffy—this step aerates the dough for that tender texture.
Step 3: Bring in the Eggs, Vanilla & Milk
While mixing on medium, add the egg yolks, vanilla extract, and whole milk. Scrape down the bowl so everything mixes evenly—a small but important step to avoid any flour pockets later.
Step 4: Add the Flours Slowly
Whisk together the all-purpose and cake flours, then add them in two batches to the mixer on low speed. Scrape down the sides again to ensure everything comes together without overmixing. If your dough feels too stiff to pipe, a splash more milk will soften it nicely, but be gentle here.
Step 5: Pipe, Chill, and Bake
Transfer the dough to a large piping bag fitted with a ½-inch open star tip. Pipe your cookies onto lined sheets, spacing them about two inches apart to allow a little expansion. Sprinkle with coarse sugar for that inviting sparkle. Pop the trays into the fridge for 20-30 minutes—don’t skip this, it makes all the difference in the final texture.
Preheat your oven to 350°F and place the rack in the middle. Bake the cookies for 10-15 minutes or until edges turn just a hint of golden brown. Cooling them on the baking sheet for a few minutes before moving to a wire rack keeps them from breaking apart.
Pro Tips for Making Melt-in-Your-Mouth Danish Butter Cookies Recipe
- Butter Temperature Matters: I’ve found leaving the butter out for about 45 minutes to reach around 67°F yields the best creamy, smooth dough without being greasy.
- Keep an Eye on Baking Time: Cookies can go from perfectly golden to overly brown quickly—10-15 minutes is your safe window, but start checking at 10.
- Mix Gently: Overmixing develops gluten and toughens these tender cookies, so stop mixing once flours disappear.
- Flour Measurement: Using a kitchen scale prevents adding too much flour, which can dry out the cookies—definitely worth the small investment!
How to Serve Melt-in-Your-Mouth Danish Butter Cookies Recipe

Garnishes
I usually keep things classic with just a sprinkle of coarse sugar or pearl sugar before baking—it adds a lovely crunch and sparkle. Sometimes, I dip half the cookie edges in melted dark or milk chocolate for a special occasion, which instantly impresses guests.
Side Dishes
These cookies are perfect with a hot cup of black tea, coffee, or even a creamy hot chocolate on chilly days. I’ve also served them with a side of fresh berries or a citrusy marmalade to cut through the richness, which makes a lovely contrast.
Creative Ways to Present
For celebrations, I arrange them in pretty tins with layers of parchment paper or wrap individually in cellophane tied with a ribbon—everyone loves receiving these as homemade gifts! You can also stack them in a glass jar for a cute kitchen display or party favor.
Make Ahead and Storage
Storing Leftovers
I always store my leftover butter cookies in an airtight container at room temperature. This keeps them fresh and crisp for up to five days. Leaving them out overnight lets the crisp edges soften slightly while keeping the melt-in-your-mouth center intact, which I find irresistible.
Freezing
If I’m making a big batch, I freeze the unbaked piped cookies on the sheet first, then transfer them to a freezer-safe container. They freeze beautifully for up to three months. When you’re ready, just pop them straight into the oven from frozen—add a couple of extra minutes to baking time and voilà.
Reheating
I reheat leftover cookies in a preheated 300°F oven for about 3-5 minutes to restore that just-baked crispness. Avoid microwaving as it tends to make them chewy rather than maintain the signature melt-in-your-mouth texture.
FAQs
-
Can I use unsalted butter instead of salted?
Absolutely! If you use unsalted butter, just add about ¼ teaspoon of kosher salt to the dough to balance the flavors. Salt enhances the sweetness and brings out the richness of the butter, so don’t skip it.
-
Why do I need to chill the cookies before baking?
Chilling solidifies the fat in the dough, which helps the cookies hold their shape when baked instead of spreading too thin. It’s a small step that makes a big difference in the final presentation and texture of the cookies.
-
Can I skip the cake flour and use only all-purpose flour?
You can, but the texture will be a bit different. Cake flour lightens the dough, giving that melt-in-your-mouth quality. If you must skip it, increase all-purpose flour slightly, but expect a sturdier cookie rather than a delicate crumb.
-
How do I prevent cookies from turning hard after baking?
Avoid overbaking and store cookies in an airtight container at room temperature. Adding a small piece of bread into the container can help keep them soft by maintaining humidity.
-
What shapes work best with this recipe?
I love using a large open star piping tip to create classic rosettes, pretzels, or circles, but feel free to experiment with squares or custom shapes—the dough holds details well after chilling.
Final Thoughts
This Melt-in-Your-Mouth Danish Butter Cookies Recipe is truly a labor of love that brings a hint of Danish hygge to your kitchen. From the moment you pipe the dough to when you enjoy that first crisp bite dissolving effortlessly, it’s a joyful experience. I hope you’ll give this a try and see just how easy it is to impress everyone with homemade elegance. Happy baking, and don’t forget to share some—I know it’s tough, but trust me, friends will thank you!
Print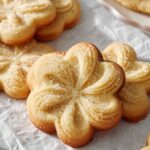
Melt-in-Your-Mouth Danish Butter Cookies Recipe
- Prep Time: 15 minutes
- Cook Time: 15 minutes
- Total Time: 1 hour 30 minutes
- Yield: 24 cookies
- Category: Dessert
- Method: Baking
- Cuisine: Danish
- Diet: Vegetarian
Description
Danish Butter Cookies are classic melt-in-your-mouth treats made with European salted butter, sugar, egg yolks, and a mix of all-purpose and cake flour. These crisp, buttery cookies are piped into pretty shapes, chilled, then baked to a light golden perfection. Perfect for holiday gifting or anytime indulgence!
Ingredients
Cookie Dough
- 1 cup (227 g) European salted butter, room temperature
- ½ cup (100 g) granulated sugar
- ⅛ teaspoon salt
- 2 egg yolks
- 2 teaspoons (10 g) vanilla extract
- 1 tablespoon (15 g) whole milk or more to soften
- 2 cups (220 g) all-purpose flour
- ½ cup (50 g) cake flour
For Decoration
- Coarse sugar for decorating
Instructions
- Prepare refrigerator and baking sheets: Make space in your refrigerator for a baking sheet to chill shaped cookies. Line two baking sheets with parchment paper or silicone mats and set aside.
- Cream butter, sugar, and salt: Using a stand mixer fitted with a paddle attachment, beat the butter on medium speed until smooth. Slowly add sugar and salt while mixer runs on low, then increase to medium speed until light and fluffy.
- Add egg yolks, vanilla, and milk: Pour in egg yolks, vanilla extract, and milk while mixing on medium speed. Mix until fully combined, scraping down the bowl sides as needed.
- Incorporate dry ingredients: Whisk together all-purpose and cake flour in a separate bowl. Add flour mixture to mixer in two batches on low speed, mixing just until combined without flour streaks. If dough is too stiff to pipe, add another tablespoon of milk.
- Pipe the cookies: Place dough into a large piping bag fitted with a ½-inch open star tip. Pipe 2-inch cookies into shapes like rosettes, pretzels, circles, or squares on prepared baking sheets, spacing them 2 inches apart. Sprinkle with coarse sugar if desired. Chill in refrigerator for 20-30 minutes.
- Preheat oven: Set oven to 350°F and position the rack in the middle.
- Bake cookies: Bake chilled cookies for 15 minutes or until edges are just lightly golden. Allow to cool on baking sheets for 5 minutes, then transfer to wire racks to cool completely.
Notes
- Use room temperature butter (about 67°F) to ensure easy mixing and smooth batter.
- Use room temperature eggs for even baking; warm cold eggs in slightly warm water for 5 minutes if needed.
- Do not overmix the batter to avoid tough cookies caused by gluten development.
- Keep an eye on cookies during baking as times vary with cookie size and shape.
- You can substitute all-purpose flour entirely (260 g) if cake flour is unavailable, although texture may differ slightly.
- Use a kitchen scale for accurate flour measurement. If unavailable, fluff flour, spoon lightly into measuring cup, and level with a knife.
- If using unsalted butter, add ¼ teaspoon kosher salt to dough.
- Store cookies in an airtight container at room temperature for up to 5 days, or freeze for up to 3 months.
- Chill shaped cookies up to 2 days before baking; cover if chilling longer than 30 minutes.
- You can freeze unbaked shaped dough for 2-3 months; bake frozen dough directly, adding a few extra minutes to baking time.
Nutrition
- Serving Size: 1 cookie
- Calories: 90 kcal
- Sugar: 5 g
- Sodium: 30 mg
- Fat: 6 g
- Saturated Fat: 3.5 g
- Unsaturated Fat: 2 g
- Trans Fat: 0 g
- Carbohydrates: 9 g
- Fiber: 0.3 g
- Protein: 1 g
- Cholesterol: 25 mg

