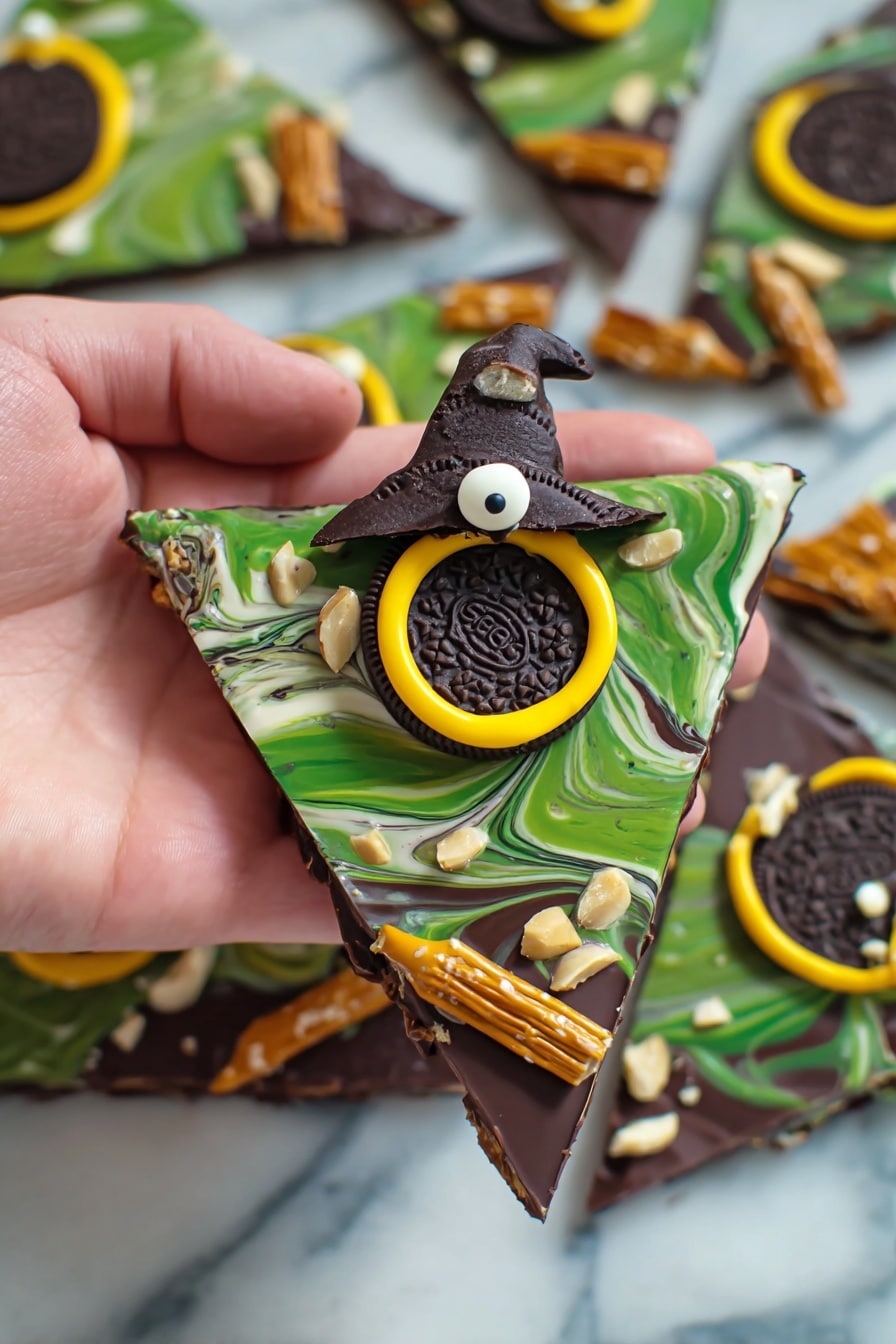
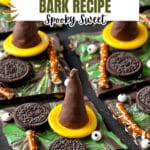
Melted Witch Halloween Bark Recipe
If you’re looking for a spooktacular treat to impress your friends and family this Halloween, you have to try my Melted Witch Halloween Bark Recipe. It’s fun, festive, and honestly, a fan-freaking-tastic way to combine chocolatey goodness with creepy-cute witchy vibes. Whether you’re making it for a party or just because you love anything seasonal, this recipe brings together homemade witch hats, brooms, and that magical Halloween bark that’s just too good to resist. Trust me, once you make this, it’s going to be your new fall obsession!
Why This Recipe Works
- Layered Fun: Combining witch hats, brooms, and bark creates a visually exciting and texturally diverse treat.
- Simple Ingredients: Uses mostly candy melts and everyday baking staples—no complicated sourcing needed.
- Customization Friendly: Easy to tweak with different chocolates or candy decorations to match your style.
- Perfect Festive Presentation: The finished bark is perfect for gifting or setting out as a Halloween party centerpiece.

Ingredients & Why They Work
The ingredients here are fantastic because each one brings a little piece of magic to the Witch Halloween Bark. You don’t need anything fancy or rare; just a few clever choices and a sprinkle of creativity can transform simple chocolate and candy into a Halloween masterpiece. When shopping, prioritize quality candy melts and good chocolate for melting to get that perfectly smooth and shiny finish.
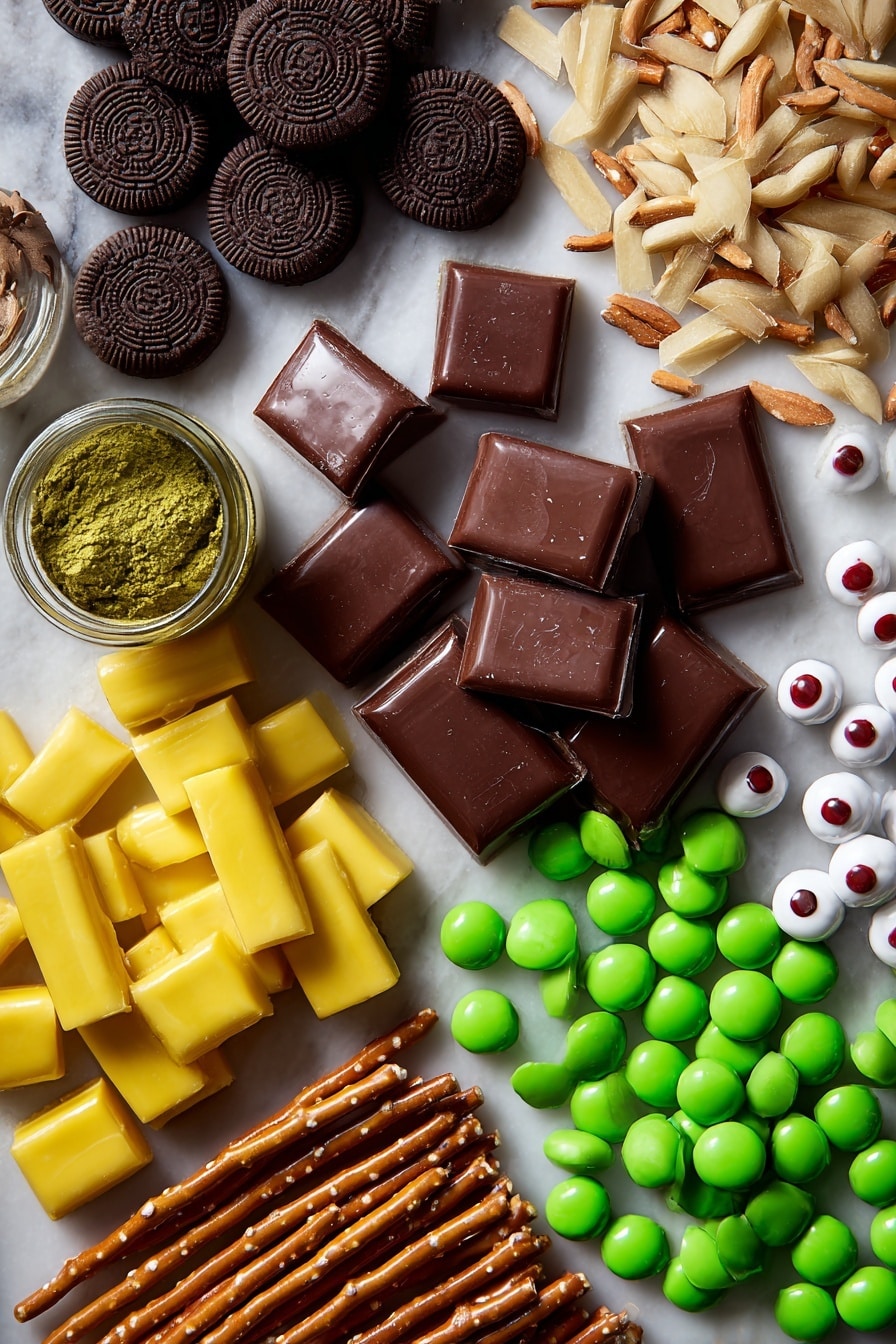
- Milk chocolate candy melts: These melt smoothly and harden with a nice shine, making the base for the hats and bark.
- Chocolate cookies: I usually go with Girl Guide cookies, but Oreos or any crunchy chocolate cookie will work great.
- Bugles: Perfect for witch hat brims because of their shape and crunch—they’re surprisingly versatile!
- Fondant (yellow): You’ll use this to make the little rim detail on the witch hats—easy to mold and adds a cute color pop.
- Semi sweet dark chocolate: Great for swirling into the milk chocolate bark to add depth of flavor and contrast.
- Milk chocolate (melting chocolate or chips): This is the main chocolate base in the bark—melts well and tastes creamy.
- Almond slivers: These mimic broom bristles—adding crunch and a natural touch.
- Pretzel sticks: Use these for the broom handles—salty, crunchy, and visually perfect.
- Green candy melts: For spooky puddles on the bark—bright, festive, and fun to swirl.
- White or small red candy eyeballs: These are the finishing creepy-cute touches that give the bark personality.
Tweak to Your Taste
I like to play around with the colors and types of candy melts depending on the vibe I want. Sometimes, I’ll swap out the green candy melts for purple or orange if I want a bolder look. You should definitely make this recipe your own! After all, Halloween is about creativity and a little mischief.
- Variation: I once added crushed peppermint candy to the bark for a minty surprise—it was a fun holiday twist that my family adored.
- Dietary Modification: Want to keep it dairy-free? Look for vegan candy melts or use dark chocolate chips that are dairy-free.
- Seasonal Change: Swap the eyes for mini marshmallows or gummy worms for a less “witchy” but still festive bark.
Step-by-Step: How I Make Melted Witch Halloween Bark Recipe
Step 1: Melt and Dip the Bugles for Witch Hats
Start by melting half the package of milk chocolate candy melts in the microwave at 50% power in 30-second bursts. Stir between each burst because chocolate can easily overheat and seize—slow and steady is the way to go. Once smooth, dip each bugle into the melted chocolate and gently shake off the extra so it’s not dripping. Then place the bugle onto your chocolate cookie, pressing lightly to set the “hat brim.” Let them harden at room temperature—this usually takes about 15-20 minutes.
Step 2: Add the Fondant Rim for Extra Witchy Flair
While the hats set, roll a small snake from yellow fondant and carefully wrap it around the rim of each cookie hat. You can trim any excess with a small knife. This little detail makes such a huge difference, giving your hats that extra dash of character. Fondant can be sticky, so keep your hands lightly dusted with powdered sugar if needed.
Step 3: Crafting the Witch Brooms
Reheat any leftover milk chocolate candy melts until smooth again, then dip one end of each pretzel stick into the chocolate. Place on parchment paper. Next, add 4 almond slivers on top of the chocolate-covered end to mimic broom bristles. Spoon a little more melted chocolate over the almonds to secure them. Let this harden completely before trimming the edges with a paring knife—this step takes patience but is worth it for the perfect broom look.
Step 4: Make the Swirly Halloween Chocolate Bark Base
Now let’s get to the bark! Line a baking sheet with parchment paper and melt your milk chocolate (or milk chocolate chips) in 30-second intervals at 50% power, stirring until silky smooth. Pour this onto the parchment sheet and spread it out evenly. Melt the semi-sweet dark chocolate the same way, then drop spoonfuls on top and gently swirl with a knife to create a marbled effect. Repeat the process with the green candy melts, dropping puddles around and swirling a bit on the edges for a spooky vibe.
Step 5: Assemble the Witch Hats, Brooms, and Eyes
Arrange the witch hats and brooms evenly on top of the swirling chocolate bark, pressing very gently to embed them just a bit. Sprinkle the candy eyeballs throughout for that perfect eerie touch. Give the baking sheet a few gentle taps on the counter (3 or 4 times) to release any air bubbles trapped beneath the chocolate. Set your masterpiece aside for 1 to 2 hours to fully harden—your patience here means cleaner cuts later!
Pro Tips for Making Melted Witch Halloween Bark Recipe
- Watch Your Chocolate Temperature: Melting at half power and stirring frequently prevents burnt chocolate, ensuring a smooth finish.
- Don’t Rush Setting: Allow the bark and decorations to fully harden at room temp for the best texture—refrigeration can cause bloom.
- Use Parchment Paper: This makes removing the bark from the pan effortless and keeps everything neat for cutting.
- Trim with a Sharp Knife: When cutting the hardened bark, a hot, sharp knife gives the cleanest edges and prevents cracking.
How to Serve Melted Witch Halloween Bark Recipe
Garnishes
I like to sprinkle extra candy eyeballs and chopped nuts around the serving platter for a little extra creepy crawlspace feel. If you’re serving kids, tiny gummy spiders or candy bones are adorable garnishes that add whimsy and delight.
Side Dishes
This bark goes wonderfully alongside warm apple cider or a rich pumpkin spice latte. For parties, pair it with other Halloween treats like caramel apples or spiced popcorn to keep the fall vibes flowing.
Creative Ways to Present
For a Halloween party, I like to break the bark into large pieces and place it layered like a stack in a rustic wooden tray lined with black tissue paper. Draping faux cobwebs and placing tiny candles around adds so much ambiance. You can also gift smaller pieces wrapped in clear bags with festive ribbons—a guaranteed hit for party favors!
Make Ahead and Storage
Storing Leftovers
I store leftover bark in an airtight container layered with parchment paper between pieces. Keeping it in a cool, dry place prevents the candy melts from sweating or sticking together. It’s still tasty several days later but best enjoyed fresh for ultimate crunch.
Freezing
If you want to freeze the bark, wrap pieces tightly in plastic wrap then place them in a freezer-safe container. When thawed, it maintains texture nicely. Just avoid refreezing after thawing to keep the flavors at their best.
Reheating
This bark is best enjoyed at room temperature, so if refrigerated or frozen, let it sit out for 15-20 minutes before serving. Avoid heating it again, as melting chips and candy melts can get grainy or lose shape.
FAQs
-
Can I use regular chocolate instead of candy melts for the witch hats?
Yes, you can use regular milk chocolate, but candy melts are designed to melt smoothly and harden with a nice gloss, which helps the bugles stick better and keeps the hats looking polished. If you use regular chocolate, be sure to temper it properly for the best result.
-
What’s the best way to prevent the candy melts from seizing?
Melting candy melts at 50% microwave power in short intervals with frequent stirring is key. Avoid any water getting into the chocolate, and never rush the melting process. If it does seize, adding a small amount of vegetable oil or shortening while stirring can help smooth it out.
-
How do I make sure the bark cracks nicely and doesn’t crumble?
Pour the melted chocolate evenly and allow it to fully cool and harden on parchment paper at room temperature. Avoid stacking or pressing heavy items on top. Using a sharp knife to cut prevents crumbling and jagged edges.
-
Can this recipe be vegan or dairy-free?
Absolutely! Swap the milk chocolate candy melts and chips for plant-based or dairy-free versions, and double-check that your cookies and other components are vegan-friendly. There are great vegan almond slivers and pretzel options, so you can enjoy this recipe without dairy.
Final Thoughts
I’m honestly so excited every time I make the Melted Witch Halloween Bark Recipe because it’s playful, delicious, and really brings out the creative side of baking. It’s not just a treat, it’s a Halloween experience you can share with everyone around you. I love seeing the smiles when people spot those little candy eyes and broomsticks, and once you try it, I’m confident you’ll have your own favorite ritual for this spooky season. So, go ahead—grab your candy melts and cookie stash, and let’s make some magic in your kitchen!
Print
Melted Witch Halloween Bark Recipe
- Prep Time: 30 minutes
- Cook Time: 2 hours
- Total Time: 2 hours 30 minutes
- Yield: 12 servings
- Category: Dessert
- Method: No-Cook
- Cuisine: American
Description
A spooky and delicious Halloween treat combining chocolate witch hats, brooms, and colorful melted chocolate bark with candy decorations. Perfect for festive parties and easy to make with simple ingredients and fun decorative touches.
Ingredients
Witch Hats
- ½ 340 g package of milk chocolate candy melts
- 12 chocolate cookies (such as Girl Guide or Oreos)
- 12 bugles
- Yellow fondant
Witch Brooms
- 4 oz semi sweet dark chocolate
- 2 lbs milk chocolate melting chocolate or milk chocolate chips
- 48 almond slivers (approximately)
- 12 pretzel sticks
Chocolate Bark
- ½ 340 g package of green candy melts
- 18 white or small red candy eyeballs (approximately)
Instructions
- Prepare Witch Hats: Melt the milk chocolate candy melts at ½ power in 30 second intervals, stirring between, until smooth. Dip each bugle in the melted chocolate and gently shake off excess. Immediately place the bugles onto the chocolate cookies and allow to harden completely. Once hardened, roll yellow fondant into thin snakes and fit around the rim of each cookie hat, trimming to fit perfectly.
- Prepare Witch Brooms: Reheat remaining milk chocolate candy melts if needed. Dip one end of each pretzel stick into melted milk chocolate and lay them on parchment paper. Add approximately 4 almond slivers to each pretzel end to resemble broom bristles, then spoon a little melted chocolate over the almonds to secure them. Let harden fully. Trim broom edges neatly with a paring knife once set.
- Make Chocolate Bark Base: Line a baking sheet with parchment paper. Melt the milk chocolate melting chocolate or chips at 50% power in 30 second intervals, stirring in between until fully melted. Pour the melted milk chocolate onto the prepared pan and spread evenly.
- Add Chocolate Swirls: Melt the semi sweet dark chocolate in the microwave using 30 second intervals at 50% power, stirring until smooth. Drop spoonfuls onto the milk chocolate base and swirl gently with a knife to create a marbled effect.
- Add Green Candy Melt Puddles: Melt green candy melts similarly in the microwave. Drop spoonfuls onto the chocolate bark in spaced puddles and swirl gently at the edges with a knife for a spooky effect.
- Assemble Decorations: Place the cookie witch hats evenly over the chocolate bark. Distribute the witch brooms evenly throughout the bark. Scatter the candy eyeballs on top for a creepy touch.
- Remove Air Bubbles: Firmly bang the bottom of the baking sheet on the counter 3-4 times to release any trapped air bubbles and ensure even spreading.
- Set and Serve: Set aside the chocolate bark to harden for 1-2 hours at room temperature. Once fully hardened, cut into pieces and serve.
Notes
- Use a microwave-safe bowl for melting chocolates and candy melts.
- Be careful not to overheat the chocolate to avoid burning; stir often.
- Fondant can be colored with food coloring if yellow fondant is unavailable.
- Almond slivers can be substituted with shredded coconut or thinly sliced nuts for broom bristles.
- Use different cookie types according to preference; any sturdy chocolate cookie works well.
- Store leftover bark in an airtight container at room temperature away from heat.
- For extra fun, add sprinkles or edible glitter to the bark before hardening.
Nutrition
- Serving Size: 1 serving
- Calories: 350 kcal
- Sugar: 30 g
- Sodium: 120 mg
- Fat: 18 g
- Saturated Fat: 10 g
- Unsaturated Fat: 7 g
- Trans Fat: 0 g
- Carbohydrates: 40 g
- Fiber: 2 g
- Protein: 4 g
- Cholesterol: 15 mg