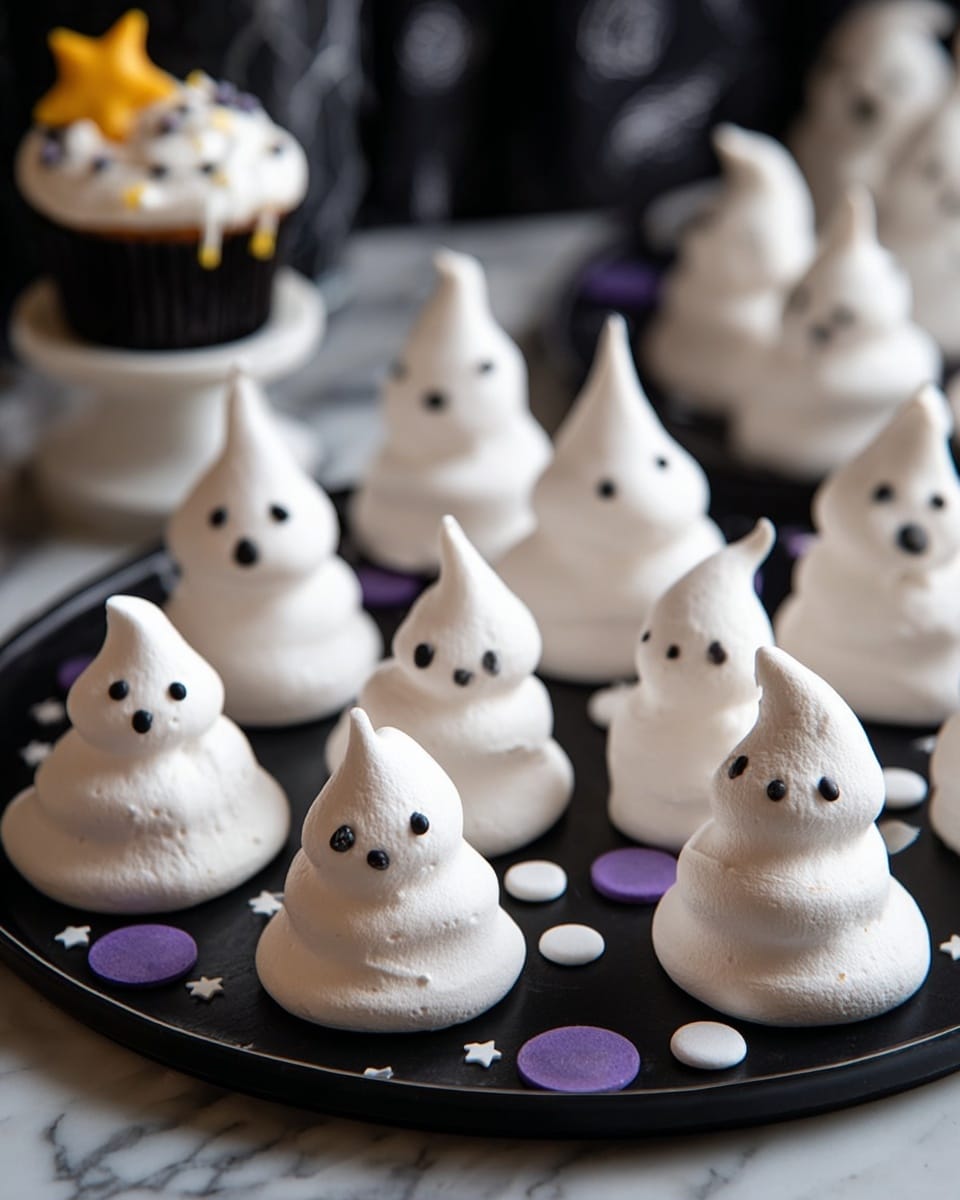
Meringue Ghosts Recipe
If you’re looking for a delightfully spooky yet sweet treat to impress friends or just enjoy at home, this Meringue Ghosts Recipe is a total game-changer. Light, airy, and irresistibly cute, these little ghostly meringues bring a fun Halloween vibe without fussing over complex ingredients. Trust me, once you try them, you’ll want to make them every year — I sure do!
Why This Recipe Works
- Simple Ingredients: Just egg whites and sugar come together to make magic, no complicated flavor combos needed.
- Easy Decoration: Using black food coloring for the ghost faces makes it quick and fun without extra baking.
- Long Bake, Crisp Texture: Low and slow baking guarantees crisp, melt-in-your-mouth meringue ghosts every time.
- Kid-Friendly & Festive: A perfect project for little hands to get involved with and enjoy making spooky snacks.

Ingredients & Why They Work
The beauty of this meringue ghost recipe lies in its simplicity — fewer ingredients mean the quality really shines. Using room-temperature egg whites whipped to stiff peaks with superfine sugar creates that glossy, stable base perfect for shaping ghosts that hold their fun forms.
- Caster (Super Fine) Sugar: It dissolves faster in egg whites, making your meringue smooth and shiny without graininess.
- Egg Whites: Fresh and room temperature whites whip up better and give volume — key for light fluffy ghosts.
- Black Food Colouring Gel or Paste: This helps create vivid ghost faces easily without watering down your meringues.
Tweak to Your Taste
I love using this basic but magical Meringue Ghosts Recipe as my canvas. Sometimes I add a few drops of vanilla extract for a hint of warmth, and other times I color the meringue with a subtle pastel tint before piping to make whimsical spookier friends!
- Vanilla Variation: Adding vanilla has given my meringues a gentle flavor that pairs beautifully with hot chocolate.
- Chocolate-Dipped Ghosts: I’ve dipped the bottoms in melted dark chocolate for extra indulgence—and who doesn’t love chocolate?
- Food Coloring Fun: Use edible dust or pastel gels to create pastel ghosts perfect for a kid’s party or springtime twist.
- Diet Adjustments: This recipe naturally fits gluten and dairy-free diets, making it great for many special eating needs.
Step-by-Step: How I Make Meringue Ghosts Recipe
Step 1: Prep Your Tools and Oven
Start by preheating your oven to 100°C (212°F). Line a large baking sheet with non-stick baking parchment — this is essential because your meringue ghosts will stick to any residual grease. I always wipe my bowl and beaters with a little vinegar and ensure everything is completely dry and spotless before moving on.
Step 2: Whisk the Egg Whites to Soft Peaks
Using a clean mixing bowl, whisk the room temperature egg whites on medium speed until soft peaks form – the kind that slightly bend when you lift the whisk. This usually takes a couple of minutes. Pro tip: If you don’t see any volume, don’t give up—try switching to a handheld mixer or double-check your utensils are 100% grease-free.
Step 3: Add Sugar Gradually and Whisk to Stiff Peaks
Spoon in the caster sugar gradually, one spoonful at a time, while continuing to whisk. Patience here is everything — rushing this step means your meringue won’t be glossy or hold its shape. Whisk until you reach stiff, shiny peaks that stand straight up when you lift the whisk. This step is my favorite because that glossy texture looks so dreamy!
Step 4: Pipe and Shape Your Ghosts
Fit a piping bag with a 1cm round nozzle (or just snip the tip wide enough) and fill it with your meringue. Pipe ghost shapes onto your lined baking sheet — little swirly dollops that look like floating ghosts. Don’t worry about perfect shapes, their charm is in their quirky forms!
Step 5: Bake and Cool Slowly
Bake at the low temperature for about an hour, until the ghosts are crisp and lift easily off the parchment. Don’t open the oven door to peek too often! Turn off the oven and leave the meringues in there for a few hours or better yet, overnight — this helps them dry out fully and ensures that delightful crisp texture.
Step 6: Give Your Ghosts Their Spooky Faces
Once cold, grab your black food coloring pen or a tiny paintbrush dipped in black gel and draw on little eyes and mouths. I like to let my kids create silly or spooky faces, making it a fun project and getting everyone involved!
Pro Tips for Making Meringue Ghosts Recipe
- Perfect Bowl Prep: I always wipe my mixing bowl and beaters with white vinegar and a paper towel to remove grease, which is a meringue killer.
- Slow Sugar Addition: Adding sugar slowly allowed me to avoid gritty meringue and get that signature glossy shine.
- Low and Slow Baking: Baking at 100°C ensures the meringues dry out without browning, so they stay snow-white—just like little ghosts.
- No Peeking: Opening the oven door mid-bake can cause cracks; patience really pays off for smooth, crisp meringues.
How to Serve Meringue Ghosts Recipe
Garnishes
I usually keep it simple with those adorable black eyes and mouths drawn on with food coloring. But sometimes I sprinkle a tiny pinch of edible silver glitter on top for that magical shimmer—it’s subtle but adds a festive sparkle that guests love.
Side Dishes
Pair these meringue ghosts with a cozy cup of hot cocoa or a spiced pumpkin latte for the perfect seasonal treat. They also work wonderfully alongside a bowl of fresh berries or a soft pumpkin mousse if you’re going for a Halloween-themed dessert spread.
Creative Ways to Present
For a fun Halloween party, I’ve arranged the ghosts on a tiered cake stand mixed with mini candy pumpkins and spider rings for a playful touch. Another time, I served them nestled in clear treat bags tied with orange and black ribbons — perfect little take-home favors for guests.
Make Ahead and Storage
Storing Leftovers
I store leftover meringue ghosts in an airtight container at room temperature. This keeps them crisp for up to a week. Just be careful to keep them away from humidity; otherwise, they’ll soften up quickly and lose that great crunch.
Freezing
If you want to make these well ahead, you can freeze unbaked piped meringues. Just flash freeze them on the baking tray until hard, then transfer to a sealed container; bake straight from frozen, adding a few extra minutes. I’ve done this for Halloween parties when I needed to prep in advance, and it worked like a charm.
Reheating
I usually don’t reheat these since they’re best crisp and cool. But if they soften up, a quick 5–10 minute zap in a very low oven (about 90°C) can revive the crunch. Just keep a close eye on them so they don’t brown.
FAQs
-
Can I use regular sugar instead of caster sugar for the Meringue Ghosts Recipe?
It’s best to use caster (super fine) sugar since it dissolves quickly in the egg whites, ensuring a smooth, shiny meringue. Regular granulated sugar may feel grainy and affect the texture negatively.
-
Why won’t my egg whites whip up for the meringues?
Make sure your mixing bowl and beaters are completely clean and grease-free. Even a small amount of fat or yolk can prevent the whites from whipping. Also, use room temperature egg whites as they whip more easily and to a greater volume.
-
How long should I bake the meringue ghosts?
Bake them low and slow at 100°C (212°F) for about 1 hour until crisp and easy to lift from the baking sheet. Then, leave them in the turned-off oven for a few hours or overnight to dry completely and get that perfect texture.
-
Can I decorate the ghosts with something other than black food coloring?
Absolutely! You can use edible food markers, melted chocolate piped with a fine nozzle, or even small candy eyes. Just be sure your decorations are food-safe and won’t add moisture that could soften the meringues.
-
How should I store leftover meringue ghosts?
Keep them in an airtight container at room temperature, away from humidity. Properly stored, they’ll stay crisp for up to a week. Avoid refrigeration as the moisture can make the meringues chewy.
Final Thoughts
This Meringue Ghosts Recipe holds a special spot in my holiday baking because it’s fun, simple, and always delivers that magical crunch that everyone loves. Whether for Halloween, themed parties, or just a sweet treat to brighten a day, these ghosts bring smiles all around. I can’t wait for you to try them and maybe share the ghostly fun with your friends and family too!
Print
Meringue Ghosts Recipe
- Prep Time: 30 minutes
- Cook Time: 1 hour
- Total Time: 1 hour 30 minutes
- Yield: 20 ghosts
- Category: Dessert
- Method: Baking
- Cuisine: British
- Diet: Vegetarian
Description
These Meringue Ghosts are a delightful and spooky treat perfect for Halloween or any festive occasion. Light, crispy, and sweet, they are made from whipped egg whites and caster sugar, baked low and slow to achieve the perfect crisp texture. Decorated with black food coloring to create ghostly faces, they are both fun to make and enjoy.
Ingredients
Main Ingredients
- 120 g caster (super fine) sugar
- 2 medium egg whites, at room temperature
- black food colouring gel or paste for the eyes and mouth
Instructions
- Preheat Oven: Preheat your oven to 100°C (212°F, Gas Mark 1/2). Line a large baking sheet with non-stick baking parchment to prevent the meringues from sticking.
- Whisk Egg Whites: In a spotless bowl, whisk the egg whites on medium speed until soft peaks form. This ensures your meringue will have the right texture.
- Add Sugar Gradually: Gradually add the caster sugar, a spoonful at a time, while continuously whisking until the mixture becomes shiny and forms stiff peaks.
- Pipe the Ghosts: Spoon the meringue into a piping bag fitted with a 1 cm round nozzle. Pipe ghost shapes onto the lined baking sheet until all the meringue is used up.
- Bake Meringues: Place the baking sheet in the oven and bake for about 1 hour or until the meringues are crisp and can be easily lifted from the parchment.
- Cool in Oven: Turn off the oven and leave the meringue ghosts inside for a few hours or overnight to cool completely and dry out for the perfect crunch.
- Decorate Faces: Once the meringues are completely cool, use a black food colouring pen or a small paintbrush with black food colouring paste to draw eyes and mouths on the ghosts. Let the decorations set before serving.
Notes
- Ensure the mixing bowl is completely spotless and free from grease to allow the egg whites to whisk properly.
- You can decorate using either a black icing pen or a paintbrush dipped in black food colouring paste for detailed ghost faces.
- Room temperature egg whites whisk better and create more volume, improving the meringue texture.
Nutrition
- Serving Size: 1 ghost
- Calories: 20 kcal
- Sugar: 5 g
- Sodium: 0 mg
- Fat: 0 g
- Saturated Fat: 0 g
- Unsaturated Fat: 0 g
- Trans Fat: 0 g
- Carbohydrates: 5 g
- Fiber: 0 g
- Protein: 1 g
- Cholesterol: 0 mg

