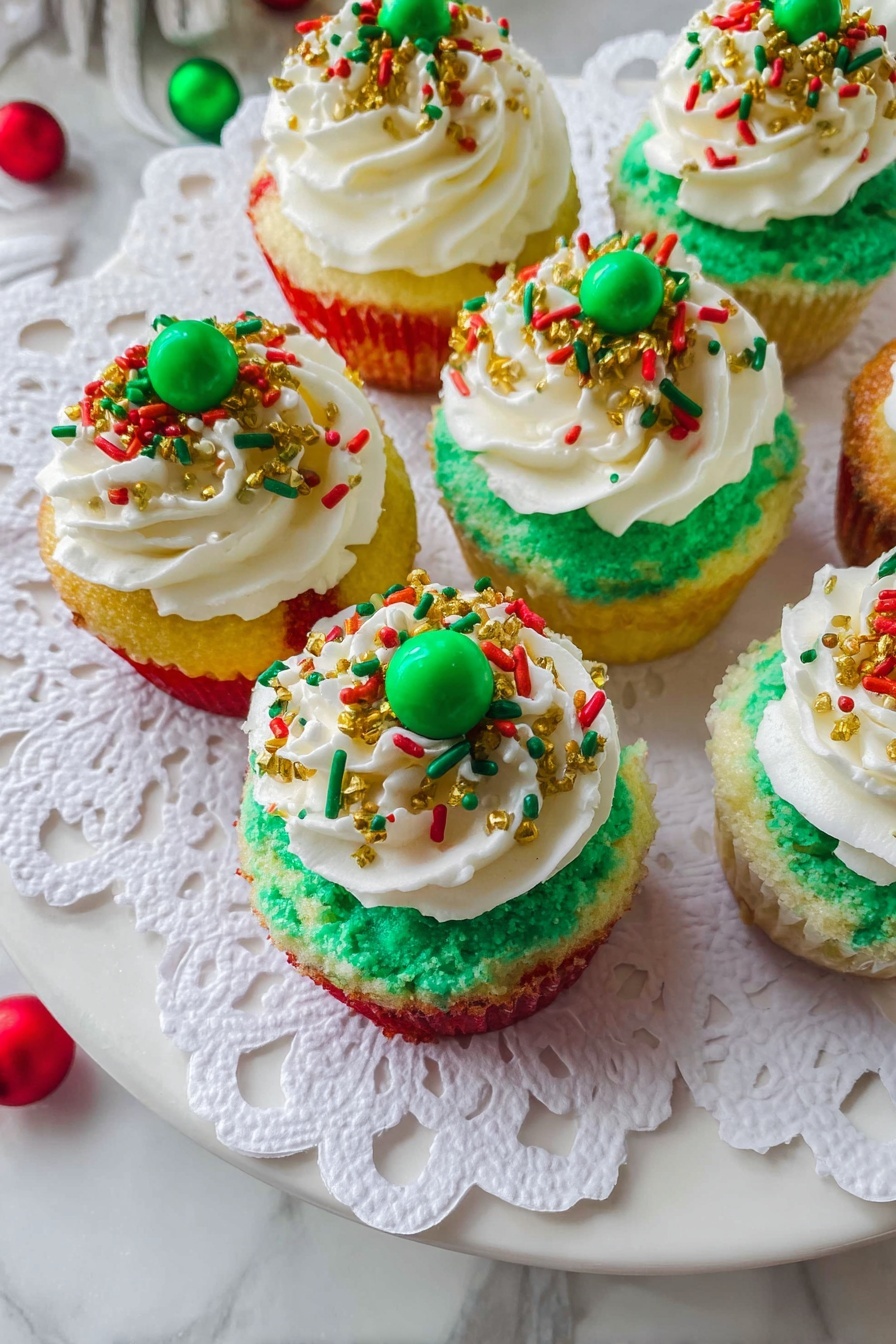
Mini Christmas Cheesecake Bites Recipe
If you’re on the hunt for a festive, bite-sized dessert that’s both adorable and downright addictive, you’ve come to the right place. Today, I’m so excited to share my Mini Christmas Cheesecake Bites Recipe—a fun twist on classic cheesecake that’s perfect for holiday parties, cookie exchanges, or just treating yourself to a little Christmas magic. These little gems are creamy, perfectly portioned, and decorated with festive red and green swirls that’ll bring a smile to anyone’s face. Trust me, once you try these, you’ll be hooking everyone you know on them!
Why This Recipe Works
- Perfect Portion Size: These mini bites are ideal for sharing and make dessert guilt-free with just the right amount of cheesecake in each.
- Festive Swirls: The red and green marbling isn’t just festive—it adds a lovely visual surprise that gets guests talking.
- Decadent Oreo Crust: Using crushed Oreos with the filling included gives the crust a rich, chocolaty crunch that balances the creamy cheesecake perfectly.
- Simple Yet Impressive: Despite the fancy look, the recipe itself is straightforward and beginner-friendly, so you can wow without stress.

Ingredients & Why They Work
The magic of this Mini Christmas Cheesecake Bites Recipe lies in carefully choosing ingredients that complement each other, creating layers of flavor and texture. From the Oreo crust that adds crunch, to the tangy cream cheese base, and the festive colors that bring holiday cheer—each element is essential. When you’re shopping, I recommend using full-fat cream cheese and heavy cream for that luxurious bite, and make sure your Oreos include the filling for maximum flavor and moisture in the crust.
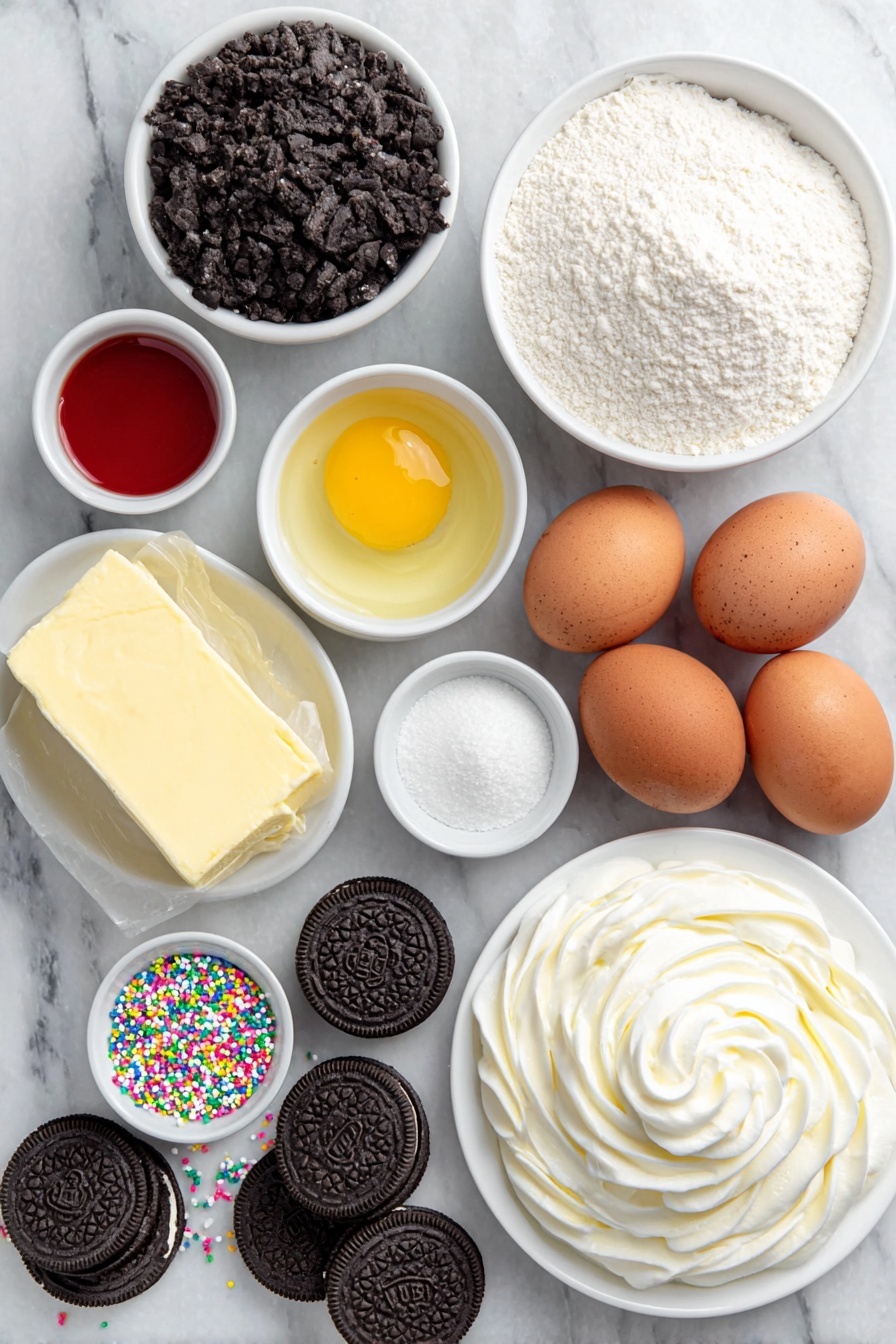
- Oreo Cookies: I always use Oreos with the filling because it helps bind the crust and adds sweetness.
- Butter: Melted butter lets you easily mix and pack the crust crumbs, helping it hold together without baking.
- Cream Cheese: Full-fat is key for creamy texture and rich flavor; make sure it’s softened to avoid lumps.
- Granulated Sugar: Balances the tang of the cream cheese without overpowering.
- All Purpose Flour: Just a little helps set the cheesecake without making it cakey.
- Vanilla Extract: Gives a warm, fragrant base note to the batter.
- Lemon Zest: Adds a subtle brightness that lifts the rich cream cheese.
- Heavy Cream: Makes the batter silky and smooth and helps with that melt-in-your-mouth feel.
- Eggs: Important binder that provides structure.
- Red & Green Food Coloring: For the festive, marbled effect—use gel colors to get vibrant hues without altering the batter consistency.
- Whipped Cream & Sprinkles (Toppings): Optional but so fun for finishing that holiday look and adding a bit of extra sweetness.
Tweak to Your Taste
One of the best things about this Mini Christmas Cheesecake Bites Recipe is how easy it is to personalize. Whether you want more or less sweetness, extra zest, or a completely different crust, I’ve found little swaps can totally elevate the bites or adapt them for your dietary needs. Feel free to experiment, and don’t be afraid to make this your own—it’s what makes baking so special!
- Crust Variation: I sometimes swap Oreos for graham crackers or ginger snaps to give a seasonal twist.
- Flavor Enhancement: Adding a tablespoon of espresso or almond extract can bring a unique depth – definitely try it if you love coffee or nuts!
- Dairy-Free Option: Use vegan cream cheese and coconut cream to create a luscious, plant-based version.
- Color Fun: Play with shades—sometimes I add gold or silver edible glitter for an extra festive sparkle.
Step-by-Step: How I Make Mini Christmas Cheesecake Bites Recipe
Step 1: Prep the Festive Oreo Crust
This step is where the crunch magic begins! Crush your Oreo cookies (including that sweet filling) until they’re fine crumbs—using a food processor works best, but you can also pop them in a zip lock bag and bash gently with a rolling pin if that’s what you’ve got. Mix in the melted butter until everything is evenly moistened; you want it just sticky enough to press into your cupcake liners firmly without crumbling. Using a small rolling pin or the back of a spoon, firmly compact about a tablespoon of crust mixture into each cupcake casing. Setting this firm base is crucial to avoid a crumbly bottom later on, so don’t rush this!
Step 2: Beat Your Creamy Cheesecake Batter
Start by beating your softened cream cheese until it’s luxuriously smooth—this usually takes about 30 to 60 seconds, and don’t forget to scrape your bowl often so you don’t get lumps. Then add the sugar, flour, and lemon zest and beat again briefly just to combine. Add both eggs and vanilla extract at the same time, and gently beat until the eggs are incorporated without overmixing. Overbeating traps air and can cause cracks later, so keep it smooth and creamy. Finally, fold in the heavy cream by hand for that silky finish.
Step 3: Color & Marble the Batter
Divide about a third of the batter into two small bowls, and tint one with green and the other with red food coloring. Use gel food color for vibrant hues without thinning your batter. To create the signature holiday marble effect, spoon the plain, red, and green batters alternately into the crust-lined cupcake liners. Then use a skewer to gently swirl the colors in a circular motion—be careful not to let the skewer touch the crust or you’ll disturb that perfect base you worked hard on.
Step 4: Bake with Care
Bake mini cheesecakes at 150°C (300°F) for 20 minutes. To ensure even baking and a creamy texture, place a shallow dish of water in the oven while baking—it keeps the oven moist, preventing cracking. Once the time’s up, don’t rush to pull them out; leave them in the warm oven for another 5 minutes to finish gently. Then let them cool on the counter for about 15 minutes before chilling. Patience here pays off big time!
Step 5: Chill & Decorate
Refrigerate the mini cheesecakes for at least 4 hours or ideally overnight to set perfectly. When you’re ready to serve, peel off the cupcake liners carefully—they should come away clean if chilled well. Top each bite with a dollop of whipped cream and sprinkle your favorite festive toppings on top. I love adding colorful sprinkles or crushed peppermint for that extra holiday sparkle and crunch!
Pro Tips for Making Mini Christmas Cheesecake Bites Recipe
- Soft Cream Cheese Matters: Make sure your cream cheese is fully softened to avoid lumpy batter—leave it out at room temp for at least 30 minutes beforehand.
- Don’t Overbeat: Overmixing incorporates too much air, leading to cracks or puffed cheesecakes that sink when cooling.
- Water Bath Trick: Using a water bath or oven-safe dish with water keeps the baking environment moist, resulting in smooth, creamy cheesecakes.
- Chill Thoroughly: Chilling overnight enhances flavor and helps the cheesecakes set, making them easier to handle and taste better.
How to Serve Mini Christmas Cheesecake Bites Recipe
Garnishes
I love topping my mini cheesecakes with freshly whipped cream—lightly sweetened and fluffy, it balances the rich cheesecake beautifully. For festive flair, I add rainbow or holiday-themed sprinkles, crushed candy canes for a minty punch, or even a small fresh cranberry for color contrast. These simple additions make your guests feel like they’re getting a special, handcrafted treat.
Side Dishes
These mini cheesecakes shine on their own, but I like pairing them with warm spiced drinks—think mulled wine, cinnamon hot cider, or even peppermint mochas. If you’re setting up a dessert buffet, they go beautifully alongside gingerbread cookies or fresh fruit platters to add variety without overwhelming anyone’s palate.
Creative Ways to Present
For holiday gatherings, I sometimes arrange the mini cheesecakes on a tiered dessert stand for an elegant presentation. Wrapping each bite in a little festive cupcake liner with a delicate ribbon adds a charming touch, especially if you’re gifting them. You can also serve them in mini mason jars topped with whipped cream for a rustic, cozy vibe that guests adore.
Make Ahead and Storage
Storing Leftovers
I always keep any leftover mini cheesecake bites in an airtight container in the fridge. They stay fresh and creamy for up to 4 days—but honestly, that’s rare because they tend to disappear fast! Keeping them chilled also helps maintain that perfect texture and flavor.
Freezing
If you want to freeze these, wrap each mini cheesecake bite individually in plastic wrap and place them in a freezer-safe container. When you’re ready to enjoy them, thaw overnight in the fridge. From my experience, freezing preserves their texture surprisingly well without becoming icy or crumbly.
Reheating
These are best enjoyed cold, but if you prefer a slightly softer texture, you can leave them out at room temperature for 20 minutes before serving. I don’t recommend microwaving— I’ve found that tends to change the texture unfavorably.
FAQs
-
Can I use a different cookie for the crust instead of Oreos?
Absolutely! While Oreos give a rich chocolatey base, you can substitute with graham crackers, ginger snaps, or digestive biscuits depending on your preference. Just crush them finely and mix with melted butter to form the crust.
-
What if I don’t have a food processor to crush the cookies?
No worries! Put the cookies in a sturdy zip-lock bag, seal it tightly, and gently crush them with a rolling pin or a heavy pan until fine crumbs form. It’s a bit more effort but works just as well.
-
How do I avoid cracks in the cheesecake bites?
The key is to avoid overbeating the batter and use the water bath method to keep baking moist and even. Also, letting the cheesecakes cool gradually and chilling them thoroughly helps prevent cracking.
-
Can I make a full-sized festive cheesecake using this recipe?
Yes! You can pour this batter into a 7-inch or 9-inch pan, adjusting the bake times as noted in the recipe card (about 55-70 minutes). Just keep in mind that the festive swirl effect works best with careful layering and marbling in larger pans.
-
What kind of food coloring is best for the batter?
I recommend gel food coloring, as it provides vibrant colors without thinning out your batter like liquid dyes might.
Final Thoughts
This Mini Christmas Cheesecake Bites Recipe has become one of my go-to festive treats because it’s so joyful to make and even more fun to share. The combination of creamy cheesecake with a crunchy chocolate crust, all dressed up in holiday colors, feels like a little party in every bite. Whether you’re baking for family, friends, or just to brighten your own day, these bites deliver smiles and satisfaction every time. I can’t wait for you to try them and watch how they become a holiday favorite in your kitchen too!
Print
Mini Christmas Cheesecake Bites Recipe
- Prep Time: 30 minutes
- Cook Time: 20 minutes
- Total Time: 4 hours 50 minutes
- Yield: 12 servings
- Category: Dessert
- Method: Baking
- Cuisine: American
- Diet: Vegetarian
Description
Enjoy festive Mini Christmas Cheesecakes with a delightful Oreo crust and colorful marbled batter, topped with whipped cream and sprinkles. Perfect for holiday celebrations and easy to make ahead.
Ingredients
Cheesecake Crust
- 100 g Oreo Cookies crushed with the filling
- 30 g butter melted
Cheesecake Batter
- 450 g cream cheese
- 150 g granulated sugar
- 20 g all purpose flour
- ½ teaspoon vanilla extract
- 1 tablespoon lemon zest
- 60 g heavy cream
- 2 eggs
- red & green food coloring as needed
Topping & Garnish
- Whipped cream as needed
- Sprinkles as needed
Instructions
- Preheat Oven: Preheat oven to 150°Celsius. Place cupcake casings into a cupcake tray.
- Prepare Crust: Process the Oreo cookies into fine crumbs together with the filling using a food processor or crush manually with a rolling pin in a zip lock bag. Transfer crumbs to a bowl, add melted butter, and mix until evenly moistened.
- Form Crust: Place one tablespoon of cookie crumbs into each cupcake casing. Use the side of a small rolling pin or spoon to press down firmly. Set aside.
- Beat Cream Cheese: In a separate bowl, beat cream cheese until smooth, about 30 to 60 seconds, scraping the bowl often.
- Add Sugar, Flour, Lemon Zest: Add granulated sugar, flour, and lemon zest. Beat again for 20 seconds until combined.
- Incorporate Eggs and Vanilla: Scrape the bowl, add both eggs and vanilla extract at once. Beat for 10 seconds until combined, scrape the bowl, then beat another 10 seconds until smooth and creamy. Avoid overbeating to prevent air incorporation.
- Fold in Heavy Cream: Gently fold heavy cream into the batter until combined.
- Color Batter: Transfer one third of batter into two smaller bowls. Add green food coloring to one and red food coloring to the other, mixing well.
- Assemble Cheesecakes: Pour the plain batter into cupcake casings first, then alternate with red and green colored batter. Use a skewer to swirl in a circular motion to create a marbled effect. Avoid touching the crust with the skewer.
- Bake: Bake at 150°Celsius for 20 minutes. Place a baking dish with water in the oven to maintain moisture.
- Rest in Oven: After baking, leave cheesecakes in the oven for an additional 5 minutes to settle.
- Cool: Remove from oven and let cool for 15 minutes at room temperature.
- Refrigerate: Chill cheesecakes in the refrigerator for at least 4 hours or overnight.
- Remove Liners: Once thoroughly chilled, carefully peel off the cupcake casings.
- Garnish and Serve: Top with whipped cream and sprinkles before serving. Keep any leftovers refrigerated.
Notes
- For a large 7-inch round cheesecake, use the same recipe poured into a 7-inch cake tin and bake for 55 to 60 minutes.
- For a 9-inch round cheesecake, double the recipe and bake for 65 to 70 minutes until sides are firm but center remains slightly wobbly.
- Do not overbeat the batter to avoid excess air that can cause cracking.
- Use a water bath or a baking dish with water in the oven to keep the cheesecakes moist during baking.
- Chilling overnight enhances the texture and flavor of the cheesecakes.
Nutrition
- Serving Size: 1 mini cheesecake
- Calories: 320 kcal
- Sugar: 21 g
- Sodium: 150 mg
- Fat: 24 g
- Saturated Fat: 15 g
- Unsaturated Fat: 7 g
- Trans Fat: 0 g
- Carbohydrates: 20 g
- Fiber: 1 g
- Protein: 5 g
- Cholesterol: 90 mg

