No Bake Biscoff Cheesecakes Recipe
If you’re on the hunt for a dessert that feels indulgent yet is surprisingly easy to whip up, you’ve got to give this No Bake Biscoff Cheesecakes Recipe a try. It’s got that creamy, dreamy cheesecake texture paired with the unmistakable caramelized cinnamon flavor of Biscoff—without ever turning on your oven. Trust me, once you taste these mini cheesecakes, you’ll be hooked, and they’re perfect for parties or a sweet treat anytime.
Why This Recipe Works
- No Oven Required: Perfect for those hot summer days or when you just want something quick without fussing with baking.
- Rich Biscoff Flavor: Using both crushed Biscoff cookies and the luscious cookie butter guarantees that deep, spiced caramel taste in every bite.
- Light and Creamy Texture: Whipped cream folded into the cheesecake mix keeps it airy, making these minis irresistible and not too heavy.
- Make-Ahead Friendly: These cheesecakes hold up well in the fridge or freezer, so you can prep them in advance and impress guests with ease.

Ingredients & Why They Work
Let’s talk about the magic behind the ingredients in this No Bake Biscoff Cheesecakes Recipe. Each component plays a role to balance flavor, texture, and stability—so you end up with mini cheesecakes that slice cleanly and melt in your mouth. I always suggest using full-fat cream cheese and cold heavy cream to get that perfect fluffy filling.

- Biscoff Cookies: They’re the star of the crust and topping, providing that signature caramelized crunch.
- Melted Unsalted Butter: Binds the cookie crumbs together without overpowering the sweetness.
- Heavy Cream: Chilled for whipping into stiff peaks, this lightens the filling beautifully.
- Full-Fat Cream Cheese: Softened to room temp for smooth mixing and rich creaminess.
- Powdered Sugar: Dissolves instantly, keeping the filling silky and sweet.
- Biscoff Cookie Butter: Adds intense flavor and a creamy, spreadable texture that elevates this cheesecake.
- Sour Cream: Adds tanginess and balance to the rich sweetness.
- Vanilla Extract: A little vanilla always enhances desserts, bringing out the other flavors.
- Pinch of Salt: Just enough to brighten and round out flavors.
- Additional Biscoff Cookies & Whipped Cream: For topping and adding that final wow factor.
Tweak to Your Taste
Your kitchen, your rules! This No Bake Biscoff Cheesecakes Recipe is a fantastic base that welcomes little personal twists. I like to sneak in a pinch more cinnamon or swap the sour cream for Greek yogurt when I want a tangier touch. Feel free to make it your own.
- Nut-Free Variation: I’ve made this without butter by using coconut oil—it changes the flavor slightly but keeps the crust firm and safe for nut allergies.
- Mini vs. Full Size: While these are mini cheesecakes, I’ve experimented with one larger springform pan, but I love the portion control of minis for gatherings.
- Chocolate Twist: Drizzle melted dark chocolate on top for a fancy finish I recently surprised friends with—it’s a crowd-pleaser every time!
Step-by-Step: How I Make No Bake Biscoff Cheesecakes Recipe
Step 1: Prep the Crust with Love
I start by blitzing the Biscoff cookies in my food processor until they’re finely ground—think sandy texture. Then, I drizzle in melted unsalted butter and pulse a few times until everything just holds together when you pinch a handful. It shouldn’t be mushy, but it should stick well. Press about a tablespoon of this mixture into each cavity of your mini cheesecake pans or muffin liners. Pop these into the fridge or freezer while you whip up the filling; chilling the crust helps it set better later on.
Step 2: Whip the Cream to Stiff Peaks
Use a chilled bowl and cold heavy cream—that’s my secret to getting a lovely light texture. Whip with a hand mixer or stand mixer until you see stiff peaks forming but not dry. This usually takes about two minutes. Place the whipped cream back in the fridge to keep it cold while you prepare the cream cheese mixture.
Step 3: Make the Cheesecake Filling
Next, in a large bowl, beat together room temperature cream cheese, powdered sugar, Biscoff cookie butter, sour cream, vanilla extract, and a pinch of salt. I use the paddle attachment on my mixer for this step to get a silky smooth base. Take your time here; no lumps allowed! Once everything is creamy and combined, gently fold in the whipped cream using a spatula, turning slowly so you don’t deflate the mixture. The goal is a fluffy, dreamy cheesecake batter.
Step 4: Pipe the Cheesecake Filling onto Crusts
Here’s a fun part: I spoon the filling into a piping bag fitted with a round tip, which helps me get an even, neat layer of cheesecake on each crust without mess. If you don’t have a piping bag, a spoon works just fine—just smooth the tops with the back of a spoon. After filling the cups, cover them loosely and refrigerate for at least 6 hours or overnight to let the flavors meld and the filling firm up.
Step 5: Add the Finishing Biscoff Topping
When the cheesecakes are nicely set, gently microwave the remaining Biscoff cookie butter for about 20–30 seconds until it’s spreadable but not hot. Spread a thin layer over the top of each cheesecake, letting it drip a little down the sides for a rustic look. Pop them back in the fridge for about 15–20 minutes to let that top layer set. Finally, garnish with extra Biscoff cookies, crushed or whole, and a dollop of fresh whipped cream if you’re feeling fancy.
Pro Tips for Making No Bake Biscoff Cheesecakes Recipe
- Keep Everything Cold: Chilling your bowls and beaters before whipping cream makes a big difference in achieving stiff peaks faster.
- Don’t Overmix the Whipped Cream: Fold gently to keep the airy texture—overmixing can turn your filling dense.
- Use Full-Fat Cream Cheese: Low-fat versions tend to give a grainy texture and less rich flavor.
- Chill for the Full Time: Allowing those 6+ hours for set-up guarantees beautiful, firm cheesecake that holds its shape.
How to Serve No Bake Biscoff Cheesecakes Recipe

Garnishes
I love keeping it simple yet elegant—fresh whipped cream piped on top adds lightness, and a small piece of a whole Biscoff cookie leaning on the side brings that extra visual appeal and crunch. For a festive touch, a sprinkle of crushed cookie over the top never fails to impress guests.
Side Dishes
Since these are mini cheesecakes, I usually serve them alongside fresh berries—strawberries or raspberries add that bright contrast which balances the rich Biscoff flavors beautifully. A cup of strong coffee or chai makes for the perfect pairing.
Creative Ways to Present
For special occasions, I’ve placed these mini cheesecakes on individual dessert plates with edible gold flakes and microgreens for a modern look. Another fun trick is serving them in small glass jars layered with whipped cream and cookie crumbs for a fancy parfait vibe that’s a guaranteed crowd-pleaser.
Make Ahead and Storage
Storing Leftovers
I store leftover mini cheesecakes in a tightly sealed container in the fridge—this keeps them fresh for up to four days. Make sure they’re covered well because the Biscoff topping can dry out a bit if exposed to air.
Freezing
I’ve frozen these successfully by wrapping each cheesecake individually in plastic wrap and then placing them in an airtight container. They freeze well for up to 3 months. To thaw, I recommend moving them to the fridge overnight rather than defrosting at room temp to keep the texture just right.
Reheating
Since these are no bake cheesecakes, you really don’t want to “reheat” them. Instead, just enjoy straight from the fridge or let sit at room temperature for about 15 minutes to take the chill off—this softens the filling and enhances the Biscoff flavor without losing any creaminess.
FAQs
-
Can I use regular cream cheese instead of full-fat?
You want to go with full-fat cream cheese for this No Bake Biscoff Cheesecakes Recipe because low-fat versions tend to make the filling less creamy and sometimes a bit grainy. Full-fat ensures the best texture and flavor.
-
Do I have to use a piping bag for the filling?
Not at all! A piping bag helps you get a clean, even layer, but you can simply spoon the filling into each crust cavity and smooth out the tops with a spoon or spatula. It’s a bit messier but just as delicious.
-
Can I make these cheesecakes without a food processor?
If you don’t have a food processor, you can place the Biscoff cookies in a strong plastic bag and crush them using a rolling pin until finely ground. Just be patient to get a consistent texture for the crust.
-
How long will these cheesecakes last in the fridge?
Stored properly in an airtight container, these mini Biscoff cheesecakes will stay fresh for about 4 days in the fridge. Beyond that, the crust may start to get soggy and the filling can lose its firmness.
-
Can I use almond flour or graham crackers for the crust instead?
While Biscoff cookies are the star here, you can experiment with graham cracker crumbs or almond flour if you’re looking for a different twist. Just keep in mind the characteristic Biscoff flavor will be less pronounced.
Final Thoughts
This No Bake Biscoff Cheesecakes Recipe has become one of my absolute go-to desserts whenever I want something special without spending hours in the kitchen. I love how it balances that classic cheesecake creaminess with the unique Biscoff cookie flavor we all adore. Honestly, it’s a guaranteed crowd-pleaser, whether you’re serving family, friends, or just indulging yourself. Give it a try—you might find it becoming your signature dessert too!
Print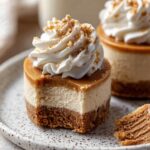
No Bake Biscoff Cheesecakes Recipe
- Prep Time: 30 minutes
- Cook Time: 0 minutes
- Total Time: 6 hours 30 minutes
- Yield: 24 mini cheesecakes
- Category: Dessert
- Method: No-Cook
- Cuisine: American
- Diet: Vegetarian
Description
These No Bake Mini Biscoff Cheesecakes are rich, creamy, and topped with luscious Biscoff spread. Perfectly portioned as bite-sized treats, they feature a crunchy Biscoff cookie crust with a smooth and fluffy Biscoff-flavored filling. Easy to make and requiring no oven, these mini cheesecakes are a delightful dessert for any occasion.
Ingredients
Crust
- 1 (8.8 oz, 250g) package Biscoff cookies
- 1/2 cup melted unsalted butter
Filling
- 1 cup cold heavy cream
- 3 (8 oz) blocks full-fat cream cheese, softened to room temperature
- 1 cup powdered sugar
- 1 cup creamy Biscoff cookie butter
- 1/3 cup sour cream, room temperature
- 2 tsp pure vanilla extract
- Pinch of salt
Topping
- 1/2 cup creamy Biscoff cookie butter
- Additional Biscoff cookies for garnish (whole or crushed)
- Whipped cream
Instructions
- Prepare the Crust: Blitz the Biscoff cookies in a food processor until finely ground. Stream in the melted butter and pulse until combined into a sandy mixture that holds together when pressed.
- Form the Crust: Spray 2 mini cheesecake pans or 2 muffin pans with non-stick spray or line with cupcake liners. Press about 1 tablespoon of the crumb mixture into each cup. Freeze or refrigerate while preparing the filling.
- Whip the Cream: Using a hand mixer or stand mixer with the whisk attachment, beat the cold heavy cream in a chilled bowl until stiff peaks form, about 2 minutes. Be careful not to overbeat. Refrigerate until ready to use.
- Make the Filling: In a separate bowl, beat the softened cream cheese, powdered sugar, Biscoff cookie butter, sour cream, vanilla extract, and salt together until smooth and fully combined.
- Fold in Whipped Cream: Gently fold the whipped cream into the cream cheese mixture using a rubber spatula until no white streaks remain.
- Assemble Minis: Spoon the filling into a piping bag fitted with a round 1A tip. Pipe the filling onto the chilled crusts and smooth the tops evenly.
- Chill: Refrigerate the mini cheesecakes for 6 hours or overnight, loosely covered.
- Add Topping: Melt the Biscoff spread in the microwave for 20-30 seconds until soft. Spread the melted spread over the tops of the cheesecakes, allowing it to drip down the sides slightly. Return to fridge for 15-20 minutes to set.
- Garnish and Serve: Decorate with additional Biscoff cookies (whole or crushed) and whipped cream as desired. Serve chilled and enjoy!
Notes
- Storage: Keep the mini cheesecakes stored in the refrigerator for up to 4 days or freeze for up to 3 months.
- Make Ahead: Cheesecakes can be prepared a day in advance to enhance flavors.
- Substitutions: Use lactose-free cream cheese and heavy cream for a low lactose version.
- Serving Suggestion: Let cheesecakes sit at room temperature for 5-10 minutes before serving to soften slightly for best texture.
- Crust Variations: For a crunchier crust, add a pinch of cinnamon or nutmeg to the cookie crumbs.
Nutrition
- Serving Size: 1 mini cheesecake
- Calories: 190 kcal
- Sugar: 12 g
- Sodium: 120 mg
- Fat: 14 g
- Saturated Fat: 8 g
- Unsaturated Fat: 5 g
- Trans Fat: 0 g
- Carbohydrates: 12 g
- Fiber: 0.5 g
- Protein: 3 g
- Cholesterol: 50 mg

