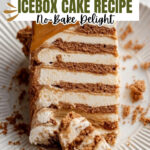
No-Bake Cookie Butter Icebox Cake Recipe
If you’re on the hunt for a dessert that’s both effortless and irresistibly delicious, this No-Bake Cookie Butter Icebox Cake Recipe has got you covered. Trust me, it’s a game-changer! Imagine layers of those crunchy Lotus Biscoff cookies soaked in a dreamy, whipped cookie butter cream—no oven needed. Whether you’re short on time or just craving something sweet, this recipe will instantly become your new favorite.
Why This Recipe Works
- No-Bake Magic: You can create a stunning layered dessert without ever turning on your oven, perfect for warm days or last-minute guests.
- Cookie Butter Cream: The pairing of creamy mascarpone and Biscoff spread makes for a rich, silky filling that perfectly complements those spiced cookies.
- Simple Assembly: Just layer, chill, and enjoy—no complicated steps or fancy tools required, so it’s super approachable.
- Make-Ahead Friendly: It actually improves after a day chilling in the fridge, making it perfect for prepping ahead of time.

Ingredients & Why They Work
Each ingredient in this No-Bake Cookie Butter Icebox Cake Recipe plays an important role in building that irresistible balance between crunchy, creamy, and richly spiced flavors. Plus, they’re easy to find in most grocery stores, which makes this cake even more accessible.

- Heavy Cream: Whipped to medium peaks, this gives the cake a luscious, airy texture that lightens the richness of the cookie butter mixture.
- Biscoff Spread (Cookie Butter): The star of the show—its warm, spiced flavor sets this recipe apart and makes it uniquely addictive.
- Mascarpone Cheese: Adds richness and creaminess without being overly sweet—plus it stabilizes the whipped cream for a velvety finish.
- Pure Vanilla Extract: Enhances all the flavors, lifting the cookie butter and cream beautifully.
- Confectioner’s Sugar: Just a touch sweetens the cream mixture without overpowering the layers.
- Lotus Biscoff Cookies: These spiced, crunchy cookies soften perfectly while chilling, creating that dreamy icebox cake texture.
- Kosher Salt: A pinch balances and elevates the sweetness and spice, making everything pop.
Tweak to Your Taste
I love playing around with this No-Bake Cookie Butter Icebox Cake Recipe depending on the season or my mood. It’s incredibly forgiving, so feel free to swap out mascarpone for cream cheese if that’s what you have, or add a sprinkle of cinnamon into the cream for an extra cozy touch.
- Chocolate Twist: I sometimes drizzle melted dark chocolate between the layers for a bittersweet contrast that’s a total crowd-pleaser.
- Dairy-Free Version: Using coconut cream instead of heavy cream works beautifully if you’re avoiding dairy, though the flavor will shift a bit.
- Extra Crunch: Add chopped toasted almonds or pecans on top for a textural surprise that’s become a favorite of my family.
- Spicy Kick: A tiny pinch of ground ginger or nutmeg in the cream gives the cake a warming spice note perfect for autumn.
Step-by-Step: How I Make No-Bake Cookie Butter Icebox Cake Recipe
Step 1: Whip That Cream to Perfection
Start by pouring those 2 cups of heavy cream into your stand mixer bowl—if you don’t have one, a hand mixer or even a good whisk will do. Whip until medium peaks form; you want it soft enough to fold smoothly but stable enough to hold the cream’s structure. This part is key because the texture of the final cake depends on a beautifully whipped cream base.
Step 2: Blend in Cookie Butter and Mascarpone
Next, add ½ cup of your cookie butter spread, ⅓ cup mascarpone cheese, vanilla extract, a pinch of salt, and confectioner’s sugar right into the whipped cream. Beat gently but thoroughly until everything is perfectly combined into a dreamy, fluffy mixture. If your cookie butter is a bit stiff, warming it slightly in the microwave—just 30-second bursts—is a game changer for easy mixing.
Step 3: Layer Your Icebox Cake
Line a loaf pan with plastic wrap—this makes unmolding a breeze later. Place a single layer of your Biscoff cookies on the bottom, then spread an even layer of the cookie butter cream on top. Keep the layers roughly equal in thickness so your cake balances perfectly. Repeat the process until you reach the top, finishing with a cookie layer. It’s so satisfying to see those neat layers stack up!
Step 4: Chill, Patiently but It’s Worth It
Wrap your loaf pan loosely with plastic wrap and refrigerate for at least 24 hours. This step is non-negotiable because it allows the cookies to soften and soak up the cream, transforming from crunchy to an utterly tender treat. Trust me, the wait is part of the magic.
Step 5: Serve with Style
When ready, carefully unmold your cake onto a plate and drizzle with warmed cookie butter—warm it slowly in the microwave. For a little extra flair, sprinkle crushed Biscoff cookies on top. It’s an elegant finish that adds texture and a burst of flavor in every bite.
Pro Tips for Making No-Bake Cookie Butter Icebox Cake Recipe
- Warm the Cookie Butter: If your cookie butter is too thick to mix evenly, warming it bit by bit in the microwave avoids clumping and gives you a smoother cream.
- Plastic Wrap Advantage: Lining your loaf pan with plastic wrap means unmolding the cake is super simple and keeps your layers intact.
- Equal Layer Thickness: Keep cookie and cream layers about the same thickness so the texture feels balanced bite after bite.
- Patience Pays Off: Resist the urge to dig in early—the 24-hour chill softens the cookies perfectly for that dreamy icebox cake texture.
How to Serve No-Bake Cookie Butter Icebox Cake Recipe

Garnishes
I usually finish my cake with a generous drizzle of warmed Biscoff spread because it adds that irresistible sticky sweetness just before serving. Then I top with a handful of crushed Biscoff cookies for extra crunch and a rustic look. Sometimes, I sprinkle a few toasted coconut flakes on top too—for a subtle nutty contrast.
Side Dishes
This icebox cake is so rich and decadent I like to keep sides light—fresh berries or a simple mixed fruit salad pairs perfectly and refreshes the palate. A cup of strong coffee or spiced chai rounds out the dessert experience beautifully.
Creative Ways to Present
For parties, I’ve served this cake in individual clear glasses or jars layered with cookie and cream—it’s visually stunning and cuts down on messy slices. You can also turn it into mini parfaits topped with whipped cream and a cookie shard for a fancy touch that always impresses.
Make Ahead and Storage
Storing Leftovers
Leftovers keep wonderfully when stored tightly wrapped in the loaf pan or in an airtight container in the fridge—usually for up to 3 days. I like to cover mine well to prevent the cream from absorbing any fridge odors and to keep those flavors bright.
Freezing
I’ve frozen this cake a couple of times when I needed to prep ahead of a big event. Wrap it tightly in plastic, then place it in a freezer-safe container. When ready to enjoy, thaw it overnight in the fridge. Make sure you give it enough time to soften back up so you don’t lose that melt-in-your-mouth texture.
Reheating
This cake is meant to be served chilled, so reheating isn’t really necessary. If you want the warmed cookie butter drizzle to be melty again, just microwave a small amount gently before topping. Otherwise, slice and serve straight from the fridge for the best texture.
FAQs
-
Can I use other cookies instead of Lotus Biscoff for this No-Bake Cookie Butter Icebox Cake Recipe?
Yes! While Lotus Biscoff cookies add a signature caramelized spice flavor that pairs beautifully with the cookie butter, you can substitute similar spiced or gingersnap cookies. Just keep in mind the texture and thickness, as some cookies may not soften as nicely after chilling.
-
How long should I chill the icebox cake?
A minimum of 24 hours in the refrigerator is ideal to allow the cookies to soften and the flavors to meld. If you’re in a hurry, 12 hours can work in a pinch, but the texture won’t be quite as tender and the flavors won’t be as developed.
-
Is there a way to make this recipe dairy-free?
Definitely! Substitute the heavy cream with full-fat coconut cream and use a dairy-free cream cheese or skip mascarpone altogether, though that will change the texture slightly. The coconut cream whips well and complements the cookie butter’s flavor nicely.
-
Can I prepare this icebox cake ahead of time for a party?
Yes! Icebox cakes are perfect for advance prep. You can assemble it up to 3 days ahead and keep it covered in the fridge until serving. Just add any garnishes like warm drizzle or crushed cookies right before your guests arrive to keep everything fresh.
-
What size loaf pan do you recommend for this recipe?
I use a straight-sided loaf pan that holds about 8×4 inches. The recipe’s cookie quantity is based on that size since each layer takes roughly 9 cookies. If your pan tapers or is larger, you may need to adjust the cookie count slightly to get even layers.
Final Thoughts
This No-Bake Cookie Butter Icebox Cake Recipe is truly one of my all-time favorite crowd-pleasers because it’s so easy, so rich, and has such a fun story behind it—layering those iconic Lotus cookies to create a dessert that feels fancy but is completely relaxed to make. When I serve it, people can’t believe it didn’t require an oven or hours of effort. I hope you enjoy creating and sharing it as much as I do. You’ll love making it your own and watching it become a staple in your dessert lineup.
Print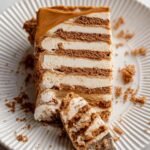
No-Bake Cookie Butter Icebox Cake Recipe
- Prep Time: 15 minutes
- Cook Time: 0 minutes
- Total Time: 1 day 15 minutes
- Yield: 8 servings
- Category: Dessert
- Method: No-Cook
- Cuisine: American
Description
This No-Bake Cookie Butter Icebox Cake with Speculoos combines layers of crunchy Biscoff cookies and a luscious cookie butter mascarpone cream, creating a decadent dessert that requires no baking and is perfect for make-ahead occasions.
Ingredients
Cream Mixture
- 2 cups heavy cream
- ½ cup (150g) Lotus Biscoff spread
- ⅓ cup (80g) mascarpone cheese
- 1 tsp pure vanilla extract
- Pinch of Kosher salt
- 2 Tbsp confectioner’s sugar
Assembly
- 2 packages Lotus Biscoff cookies (32 cookies per package)
- ⅓ cup warmed Lotus Biscoff spread for serving
Instructions
- Whip the heavy cream: Pour 2 cups heavy cream into the bowl of a stand mixer fitted with the whisk attachment. Whisk on medium-high speed until medium peaks form, which usually takes about 3-5 minutes.
- Add cookie butter and mix: To the whipped cream, add ½ cup (150g) Biscoff spread, ⅓ cup (80g) mascarpone cheese, 1 tsp pure vanilla extract, a pinch of Kosher salt, and 2 Tbsp confectioner’s sugar. Continue mixing until all ingredients are fully incorporated and the mixture is smooth.
- Assemble the icebox cake: Line a loaf pan with plastic wrap, leaving enough overhang to cover the top later. Place a single layer of Biscoff cookies evenly along the bottom of the pan. Spread a layer of the cookie butter cream mixture on top of the cookies, making it roughly the same thickness as the cookie layer. Repeat layering cookies and cream until you reach the top, finishing with a layer of cookies.
- Refrigerate the cake: Loosely wrap the loaf pan with plastic wrap and refrigerate for 24 hours to allow the cookies to soften and the flavors to meld together.
- Serve: When ready to serve, unmold the cake onto a plate or tray. Drizzle with the warmed ⅓ cup Biscoff spread and sprinkle with crushed Biscoff cookies for extra texture and flavor.
Notes
- Nutrition facts are estimated for the use of 45 cookies total.
- Loaf pan sizes vary, so cookie quantities may differ. A straight-sided loaf pan requires about 9 cookies per layer and about 1½ packages (32 cookies each) are usually sufficient. If your pan tapers, you might need fewer cookies on the bottom layer.
- To melt cookie butter for serving: place ⅓ cup of cookie butter in a microwave-safe bowl, then heat in 30-second increments, stirring between each until warm and melted.
- This icebox cake can be made up to 3 days in advance. Chill at least 24 hours before serving for best texture.
- Store leftovers in an airtight container or tightly wrapped in the loaf pan for up to 3 days in the refrigerator.
- For freezing: wrap tightly in plastic wrap, place in a freezer-safe container, and freeze. Thaw overnight in the refrigerator before serving.
Nutrition
- Serving Size: 1 slice
- Calories: 400 kcal
- Sugar: 25 g
- Sodium: 120 mg
- Fat: 30 g
- Saturated Fat: 18 g
- Unsaturated Fat: 10 g
- Trans Fat: 0 g
- Carbohydrates: 30 g
- Fiber: 1 g
- Protein: 5 g
- Cholesterol: 85 mg
