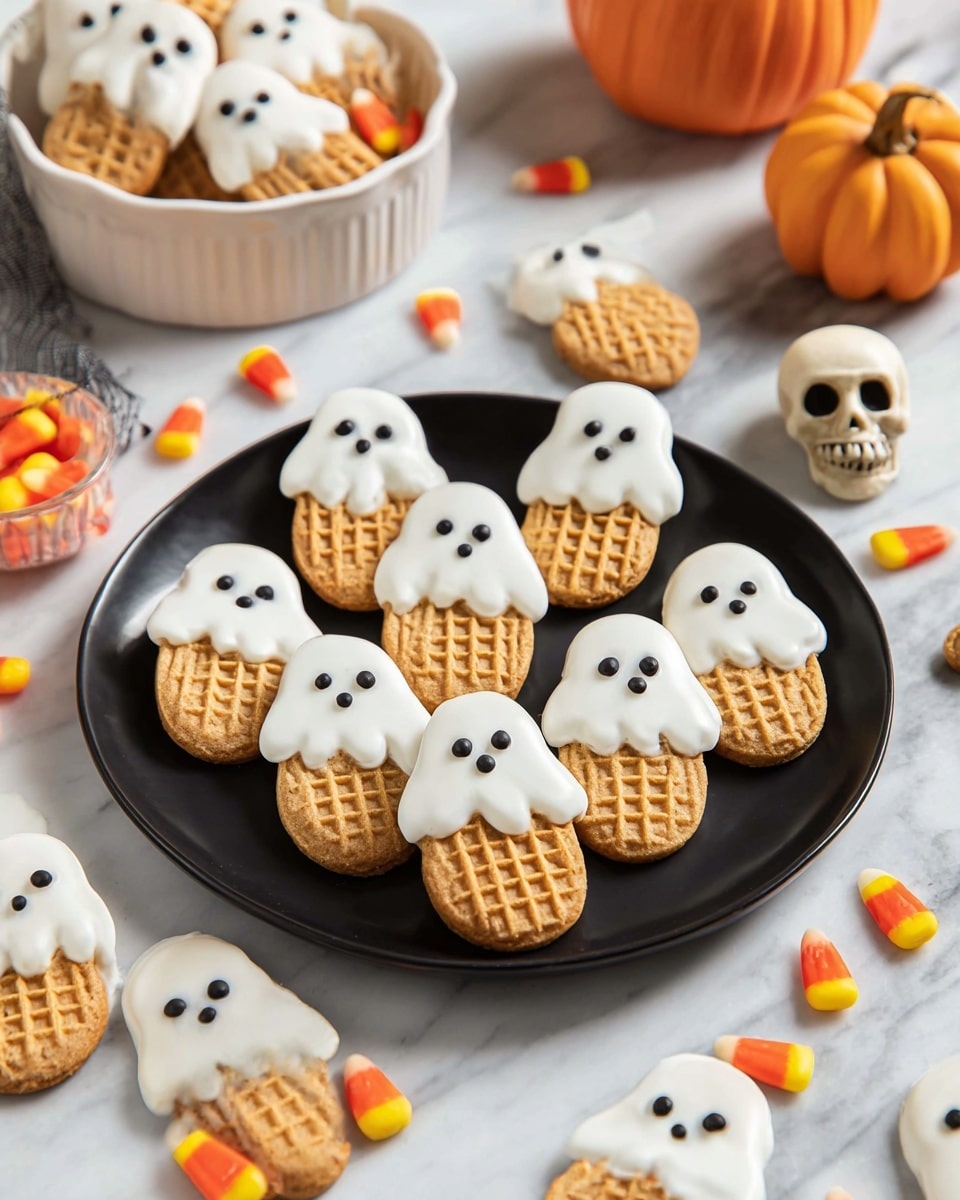
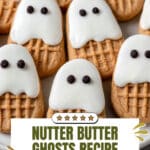
Nutter Butter Ghosts Recipe
If you love fun, festive treats that are as delightful to make as they are to eat, you’re in for a real treat with this Nutter Butter Ghosts Recipe. These adorable ghost-shaped cookies are perfect for Halloween parties, spooky-themed snacks, or just a fun way to bring a smile to someone’s face. I promise, once you dip those peanut butter cookies in luscious white chocolate and add those cute little faces, you’ll be hooked. Trust me, it’s easier than it looks, and I’m going to walk you through every step so your ghosts turn out just right!
Why This Recipe Works
- Simple Ingredients: Uses just a few pantry staples that you likely already have on hand, making it quick and fuss-free.
- Fun and Festive: The ghost shapes and faces add personality perfect for holiday celebrations or spooky snack time.
- Kid-Friendly Process: Great for getting kids involved, from dipping to decorating the faces.
- Versatile and Customizable: You can tweak the expressions and chocolate types to match your mood or theme.

Ingredients & Why They Work
The magic of this Nutter Butter Ghosts Recipe really hinges on the ingredients all working together to create that perfect balance of creamy, crunchy, and sweet with a hint of festive creepiness. Plus, the types of chocolate you choose are key to getting smooth coatings and sharp, clear ghost faces.
- Nutter Butter Cookies: These peanut butter cookies already have the perfect ghost shape—plump and rounded with ridges that add character. Pick a fresh batch for best results.
- Melting White Chocolates (or white candy coating): This melts down silky smooth and hardens nicely to give your ghosts their classic white sheet look.
- Melting Chocolate (dark or semi-sweet): Used for the eyes and mouths, this provides that striking contrast and is easy to pipe for expressive faces.
Tweak to Your Taste
What I really appreciate about this Nutter Butter Ghosts Recipe is how easy it is to make it your own. Sometimes I like to get playful and change up the ghost expressions or how much white chocolate I coat on each cookie. Don’t be shy about making it your own — the best treats are the ones with personality!
- Variation: One year, I swapped out the white melting chocolate for pastel-colored candy melts and made pastel ghost cookies—so cute for a daytime Halloween party or a birthday in October!
- Dietary Adjustments: If you need gluten-free, try specialized gluten-free peanut butter cookies instead; just check the coating for allergens.
- Difficulty Levels: If piping faces seems intimidating, just use mini chocolate chips for eyes and a tiny drop of melted chocolate for the mouth to keep it simple.
Step-by-Step: How I Make Nutter Butter Ghosts Recipe
Step 1: Prep Your Station Like a Pro
I always start by lining a cookie sheet with wax paper or parchment paper — this makes cleanup a breeze and ensures your coated cookies don’t stick. Then, I arrange the Nutter Butter cookies in a neat row to keep things organized and within reach. This little prep step saves you time and stress later on.
Step 2: Melt the White Chocolate Perfectly
Pop your white melting chocolate or white candy coating into a microwave-safe bowl. Heat in 30-second intervals, stirring in between each blast until you have a smooth, silky coating. The stirring is key here — it evenly distributes heat and prevents clumps or burnt chocolate. If your chocolate seems too thick, add a tiny splash of vegetable oil to loosen it up.
Step 3: Dip Each Cookie Like a Ghost
Now comes the fun—dip each Nutter Butter cookie about halfway into the melted white chocolate or spoon the coating over the top to create that haunt-your-halloween ghostly shape. Give each a gentle tap or shake to let excess coating drip off; trust me, less is more here to avoid drippy puddles and uneven drying. Then place them on your lined cookie sheet to set.
Step 4: Add the Eyes and Mouth
Use a piping bag or a plastic sandwich bag with a tiny corner snipped off to pipe small dots of melted chocolate on each ghost for the eyes and mouth before the white chocolate sets. Don’t worry about getting fancy; I like to mix expressions—some scared, some surprised, some silly. It’s the personality that makes these cookies a hit!
Step 5: Let Them Set Completely
The last step is patience—it takes about 5 minutes for the chocolate to harden completely at room temperature (or a little faster in the fridge). Resist the urge to move them too early or you might smudge those cute faces you just made. Once firm, they’re good to go!
Pro Tips for Making Nutter Butter Ghosts Recipe
- Use Good Quality Candy Coating: I’ve found that white almond bark melts smoother and sets faster than baking white chocolate chips, which sometimes seize up.
- Patience is Key: Avoid touching the cookies before the chocolate fully hardens to keep your ghostly designs crisp.
- Keep the Chocolate Warm: If your coating starts to thicken while dipping, warm it again in the microwave briefly to keep a smooth flow.
- Expressive Faces Make All the Difference: Don’t be afraid to get creative and playful with the eyes and mouths — it makes the cookies so much more fun to eat and share.
How to Serve Nutter Butter Ghosts Recipe
Garnishes
I usually keep things simple with these ghosts because they’re so charming on their own. Sometimes I sprinkle a little edible glitter or dust on the white chocolate before it sets to add a subtle sparkle that catches the light beautifully. It’s a small touch, but it really elevates the spooky vibe.
Side Dishes
These ghostly cookies pair wonderfully with warm drinks like pumpkin spice lattes, rich hot chocolate, or even a creamy chai tea. For a party spread, I like to set out bowls of candy corn and roasted pumpkin seeds alongside them to complete that quintessential fall flavor palette.
Creative Ways to Present
One Halloween, I set these ghosts up hovering on skewers stuck into a pumpkin for an instant spooky centerpiece. You can also wrap a few in cellophane bags tied with orange and black ribbons for festive take-home favors. Play around with different display ideas to wow your guests or delight the kids!
Make Ahead and Storage
Storing Leftovers
Storing leftover Nutter Butter Ghosts is super easy. Just layer them gently in an airtight container between sheets of wax or parchment paper to prevent sticking. I’ve kept mine fresh this way for up to 5 days, and they still taste crisp and delicious—perfect for sneaking a treat midweek!
Freezing
If you want to make these ahead for a party weeks away, you can freeze them. Wrap each cookie individually in plastic wrap first, then store in a freezer-safe container. When you’re ready to use them, thaw in the fridge overnight to avoid condensation ruining the coating.
Reheating
Luckily, there’s no reheating needed here since these cookies are best enjoyed cool or at room temperature. If your kitchen is warm and the coating softens, I pop them in the refrigerator for a few minutes to firm back up before serving.
FAQs
-
Can I use regular white chocolate chips instead of candy coating?
You can, but regular white chocolate chips don’t melt as smoothly as candy coating or almond bark and may seize or become clumpy. To improve melting, add a small amount of vegetable oil or shortening when melting white chocolate chips to get a smoother coating.
-
How do I make the faces on the ghosts without them smudging?
Pipe the eyes and mouths onto the white chocolate while it’s still wet but slightly thicker, then let the cookies rest undisturbed until the chocolate hardens completely. Use a toothpick or fine tip piping bag for precision and avoid handling the cookies too soon.
-
What is the best way to store these cookies?
Keep them in an airtight container layered with wax paper and store at room temperature for up to 5 days. For longer storage, freeze them individually wrapped and thaw in the refrigerator before serving.
-
Can kids help with making Nutter Butter Ghosts?
Absolutely! Kids love dipping the cookies and decorating the faces—it’s a fun and safe activity. Just supervise closely when working with hot melted chocolate to avoid burns.
Final Thoughts
This Nutter Butter Ghosts Recipe is one of my favorite quick and charming projects for Halloween or any spooky season. It’s lighthearted, easy to personalize, and delivers treats that bring smiles to both kids and adults. If you’re looking for a no-fuss yet impressive recipe that adds a little fun and sweetness to your celebrations, these ghost cookies are your go-to. Grab those Nutter Butter cookies and some melting chocolate—I can’t wait for you to make and enjoy them as much as I do!
Print
Nutter Butter Ghosts Recipe
- Prep Time: 15 minutes
- Cook Time: 5 minutes
- Total Time: 20 minutes
- Yield: 32 cookies
- Category: Dessert
- Method: No-Cook
- Cuisine: American
Description
Nutter Butter Ghosts are a fun and spooky treat perfect for Halloween. These peanut butter sandwich cookies are dipped in smooth white chocolate coating and decorated with melted chocolate eyes and mouths to create ghostly faces. Easy to make and delightful to eat, they are a festive snack or dessert that can be made ahead and stored for several days.
Ingredients
Cookies
- 32 Nutter Butter Cookies
Chocolate Coating
- 12 ounces melting white chocolates
- 1 ounce melting chocolate
Instructions
- Prepare the workspace: Line a cookie sheet with wax paper or parchment paper and arrange the Nutter Butter cookies on it to keep them ready for dipping.
- Melt the white chocolate: In a microwave-safe bowl, heat the white candy coating or melting white chocolates in 30 second intervals, stirring after each interval until the chocolate is completely smooth and melted.
- Dip the cookies: Dip each Nutter Butter cookie halfway into the melted white chocolate or spoon the coating over the top to create a ghostly shape. Shake off any excess coating gently to avoid a thick layer. Place the coated cookies on the prepared cookie sheet.
- Add the facial features: Before the chocolate sets, use a piping bag filled with melted dark chocolate to pipe small dots for the ghost’s eyes and mouth, creating different expressions for variety.
- Set the cookies: Allow the coated cookies to cool and harden completely on the wax paper-lined cookie sheet or on a rack, which usually takes about 5 minutes.
Notes
- Use the whole package of Nutter Butter cookies, which is typically 32 cookies in a standard 16 oz package.
- White almond bark or white candy coating melts smoothly and hardens quickly, making it ideal for this recipe.
- Tapping each dipped cookie lightly helps remove excess chocolate for a cleaner finish.
- Add personality by making ghosts with varied expressions like scared, surprised, or silly faces.
- Store dipped cookies in an airtight container with layers of wax paper between them to keep fresh for up to 5 days.
Nutrition
- Serving Size: 1 cookie
- Calories: 110 kcal
- Sugar: 9 g
- Sodium: 90 mg
- Fat: 7 g
- Saturated Fat: 4 g
- Unsaturated Fat: 2 g
- Trans Fat: 0 g
- Carbohydrates: 11 g
- Fiber: 1 g
- Protein: 2 g
- Cholesterol: 0 mg