Pan Fried Chicken Strips Recipe
If you’re anything like me, you love a quick and delicious chicken dinner that feels homemade but comes together in no time—that’s exactly why this Pan Fried Chicken Strips Recipe has become a go-to in my kitchen. Crispy on the outside, tender and juicy inside, these strips hit that perfect comfort food note every single time. Whether it’s a casual weeknight or a fun weekend snack, this dish really delivers big on flavor without a complicated process.
What makes this Pan Fried Chicken Strips Recipe special is how simple ingredients and a straightforward method turn everyday chicken breasts into something irresistibly tasty. Plus, you don’t need fancy equipment—just a trusty cast iron skillet and a thermometer for that perfect crisp. I always enjoy sharing this recipe with friends because it’s foolproof, forgiving, and totally customizable to your own taste!
Why This Recipe Works
- Perfectly Balanced Seasoning: The blend of garlic, onion powder, paprika, salt, and pepper makes each strip flavorful without overpowering the chicken.
- Double Dredge Technique: Coating the chicken twice in flour and egg ensures a crispy, golden crust that stays crunchy even after frying.
- Ideal Cooking Temperature: Maintaining 350°F oil temperature locks in juiciness while creating a perfect crunch.
- Simple Yet Effective Ingredients: No fancy sauces or complicated marinades—just pantry basics that make weeknight cooking a breeze.

Ingredients & Why They Work
This Pan Fried Chicken Strips Recipe thrives on classic and straightforward ingredients—each picked to elevate texture, flavor, or cooking ease. When shopping, look for fresh chicken breasts and good-quality flour as your base for the coating. Seasonings are key here, so don’t skimp on kosher salt and freshly ground pepper for the best flavor punch.
- Flour: Acts as the crispy coating’s backbone; using all-purpose flour gives you that satisfying crunch.
- Kosher Salt: Enhances all the other flavors and helps develop a delicious crust.
- Garlic Powder: Provides a warm, savory note that complements the chicken perfectly.
- Onion Powder: Adds subtle sweetness and depth to the seasoning mix.
- Freshly Ground Pepper: Lends a mild heat and complexity that’s fresher than pre-ground varieties.
- Paprika: Gives a smoky color and flavor that turns the coating from ordinary to irresistible.
- Egg: Binds the flour coating to the chicken strips for that perfect double-dredge crunchy finish.
- Chicken Breasts: The star ingredient, lean and tender, ideal when sliced into strips for quick frying.
- Cooking Oil (Non-GMO Canola Oil recommended): Has a high smoke point, perfect for frying and letting the chicken crisp nicely without burning.
Tweak to Your Taste
One of the reasons I love this Pan Fried Chicken Strips Recipe is how easy it is to play around with the flavor profile. You can turn it more spicy, herby, or smoky just by swapping out or adding a seasoning or two. It’s your canvas to make exactly the chicken strips you crave!
- Spicy Kick: I sometimes add cayenne pepper or chili powder to the flour mixture when I’m in the mood for a little heat—it’s fantastic for a game day snack.
- Herbaceous Twist: Fresh or dried thyme or oregano mixed into the flour can add a lovely, fragrant note that pairs wonderfully with the chicken.
- Gluten-Free Alternative: I’ve replaced the flour with a gluten-free all-purpose blend for a friend with sensitivities, and it worked out beautifully—just watch the frying time as it may vary slightly.
Step-by-Step: How I Make Pan Fried Chicken Strips Recipe
Step 1: Prep Your Chicken & Seasoning
Start by cutting the chicken breasts into uniform strips—this helps them cook evenly. Next, whisk together your flour, salt, garlic powder, onion powder, pepper, and paprika in a shallow dish. The seasoned flour mix is your secret weapon for flavor and crunch. Separately, beat the egg in a small bowl to prepare for dipping. I always like to have everything ready and close by before heating the oil to streamline the process.
Step 2: Heat the Oil to 350°F
Pour about a cup of your cooking oil into a 12-inch cast iron skillet and warm it over medium heat. Checking the temperature with a candy thermometer is the best way to make sure it hits that perfect 350°F—this temp crisps up the coating without burning it or leaving the inside undercooked. Be patient here; rushing often means greasy or unevenly cooked chicken.
Step 3: The Double Dredge Magic
Coat your chicken strips lightly in the seasoned flour, then dip each one in the beaten egg, and back into the flour again. For that golden, extra-crispy finish, I like rolling them in flour one last time before frying—it’s a small step that honestly makes a big difference. Lay the strips on a plate or cutting board while you prepare the pan.
Step 4: Fry Until Golden & 160°F Inside
Carefully place the strips in the hot oil—you’ll want to move slowly to avoid splashing. Fry for about 4 minutes on one side, then flip and cook for an additional 3-4 minutes. Use a meat thermometer to check that the internal temperature has reached 160°F for safe, juicy chicken. The crust should be a beautiful golden brown by this point.
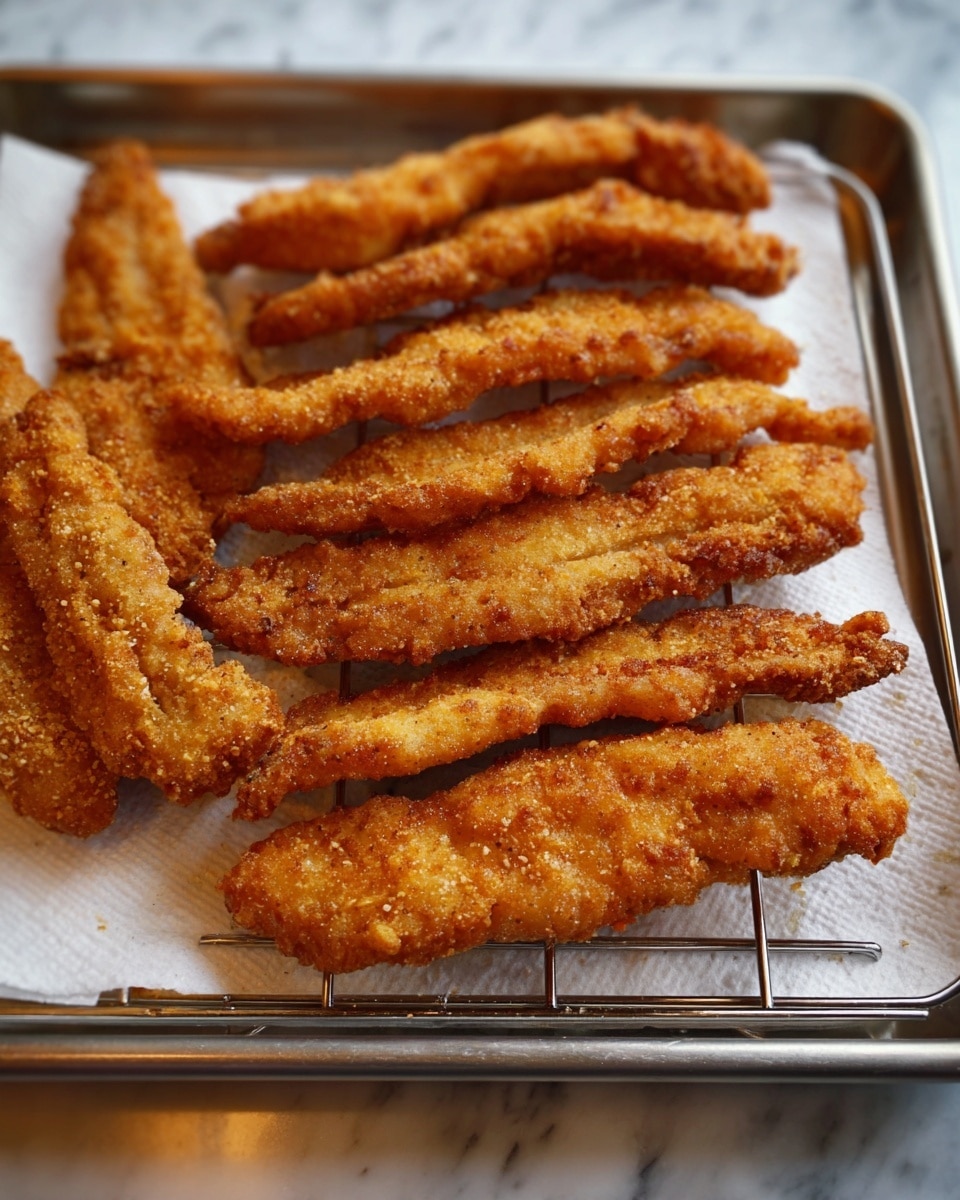
Step 5: Drain & Keep Warm
Transfer the cooked strips to a cooling rack placed over a baking sheet lined with paper towels to catch excess oil. This simple step helps keep the crust crispy instead of soggy. If you’re not ready to eat immediately, keep the pan fried chicken strips warm in a low-heat oven—it holds up nicely without drying out.
Pro Tips for Making Pan Fried Chicken Strips Recipe
- Maintain Oil Temperature: I’ve found that using a candy thermometer is a game changer—keeping the oil at 350°F yields crunchy, not greasy, strips every time.
- Don’t Crowd the Pan: Cooking the chicken in batches prevents the temperature from dropping and ensures even browning.
- Pat Dry Your Chicken: Before coating, drying the chicken strips with paper towels helps the flour stick better and prevents excess moisture from steaming the crust.
- Use a Cooling Rack to Drain: Placing fried chicken strips on a rack instead of directly on paper towels keeps the crust crisp and avoids sogginess from oil pooling.
How to Serve Pan Fried Chicken Strips Recipe
Garnishes
I love topping my pan fried chicken strips with a sprinkle of fresh parsley or chives for a pop of color and freshness. A dusting of extra paprika or a squeeze of fresh lemon adds brightness that cuts through the richness beautifully. Sometimes, I serve them with a side of tangy dipping sauces like honey mustard or a smoky chipotle mayo—trust me, it takes the experience to the next level.
Side Dishes
My favorite sides? Classic coleslaw or a crunchy green salad pairs wonderfully to balance the crispy chicken strips. Crispy roasted potatoes or sweet potato fries are also a fabulous match if you want a heartier meal. And if you’re feeling nostalgic, a simple bowl of mac and cheese alongside these strips makes for total comfort food bliss.
Creative Ways to Present
For parties, I like to serve these chicken strips on a platter with an array of colorful dipping sauces arranged in small bowls around them—guests love customizing their bites! Another fun idea I’ve tried is slicing the strips thinner and serving them over fresh rice or in a wrap with crisp veggies and creamy sauce, transforming dinner into a casual, hand-held delight.
Make Ahead and Storage
Storing Leftovers
I cool leftover chicken strips completely before placing them in an airtight container to keep the crust crisp as long as possible. Refrigerated this way, they last up to 3 days—perfect for quick lunches or snacks later in the week.
Freezing
Freezing works well if you want to prep ahead. I freeze the fried strips in a single layer on a baking tray first, then transfer them to a freezer bag. This keeps them from sticking together. When you want some later, just reheat in the oven for best results instead of the microwave.
Reheating
To reheat, I preheat the oven to 375°F and place the strips on a wire rack over a baking sheet for about 10 minutes. This crisps them back up nicely without drying out the chicken, which sometimes happens if you microwave them.
FAQs
-
Can I use chicken thighs instead of breasts for this Pan Fried Chicken Strips Recipe?
Absolutely! Chicken thighs tend to be juicier and more forgiving during frying. Just slice them similarly into strips and adjust cooking time slightly as thighs may cook faster or need a bit more time depending on thickness.
-
How do I keep the chicken strips crispy after frying?
Using a cooling rack placed on a baking sheet to drain excess oil instead of paper towels helps maintain crispiness. Also, serving immediately or keeping in a warm (not hot) oven helps keep the crust crunchy.
-
What’s the best oil to use for frying chicken strips?
I recommend oils with a high smoke point like canola, vegetable, or peanut oil. Canola oil, especially non-GMO varieties, is my favorite because it’s affordable, widely available, and neutral in flavor.
-
Can I bake these chicken strips instead of frying?
You can bake them for a healthier option, but they won’t get quite as crispy as pan frying. To bake, arrange the coated strips on a greased baking sheet and bake at 425°F for about 20 minutes, flipping halfway through.
-
How can I tell when the chicken strips are fully cooked?
The best way is to use a meat thermometer—internal temperature should reach 160°F for juicy and safe-to-eat chicken. The exterior should be golden and crisp as well.
Final Thoughts
This Pan Fried Chicken Strips Recipe has quietly become one of my staples because it combines that wonderful old-school fried chicken comfort with speed and simplicity. I love pulling it together when I need something satisfying but don’t want to fuss over complicated steps or ingredients. Give this recipe a try—you’ll likely find yourself making it over and over, just like I do, especially when friends or family come over craving that golden, crispy goodness we all adore.
Print
Pan Fried Chicken Strips Recipe
- Prep Time: 15 minutes
- Cook Time: 10 minutes
- Total Time: 25 minutes
- Yield: 4 servings
- Category: Main Course
- Method: Frying
- Cuisine: American
Description
Crispy and flavorful pan fried chicken strips coated in a seasoned flour mixture and cooked to juicy perfection, perfect for a quick and satisfying meal or snack.
Ingredients
For the Chicken Strips
- 2/3 cup flour
- 2 tsp kosher salt
- 1 1/2 tsp garlic powder
- 1 1/2 tsp onion powder
- 3/4 tsp freshly ground pepper
- 3/4 tsp paprika
- 1 egg
- 2 chicken breasts
- 1 cup cooking oil (non GMO canola oil recommended)
Instructions
- Heat the Oil: Heat the cooking oil in a 12-inch cast iron skillet over medium heat until it reaches 350° Fahrenheit, using a candy thermometer to check the temperature.
- Prepare the Flour Mixture and Egg: In a shallow dish, combine the flour, kosher salt, garlic powder, onion powder, pepper, and paprika. Whisk together until well blended. Crack the egg into a small bowl and beat with a fork until mixed.
- Coat the Chicken Strips: Cut the chicken breasts into strips. Roll each strip in the seasoned flour mixture until lightly coated, then dip in the beaten egg. Return the chicken to the flour mixture and roll again until well coated. For extra crispiness, roll each strip a final time in the flour before frying.
- Fry the Chicken: Carefully place the coated chicken strips in the hot oil. Fry for 4 minutes, then flip using tongs or a fork and cook for an additional 3 to 4 minutes, or until the internal temperature reaches 160° Fahrenheit.
- Drain and Serve: Prepare a cooling rack placed over a baking sheet lined with paper towels. Transfer the cooked chicken strips to the rack to drain excess oil. Serve immediately or keep warm in the oven until ready to eat.
Notes
- Ensure the oil temperature is maintained at 350° Fahrenheit for even cooking and crispy coating.
- Use a candy thermometer for accurate temperature measurement.
- Canola oil is recommended for frying due to its neutral flavor and high smoke point.
- Adjust the amounts of seasoned flour and egg if increasing the quantity of chicken strips.
- Chicken strips can be kept warm in the oven set to low heat if not serving immediately.
Nutrition
- Serving Size: 1 serving
- Calories: 350 kcal
- Sugar: 0 g
- Sodium: 600 mg
- Fat: 20 g
- Saturated Fat: 3 g
- Unsaturated Fat: 15 g
- Trans Fat: 0 g
- Carbohydrates: 20 g
- Fiber: 1 g
- Protein: 30 g
- Cholesterol: 90 mg
