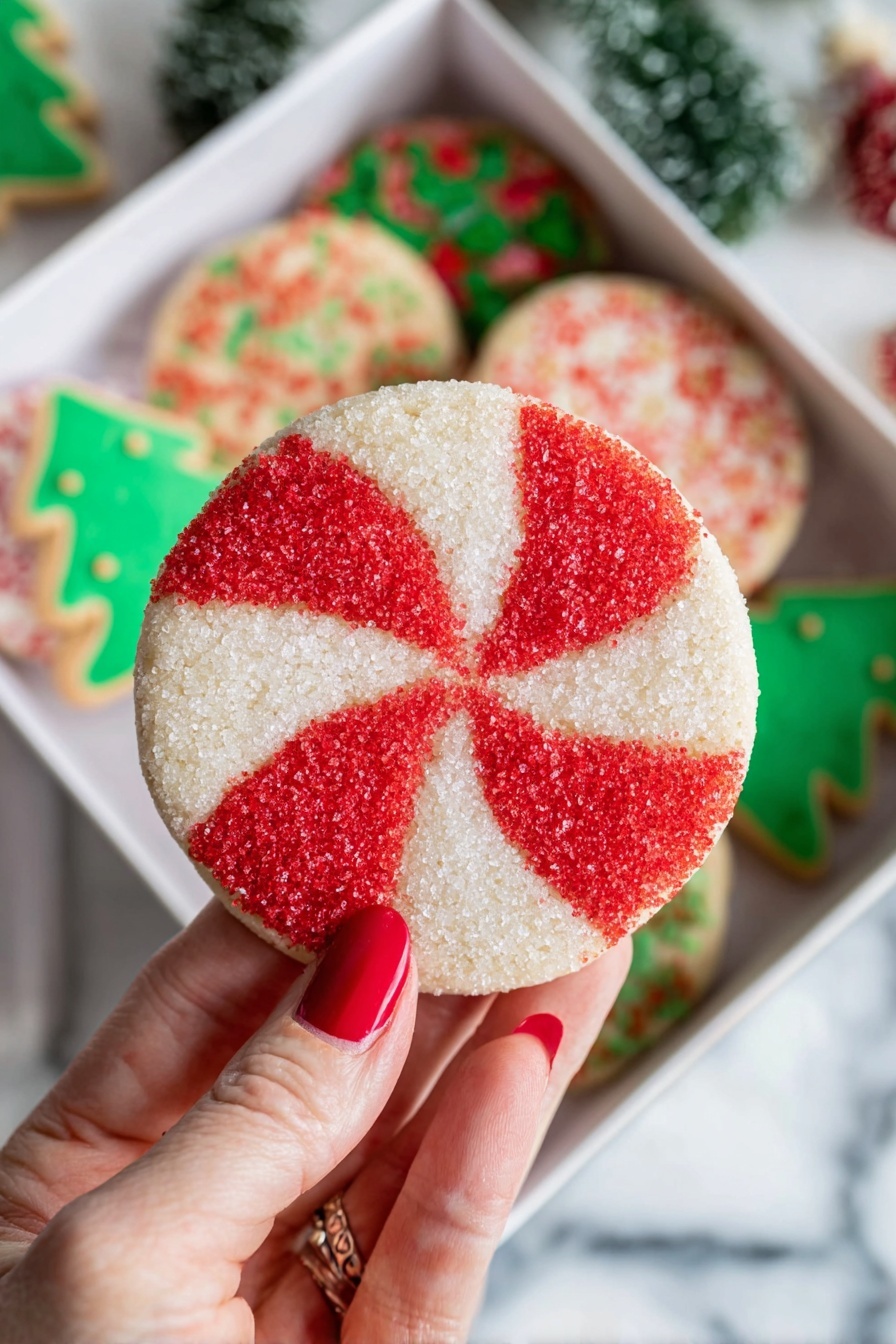
Peppermint Swirl Sugar Cookies Recipe
If you’re looking for a festive and fun cookie to brighten up your baking lineup, you have to try this Peppermint Swirl Sugar Cookies Recipe. These cookies are not only stunning with their red and white swirls, but they also deliver that perfect balance of buttery sweetness and refreshing peppermint flavor. Trust me, once you bake a batch, they’ll be the star of your cookie platter every time—you’re going to love how fun and easy they are to make.
Why This Recipe Works
- Beautiful Visual Appeal: The swirl pattern is easy to create and looks impressive without complicated steps.
- Perfect Texture: Creaming the butter and sugar well creates a slightly chewy yet tender sugar cookie every time.
- Customizable Flavor: Peppermint extract boosts the holiday vibe, but almond or vanilla can be swapped in for your preference.
- Make-Ahead Friendly: You can prep the dough and even freeze it, so it’s great for getting ahead of your holiday baking.

Ingredients & Why They Work
This Peppermint Swirl Sugar Cookies Recipe uses simple, pantry-friendly ingredients that combine into a dough that’s soft enough to swirl yet firm enough to hold its shape. Plus, I love using gel food coloring here—it’s super concentrated, so you get those vivid red swirls without messing up the dough’s consistency.
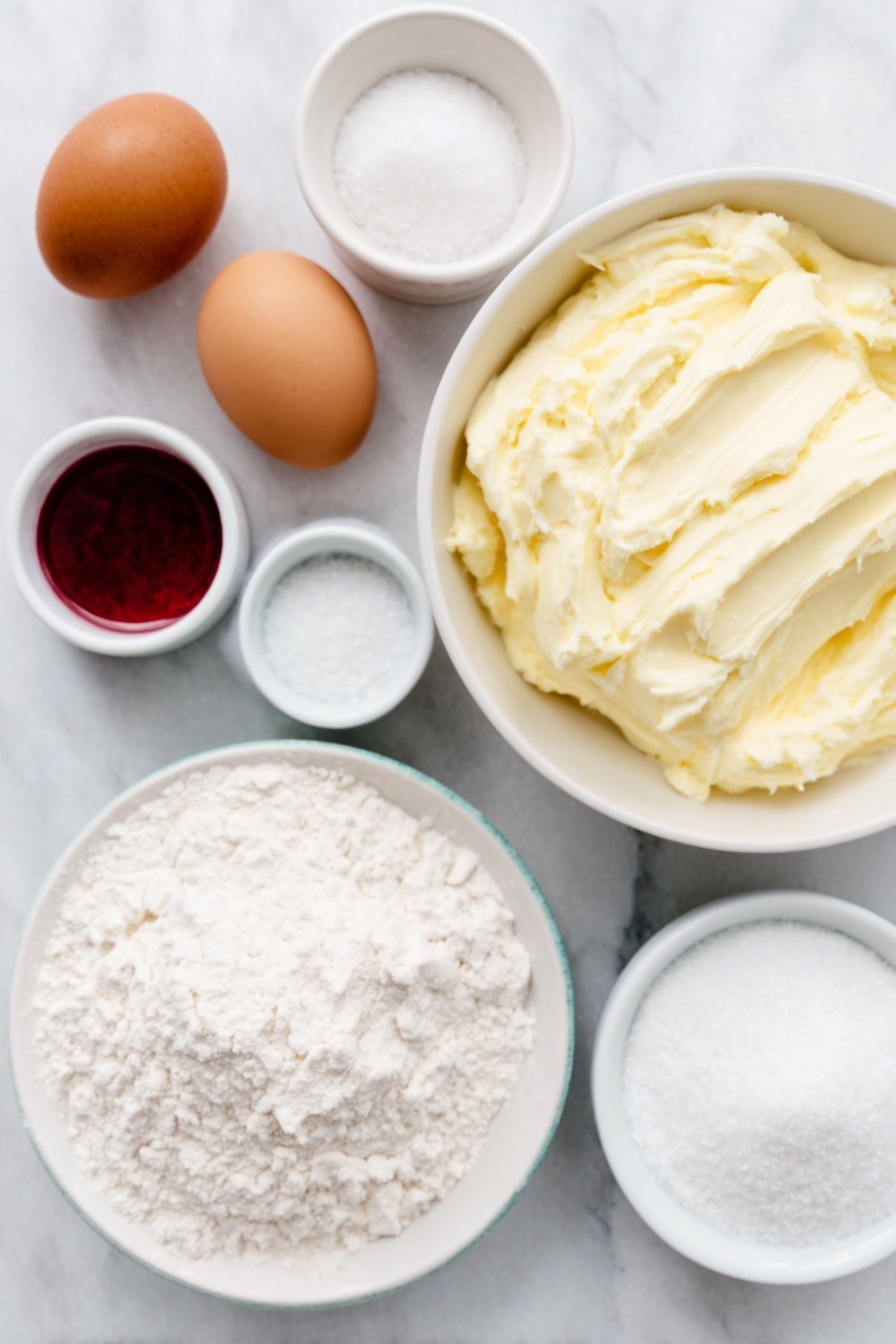
- Unsalted Butter: Using room temperature butter helps it cream perfectly with sugar, creating a fluffy base that’s key for tender cookies.
- Granulated Sugar: Provides sweetness and structure; coating the dough balls with sugar adds a delightful crunch after baking.
- Egg and Egg Yolk: Together, they add richness and help bind everything while keeping the dough soft.
- Peppermint Extract (optional): Gives that signature minty freshness—don’t skip it if you want that classic holiday taste!
- Vanilla Extract or Bean Paste: Balances the peppermint with warmth and depth.
- All-Purpose Flour: The backbone of the dough—provides structure while keeping cookies soft if combined properly.
- Cornstarch: Keeps the cookies tender and helps prevent toughness.
- Fine Salt: Enhances sweetness and balances flavors.
- Baking Soda: Offers a little lift and lightness, ensuring they aren’t dense.
- Red Gel Food Coloring: Concentrated coloring that won’t affect dough consistency or add moisture.
- White or Granulated Sugar (for coating): Added for extra crunch and a sparkling finish.
Tweak to Your Taste
I’ve played around with this recipe quite a bit and found that it’s super flexible, so feel free to customize it to fit your taste or dietary needs! For example, I sometimes swap half the all-purpose flour for almond flour for a nuttier note, or add a pinch of cinnamon to warm it up for winter.
- Almond Extract Variation: I swapped in almond extract once and loved how it added a subtle, sweet nuttiness that paired surprisingly well with peppermint.
- Gluten-Free: Try using a gluten-free all-purpose blend—just be sure it includes xanthan gum to maintain the dough’s structure.
- Color Swirl Fun: Use different food coloring combos for other holidays—pastel pink and green for Valentine’s or orange and black for Halloween.
- Texture Choice: Coating cookies in sanding sugar is my fave because it adds that lovely crunch, but you can skip this step if you want a softer surface.
Step-by-Step: How I Make Peppermint Swirl Sugar Cookies Recipe
Step 1: Cream Butter and Sugar
This is the step I never rush—using a hand or stand mixer, beat your softened butter and sugar on medium-high for a couple of minutes until it’s pale and fluffy. You’ll notice how the sugar dissolves slightly and the mixture looks lighter in color. This sets the stage for fluffy, tender cookies with the perfect texture. Don’t skimp here!
Step 2: Add Eggs and Flavors
Next, beat in your egg and extra egg yolk—this combo adds richness without making the dough too wet. Then stir in the peppermint extract (or almond if you’re feeling adventurous) and vanilla. Give it a good mix until everything is well combined, scraping the bowl’s sides so no ingredients get left behind.
Step 3: Incorporate Dry Ingredients
On low speed, mix in your flour, cornstarch, salt, and baking soda until just combined. Don’t overmix here, or your cookies could turn out tough. Scrape down the bowl and then mix for a few more seconds at medium speed to ensure the dough comes together uniformly.
Step 4: Divide and Color the Dough
Now for the fun part—split the dough evenly and add red gel food coloring to one portion. At first, stir it with a spatula, but your hands will be best for kneading it in evenly. I recommend rubber gloves if you want to keep your fingers stain-free. You’ll know it’s ready when the dough is a solid, even red color.
Step 5: Form Swirl Dough Balls
Using a teaspoon, scoop out small balls of each dough color. Take three balls of each color and arrange them alternating in a small circle, then press them gently together. Cup your hand around the mixture to smooth the edges and push lightly with your forefinger to swirl the colors slightly. This creates those gorgeous peppermint swirls that make these cookies so special.
Step 6: Coat with Sugar and Chill
If you want that sparkling crunch, toss your shaped cookie dough balls in granulated or sanding sugar until evenly coated. Then chill them for 30 minutes in the fridge (or 15 minutes in the freezer) to help maintain shape during baking. This step also makes the dough easier to handle and prevents excessive spreading.
Step 7: Bake and Cool
Set your oven to 350°F (175°C), arrange cookies on parchment-lined sheets spaced about 2 inches apart (they get roomy!), and bake one tray at a time for 11-13 minutes. Watch for edges that are set but not browned—the dough’s light colors can fool you. Let the cookies sit on the baking sheet for 15 minutes after taking them out; they’ll firm up perfectly before moving to a wire rack to cool completely.
Pro Tips for Making Peppermint Swirl Sugar Cookies Recipe
- Cream Butter and Sugar Well: This is key to light, chewy cookies; don’t rush this step.
- Use Gel Food Coloring: Avoid liquid color to keep the dough consistency perfect for rolling.
- Chill Before Baking: This helps the cookies keep their swirl definition and prevents too much spreading.
- Watch Your Bake Time: Because of the light dough, look for texture cues, not color, to avoid overbaking.
How to Serve Peppermint Swirl Sugar Cookies Recipe
Garnishes
I typically keep it simple and let the sugar coating do its magic, but sometimes I add a sprinkle of crushed peppermint candies right before baking to amp up that festive vibe and add a little crunch. A light dusting of powdered sugar after baking gives it a snowy look that’s hard to resist.
Side Dishes
These cookies pair perfectly with a cup of hot cocoa, peppermint tea, or even chilled milk for dunking. If you want a full spread, they’re delightful alongside gingerbread men or classic chocolate chip cookies for variety at holiday gatherings.
Creative Ways to Present
For holiday parties, I like to arrange these on a festive platter lined with evergreen sprigs and candy canes. You can also tie small stacks together with red and white twine for charming edible gifts. I’ve even nestled them inside clear cellophane bags topped with a peppermint sprig for a cute party favor.
Make Ahead and Storage
Storing Leftovers
I keep my leftover peppermint swirl sugar cookies in an airtight container at room temperature, layering them between sheets of parchment paper to prevent sticking. They stay fresh and chewy for about five days, but honestly, they rarely last that long in my house!
Freezing
I love to freeze both the shaped dough balls and baked cookies. For the dough, I freeze them on a tray until firm, then transfer to a zipper bag—they keep great for up to two months. When you’re ready, bake the dough balls straight from frozen, adding a couple extra minutes to the bake time.
Reheating
To revive the cookies after freezing, I pop them in a 300°F oven for 5-7 minutes to warm through and soften slightly without drying them out. You can also microwave briefly, but watch carefully to avoid overheating.
FAQs
-
Can I skip the peppermint extract in this recipe?
Absolutely! While peppermint extract adds the classic holiday twist, you can replace it with almond extract for a different but lovely flavor or stick with vanilla for a simpler sugar cookie. The texture and visual effect remain the same.
-
Why should I use gel food coloring instead of liquid?
Gel food coloring is more concentrated and doesn’t add extra liquid that could soften the dough too much. This helps keep the dough firm and easy to handle, resulting in well-defined, beautiful swirls.
-
How do I prevent the cookies from spreading too much?
Chilling the dough balls before baking is key. It solidifies the butter, so the cookies hold their shape better in the oven. Also, spacing them at least 2 inches apart on your baking sheet gives them room to spread without merging.
-
Can I make these cookies vegan or dairy-free?
Yes! Try swapping the butter for vegan margarine or coconut oil and use a flax or chia egg in place of the eggs. The texture might be slightly different, but you can still achieve a tasty peppermint swirl cookie.
-
How long do Peppermint Swirl Sugar Cookies last?
Stored in an airtight container at room temperature, they stay fresh for up to 5 days. You can freeze baked cookies for up to 2 months to extend their shelf life without losing flavor or texture.
Final Thoughts
I have to say, this Peppermint Swirl Sugar Cookies Recipe has become a sentimental favorite of mine—there’s something so joyful about shaping those candy cane stripes and seeing them bake into little edible works of art. Whether you’re baking for the holidays or just cheering up an ordinary afternoon, these cookies are sure to bring a smile. I hope you’ll give them a go and make some happy memories in your kitchen, just like I did.
Print
Peppermint Swirl Sugar Cookies Recipe
- Prep Time: 30 minutes
- Cook Time: 13 minutes
- Total Time: 43 minutes
- Yield: 24 cookies
- Category: Dessert
- Method: Baking
- Cuisine: American
- Diet: Vegetarian
Description
Delight in these festive Peppermint Swirl Sugar Cookies featuring a beautiful red and white swirl, perfectly chewy texture, and a subtle hint of peppermint or almond extract. These cookies are great for holidays or any time you want a sweet treat with a pop of color and texture from the sanding sugar coating.
Ingredients
Cookie Dough
- 1 cup unsalted butter, room temperature (226g)
- 1 3/4 cups granulated sugar (350g)
- 1 large egg + 1 large egg yolk (80g)
- 1 1/2 tsp peppermint or almond extract (optional) (8g)
- 1 tsp vanilla extract or vanilla bean paste (5g)
- 2 1/2 cups all purpose flour (325g)
- 1 Tbsp cornstarch (8g)
- 1 tsp fine salt (6g)
- 1/2 tsp baking soda (3g)
- Red gel food coloring, enough to achieve desired color
Coating
- 1 cup granulated sugar or white sanding sugar
Instructions
- Preheat Oven and Prepare Baking Sheets: Preheat your oven to 350°F (175°C) and line two large baking sheets with parchment paper or silicone baking mats. Set them aside for later use.
- Cream Butter and Sugar: In a large bowl, using a hand mixer or stand mixer fitted with a paddle attachment, beat 1 cup of room temperature butter with 1 3/4 cups granulated sugar on medium-high speed for a few minutes until the mixture is light and fluffy.
- Add Eggs and Extracts: Add 1 large egg plus 1 large egg yolk, 1 1/2 tsp peppermint extract (optional), and 1 tsp vanilla extract. Beat at medium-high speed until well combined, scraping down the sides and bottom of the bowl as needed.
- Mix Dry Ingredients: On low speed, incorporate 2 1/2 cups all-purpose flour, 1 Tbsp cornstarch, 1 tsp fine salt, and 1/2 tsp baking soda into the wet ingredients until mostly combined. Scrape sides and bottom again and then beat at medium speed for a few seconds to fully combine.
- Divide and Color Dough: Split the dough equally into two bowls (about 490g each). Knead red gel food coloring into one portion until evenly colored. Use gloves if preferred to avoid staining hands.
- Form Dough Balls: Using a teaspoon, scoop small teaspoon-sized portions of both red and white doughs, rolling each into balls. Set aside.
- Create Swirled Cookies: Take three balls of each color (six total) and place them in a circle alternating the colors (red, white, red, white, etc.). Press together to close gaps and gently shape into a rounded cookie shape. Use your forefinger to push colors creating a swirl effect.
- Coat Cookies in Sugar: Optionally, pour 1 cup of granulated or sanding sugar into a bowl and toss the shaped cookie dough balls in the sugar to fully coat, adding texture after baking.
- Chill Dough: Chill the formed cookies in the refrigerator for 30 minutes or in the freezer for 15 minutes to firm them up before baking.
- Bake Cookies: Place the cookies spaced a few inches apart on prepared baking sheets and bake one tray at a time in the middle rack of the oven for 13 minutes, or until edges are set but not browned.
- Cool Cookies: Remove cookies from oven and let them cool on the baking sheet for 15 minutes before transferring to a wire rack to cool completely.
- Store Properly: Store cooled cookies in an airtight container at room temperature for up to 5 days.
Notes
- This recipe yields about 24 cookies and can be doubled for larger batches.
- The dough can be made ahead and refrigerated up to 2 days or frozen for up to 2 months before baking.
- Pre-shaped cookie dough balls can be frozen and baked straight from freezer with a few extra minutes of bake time.
- Baked cookies can be frozen for up to 2 months as well.
- Be sure to cream butter and sugar thoroughly for a chewy, light texture.
- Space cookies about 2 inches apart on the baking sheet to allow for spreading.
- Watch closely baking times as the dough color can make it hard to judge browning; cookies continue setting once out of the oven.
- Use gel food coloring for best dough consistency and color vibrancy without altering texture.
Nutrition
- Serving Size: 1 cookie
- Calories: 150 kcal
- Sugar: 12 g
- Sodium: 80 mg
- Fat: 7 g
- Saturated Fat: 4 g
- Unsaturated Fat: 3 g
- Trans Fat: 0 g
- Carbohydrates: 20 g
- Fiber: 0.5 g
- Protein: 2 g
- Cholesterol: 40 mg
