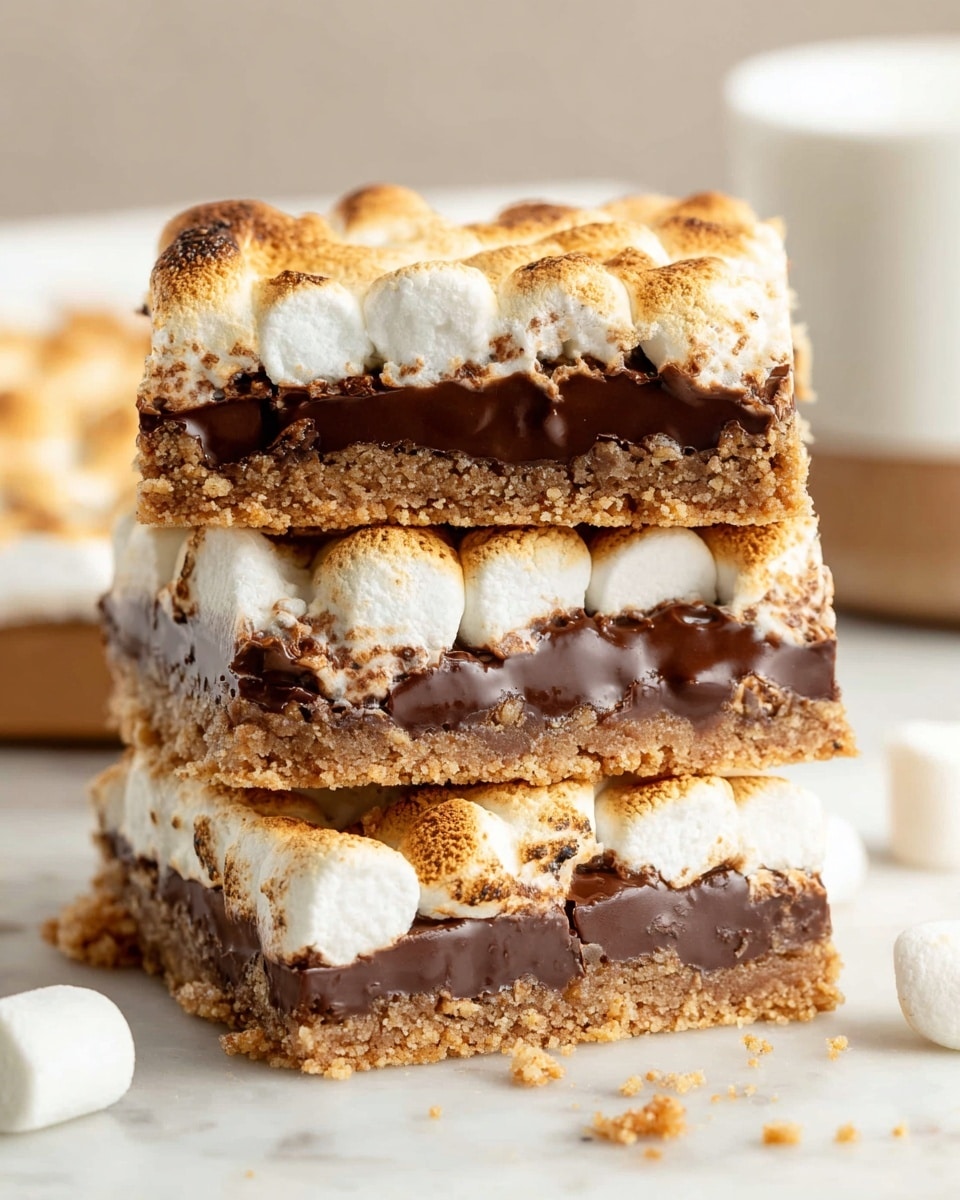
S’mores Bars Recipe
I’m super excited to share this S’mores Bars Recipe with you because it’s such a cozy, nostalgic treat that’s perfect anytime you want that campfire magic without the hassle of an actual fire. These bars capture that nostalgic combination of crunchy graham cracker crust, melty chocolate, and toasted marshmallow in an easy-to-make pan dessert that’s always a crowd-pleaser. Trust me, whether you’re throwing a casual get-together, need a simple dessert for family night, or just want a sweet snack, these bars fit the bill wonderfully.
What I really love about this S’mores Bars Recipe is how adaptable and forgiving it is—even if you’re not a baking pro, you’ll walk away with a delicious, gooey treat that reminds you of summer campfire nights. Plus, it’s a fantastic way to get kids in the kitchen or satisfy that sweet tooth any time of year. I’m sharing all my tips so you can nail that perfect melty, toasted marshmallow look and flavor every time.
Why This Recipe Works
- Simple Ingredients: Uses pantry staples and classic flavors that work beautifully together.
- Quick & Easy: Takes under 30 minutes from start to finish, perfect for last-minute treats.
- Perfect Texture: Crunchy crust, smooth melting chocolate, and gooey toasted marshmallows that balance perfectly.
- No Campfire Needed: All the s’mores flavor without stepping outside or juggling a stick over flames.

Ingredients & Why They Work
Every ingredient in this S’mores Bars Recipe plays a special role to hit that classic s’mores flavor. I love how the graham cracker crumbs create a sturdy but crumbly crust, while the powdered sugar gives just a hint of sweetness that perfectly balances the bitterness of dark chocolate and the gooey texture of marshmallows. Grab good-quality Hershey bars and fresh mini marshmallows for the best result.
- Graham cracker crumbs: Provides that iconic base texture and flavor; pressing it firmly ensures a crust that holds as bars.
- Butter (melted): Binds the crust ingredients together and adds rich flavor—make sure it’s fully melted but not hot.
- Powdered sugar: Enhances sweetness without grit, helping the crust set up nicely.
- Hershey chocolate bars: Classic milk chocolate for that nostalgic campfire taste; break into pieces for even melting.
- Mini marshmallows: Toast to golden perfection on top—the key to gooey, melty s’mores bliss.
Tweak to Your Taste
The beauty of this S’mores Bars Recipe is how easy it is to make your own. I often swap out milk chocolate for dark chocolate if I’m craving something less sweet, or sometimes add a handful of chocolate chips for extra gooey pockets. Feel free to experiment to suit your cravings or dietary needs!
- Variation: I once sprinkled chopped nuts on top of the marshmallows for a little crunchy contrast—so good!
- Dietary swaps: Use dairy-free chocolate and vegan marshmallows to make it vegan-friendly without losing any magic.
- Seasonal twist: Adding crushed peppermint candies to the crust is a perfect holiday spin.
Step-by-Step: How I Make S’mores Bars Recipe
Step 1: Make the Graham Cracker Crust
First things first, preheat your oven to 350°F and grease a 9×13 pan with non-stick butter spray—this prevents sticking and makes cleanup easier. In a medium bowl, mix your graham cracker crumbs, powdered sugar, and melted butter with a spoon. Don’t just sprinkle the butter over dry crumbs; fully mix it so every crumb is moistened. Once mixed, press the crust mixture firmly and evenly on the bottom and slightly up the sides of the pan. This “packing” step helps the crust hold together like a biscuit once baked, so don’t be shy about pressing hard. Bake for 5-8 minutes until you see the edges getting a light golden brown. Your kitchen will start smelling heavenly!
Step 2: Melt the Chocolate Layer
Take your pan out and let the crust cool a minute; it will firm up nicely. Then, lay the Hershey bars carefully over the crust, covering it as fully as possible—overlapping slightly is fine. Pop the pan back in the oven for about 3 minutes. You’re looking for the chocolate to start melting and turn glossy, but don’t let it get too melty or runny. This step primes the chocolate to adhere perfectly to that crunchy layer below.
Step 3: Toast the Marshmallows
After the chocolate layer looks shiny, remove the pan and then quickly and tightly pack mini marshmallows on top of the melted chocolate. Now, turn your oven’s broiler on and slide the pan under it. This part requires your full attention! Watch the marshmallows closely for about 2 minutes. They should puff up and start turning golden brown. Do not walk away — marshmallows can go from perfectly toasted to burnt in seconds. As soon as some browning appears, pull them out immediately.
Step 4: Cool & Serve
Let the bars cool completely on the counter. I like to pop them in the fridge afterward for about 30 minutes; it helps the chocolate and marshmallows set so the bars slice cleanly. When you’re ready to cut, use a sharp knife warmed under hot water and dried—this stops the sticky mess. You might need to repeat warming your knife as you go. Then, slice into squares, serve, and enjoy all those melty, crunchy layers that make this S’mores Bars Recipe a total winner.
Pro Tips for Making S’mores Bars Recipe
- Press the Crust Firmly: I learned the hard way that a loosely packed crust will crumble apart—packing firmly is a game changer.
- Broil with Caution: The marshmallows toast fast; I stay right by the oven to pull them out at the perfect golden spot before burning.
- Warm Your Knife: When cutting bars, a warm knife glides right through sticky marshmallows and chocolate, keeping the edges neat.
- Avoid Overbaking: The crust hardens as it cools, so bake just until golden edges appear—too long makes it dry and crumbly.
How to Serve S’mores Bars Recipe
Garnishes
I love topping these bars with a light sprinkle of crushed graham cracker crumbs or a dusting of powdered sugar for a pretty finish. Sometimes a drizzle of caramel sauce adds a rich, oozy touch that’s irresistible. For a fresh note, a few mint leaves on the side brighten things up beautifully.
Side Dishes
These bars are perfect with a scoop of vanilla or chocolate ice cream or alongside a hot cup of coffee or cocoa. For an outdoor party vibe, pair with fresh fruit like strawberries or a tangy citrus salad to cut through the sweetness.
Creative Ways to Present
I once served these s’mores bars in mini mason jars layered with extra crushed graham crackers and marshmallow fluff for a fun party presentation. They also look adorable stacked on a rustic wooden board, sprinkled with edible gold dust for a festive touch. For kid parties, let everyone build their own “s’mores bar” plates with toppings like chopped nuts, berries, or caramel drizzle.
Make Ahead and Storage
Storing Leftovers
I store leftover s’mores bars in an airtight container in the fridge to keep the marshmallows from melting into a sticky mess. They stay good for about 3-4 days, and honestly, they’re still just as tasty chilled.
Freezing
Freezing these bars works surprisingly well. I wrap each cut square tightly in plastic wrap and then place them in a freezer-safe bag. They keep beautifully for a month or two. When you want a treat, just thaw at room temperature or gently warm to soften the marshmallows again.
Reheating
If your bars have chilled and the marshmallows firmed up too much, a quick 10-15 second zap in the microwave softens them right up without melting the crust. Be careful not to overheat or you’ll lose the signature toasted gooeyness!
FAQs
-
Can I use a different type of chocolate in the S’mores Bars Recipe?
Absolutely! While traditional recipes use Hershey’s milk chocolate bars for that classic flavor, you can substitute dark chocolate, semi-sweet, or even white chocolate, depending on your preference. Just be mindful that different chocolates melt differently, so keep an eye when heating to avoid scorching.
-
How do I avoid the marshmallows burning under the broiler?
The key is to watch the marshmallows constantly while broiling—this step takes only about 2 minutes, and marshmallows can quickly shift from golden brown to burnt. Keep the oven rack a little lower if your broiler is very intense, and pull them out as soon as they start to bubble and brown.
-
Can I make the crust ahead of time?
You can bake the crust ahead and store it in an airtight container for up to 2 days, but I recommend completing the layers closer to serving for the best texture and melty marshmallow finish.
-
Why is my crust crumbly and falling apart?
This usually happens if the butter isn’t evenly mixed in or if the crust isn’t packed firmly in the pan. Make sure your melted butter is fully incorporated and press the mixture down tightly when assembling.
Final Thoughts
This S’mores Bars Recipe has been a staple in my kitchen ever since I wanted to enjoy all the fun of s’mores without starting a campfire. It’s cheerful, easy, and has that warm nostalgic feel that brings people together. Give it a try—you’ll love how effortless it is to whip up a batch of these gooey, crunchy delights that everyone will rave about. You might just find it becoming your go-to comfort dessert too!
Print
S’mores Bars Recipe
- Prep Time: 10 minutes
- Cook Time: 15 minutes
- Total Time: 25 minutes
- Yield: 16 servings
- Category: Dessert
- Method: Baking
- Cuisine: American
Description
Delicious and gooey S’mores Bars that combine a buttery graham cracker crust, melted Hershey’s chocolate, and toasted mini marshmallows, perfect for a sweet treat or party dessert.
Ingredients
Crust
- 2 cups graham cracker crumbs
- 8-12 Tablespoons butter, melted
- 1/2 cup powdered sugar
Topping
- 4 Hershey Chocolate Bars (4.4 ounce each)
- 1 package mini marshmallows
Instructions
- Preheat Oven: Preheat your oven to 350 degrees Fahrenheit to prepare for baking the crust.
- Prepare Pan: Grease a 9×13 inch baking pan with non-stick butter spray to prevent sticking.
- Mix Crust: In a medium bowl, combine graham cracker crumbs, powdered sugar, and melted butter. Stir until the mixture is evenly moistened and resembles wet sand.
- Press Crust: Press the graham cracker mixture firmly and evenly into the bottom and sides of the prepared baking pan, packing it tightly to form the base crust.
- Bake Crust: Bake the crust for 8 minutes or until the edges begin to turn golden brown. Remove from oven and allow to cool.
- Add Chocolate Layer: Place the Hershey chocolate bars evenly over the cooled crust, covering it completely.
- Melt Chocolate: Return the pan to the oven for approximately 3 minutes, just until the chocolate starts to melt and becomes shiny. Remove from oven and cool for 1-2 minutes.
- Add Marshmallows: Arrange the mini marshmallows tightly over the melted chocolate layer, covering evenly.
- Broil Marshmallows: Set the oven to broil and place the pan on the top rack. Watch carefully and broil for about 2 minutes until marshmallows turn golden brown. Remove immediately to avoid burning.
- Cool and Set: Let the bars cool completely. For easier cutting, refrigerate the bars to allow them to set firmly.
- Cut and Serve: Use a sharp knife warmed under hot water and dried to slice the bars cleanly, repeating warming if the knife gets sticky. Serve and enjoy!
Notes
- Use the full 12 tablespoons of butter if you want a firmer, more packed crust.
- Press the crust firmly to prevent crumbling after baking.
- Watch marshmallows closely while broiling to avoid burning or catching fire.
- Refrigerate bars after cooling to make cutting easier and less sticky.
- Warming the knife before cutting helps achieve cleaner slices through gooey marshmallows.
Nutrition
- Serving Size: 1 bar
- Calories: 250 kcal
- Sugar: 20 g
- Sodium: 150 mg
- Fat: 14 g
- Saturated Fat: 8 g
- Unsaturated Fat: 5 g
- Trans Fat: 0 g
- Carbohydrates: 28 g
- Fiber: 1 g
- Protein: 2 g
- Cholesterol: 30 mg


