Snowman Face Cookies Recipe
Looking for a fun and festive treat that’s as adorable as it is delicious? You’re going to want to try this Snowman Face Cookies Recipe. These charming cookies are soft, sweet, and decorated with the cutest little snowman faces that’ll bring smiles all around. Whether you’re baking for a holiday party, a kid-friendly gathering, or just because, this recipe is super straightforward and the results are fan-freaking-tastic. I can’t wait to walk you through every step so you get perfect snowman cookies that everyone will love!
Why This Recipe Works
- Simple Ingredients: Using a white cake mix saves you time but still gives you soft, cakey cookies that hold just right.
- Fun Frosting: The buttercream is smooth and easy to spread, perfect for adding that snowy look and sparkling sanding sugar.
- Playful Decoration: Using colorful candies for the faces makes decorating a blast for kids and adults alike.
- Make-Ahead Friendly: Cookies freeze wonderfully before decorating, so you can plan ahead without stress.

Ingredients & Why They Work
The ingredients in this Snowman Face Cookies Recipe are basic kitchen staples that combine beautifully to give you tender, melt-in-your-mouth cookies that frost and decorate perfectly. Each component has a role — from the cake mix for easy base to the candies that bring the faces to life. Here’s a quick breakdown of why these work so well.
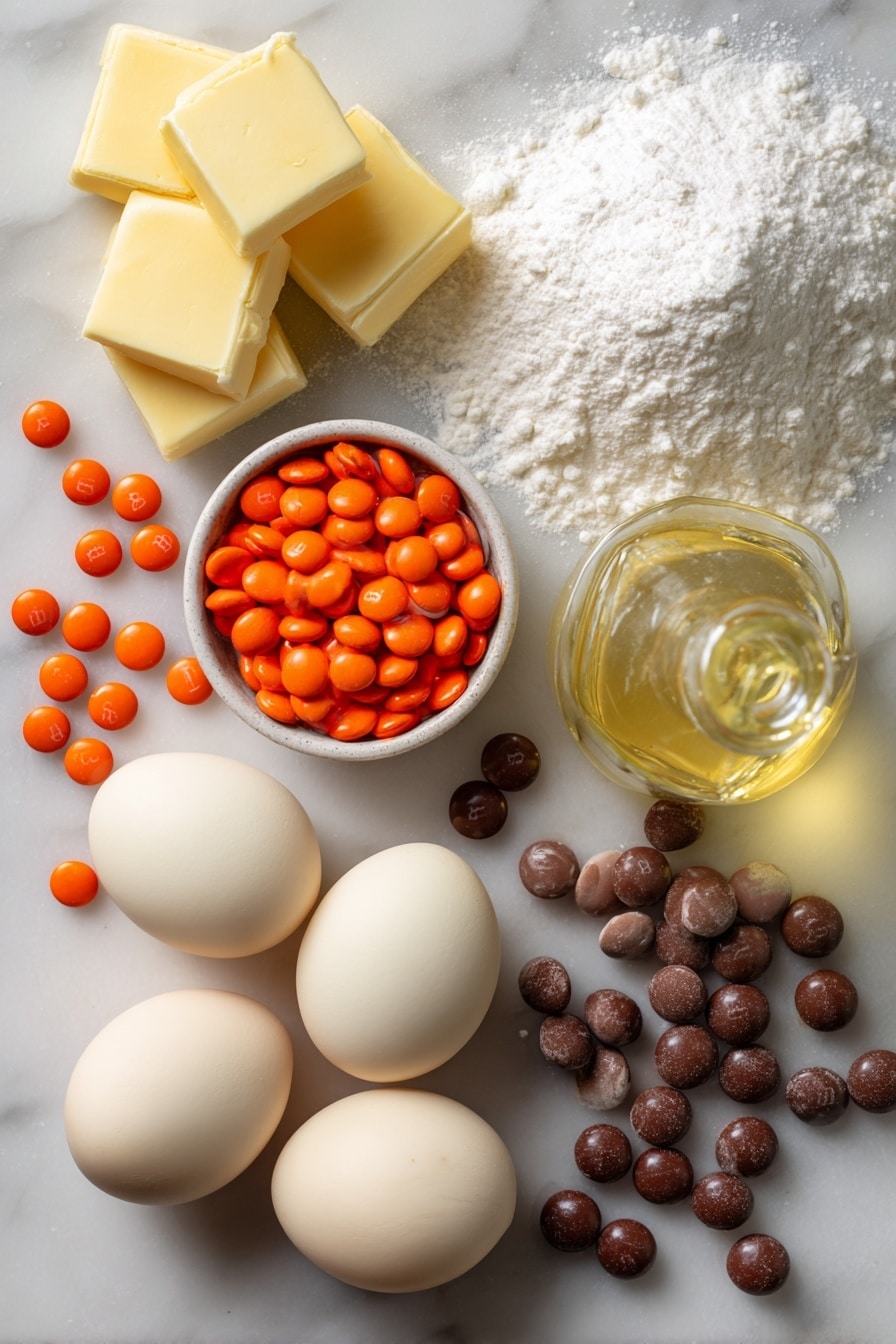
- White cake mix: Using cake mix keeps the cookie base light and cakey without complicated mixing or rising times.
- Eggs: These bind everything together and add moisture so the cookies aren’t dry.
- Canola oil: A neutral-flavored oil that keeps cookies tender without overpowering sweetness.
- Unsalted butter: Provides richness and creaminess for the buttercream frosting.
- Powdered sugar: Essential for smooth, sweet frosting that can hold shape well.
- Vanilla extract: Adds warm, comforting flavor in the frosting.
- Salt: Balances sweetness in the frosting so it’s not cloying.
- Milk or cream: Gives the frosting the perfect spreading consistency.
- White sanding sugar: Sprinkled on top, it mimics sparkling snow that makes these cookies magical.
- Orange Dot candies: Perfectly sized for the snowman’s carrot nose.
- Regular brown M&Ms: Used for the eyes — their size is just right for a cute, expressive face.
- Mini brown M&Ms: These tiny morsels create the smile, arranged in a curve for charm.
Tweak to Your Taste
I love making these Snowman Face Cookies Recipe my own by playing with the decoration and texture a bit. It’s so fun to invite friends or kids to get creative with the faces or add a personal spin on the frosting. You should definitely feel free to experiment a bit — it’s all about joy and sharing smiles!
- Variation: I sometimes swap the orange Dot candy nose with a small piece of dried apricot or a tiny candy corn for a different look — it adds a fun twist and some chewiness.
- Dietary tweak: For a dairy-free version, try using vegan butter and a non-dairy milk in the frosting, the cookies stay just as soft and yummy.
- Seasonal: You can easily swap the white sanding sugar for colored sugar to match other seasonal themes, but honestly, the white sparkle is my favorite for snowmen!
Step-by-Step: How I Make Snowman Face Cookies Recipe
Step 1: Mix It Up
Start by preheating your oven to 350°F and lining two baking sheets with parchment paper — this keeps the cookies from sticking and helps them bake evenly. In a large bowl, stir together the white cake mix, eggs, and canola oil until you form a soft dough. I usually use a sturdy spoon or my hands if things get sticky. The dough should come together easily without being too wet or crumbly. If it feels sticky, a quick chill in the fridge for 15 minutes can help.
Step 2: Scoop and Bake
Use a medium cookie scoop to drop dough balls about 2 inches apart on your lined sheets. This spacing lets the cookies spread just enough without merging. Pop them in the oven for 9-11 minutes — you want to see the edges set but keep the centers soft. When I bake, I start checking around 9 minutes to avoid over-baking. The cookies will feel slightly soft but not raw. Let them cool on the baking trays for a few minutes before transferring to a wire rack to cool completely — this step is key for good frosting grip.
Step 3: Whip Up the Buttercream
While those cookies cool, let’s make that dreamy buttercream. Beat the softened butter until creamy and smooth. Then gradually add the powdered sugar, vanilla extract, salt, and one tablespoon of milk or cream, blending until you get a spreadable consistency. If it feels too thick, just add milk one teaspoon at a time. The frosting should be soft enough to spread easily but firm enough to hold your candies.
Step 4: Frost and Decorate
Spread a generous dollop of buttercream over each cooled cookie using a butter knife or an offset spatula — this frosting layer is your snowman’s face! Then quickly sprinkle white sanding sugar on top to give that glittery snow effect. Before the frosting sets, arrange the decorations: place an orange Dot candy for the nose right in the center, add two regular brown M&Ms as eyes, and finish with mini brown M&Ms curved into a smile. I find it easiest to use tweezers for placing the tiny mini M&Ms because it’s less messy and more precise. Once decorated, let the frosting set at room temp, and voilà — your snowman faces are ready to spread some holiday cheer!
Pro Tips for Making Snowman Face Cookies Recipe
- Use Room Temperature Ingredients: Softened butter and eggs at room temp mix more smoothly making your frosting luxuriously creamy.
- Don’t Overbake Cookies: Pull them out when edges set but centers are still soft to keep that tender, cakey texture.
- Chill Dough if Needed: If you find your dough too sticky to scoop, a quick chill helps it firm up for easier handling.
- Decorate Before Frosting Sets: Apply candies promptly while frosting is soft so they stick well without sliding off.
How to Serve Snowman Face Cookies Recipe
Garnishes
I usually keep garnishes simple because the snowman faces are cute enough on their own! But sometimes I add a light dusting of powdered sugar right before serving to mimic fresh snow, which adds a pretty touch. If you want to get fancy, tiny edible glitter can add extra sparkle that kids especially love.
Side Dishes
These cookies pair beautifully with a warm mug of hot chocolate or a spiced chai latte — think cozy winter vibes! For gatherings, consider setting out a platter with other holiday treats like gingerbread men or peppermint bark to complement the theme.
Creative Ways to Present
One time I baked these for a winter-themed party and displayed them standing upright in a shallow box lined with shredded white tissue paper to look like a snow-covered scene. I also love tying a small clear bag around a couple of cookies with a festive ribbon for gifting. Presentation really amps up the “aww” factor!
Make Ahead and Storage
Storing Leftovers
Once frosted and decorated, I store my Snowman Face Cookies in an airtight container at room temperature. They stay fresh and soft for about 3-4 days, but I have to admit, mine never last that long! Keep the layers single or separated with parchment to avoid smudging the faces.
Freezing
I nearly always freeze the undecorated cookies so I can bake a big batch ahead of time. Just let the baked cookies cool, then freeze them in a single layer in an airtight container or freezer bag for up to 3 months. When you’re ready to serve, thaw completely before frosting and decorating.
Reheating
If you have leftover cookies that have cooled, you can revive their softness by warming them briefly in the microwave for 10-15 seconds. Be careful not to overheat or they’ll get too soft. This little trick makes every bite feel freshly baked!
FAQs
-
Can I use a different cake mix for this Snowman Face Cookies Recipe?
Definitely! You can try yellow or even funfetti cake mix if you want a colorful twist. Just know that the white cake mix gives the best “snowy” cookie base for the look. If you switch, the flavor will change slightly, and frosting colors might need adjustment to keep the snowman motif.
-
Can I make these cookies gluten-free?
If you find a gluten-free white cake mix, you can absolutely try it with this recipe! Just confirm the mix’s instructions and adjust baking time if needed. Keep frosting and decoration the same for simple substitutions.
-
What if I don’t have orange Dot candies for the noses?
No worries! You can substitute small orange candies like mini M&Ms, candy corn tips, or even tiny pieces of dried apricot. The key is something small, bright orange, and easy to place.
-
How long does the frosting need to set before serving?
Usually, about 30 minutes to an hour at room temperature is enough for the buttercream to firm up. If you’re in a hurry, you can pop the cookies in the fridge for 15-20 minutes, but watch out for condensation.
Final Thoughts
Making this Snowman Face Cookies Recipe always brings a little magic to my kitchen. It’s not just about the tasty cookies (though they are incredible!), but about the smiles decorating them brings — especially when the kids join in. I love how simple it is to pull together, yet so charming that everyone asks for more. Give it a try, have fun with the decorations, and enjoy every sweet bite. I promise these snowmen will warm your heart — even when it’s chilly outside!
Print
Snowman Face Cookies Recipe
- Prep Time: 20 minutes
- Cook Time: 11 minutes
- Total Time: 31 minutes
- Yield: 18 cookies
- Category: Dessert
- Method: Baking
- Cuisine: American
Description
Delightfully festive Snowman Face Cookies made from a simple white cake mix dough, topped with creamy buttercream and decorated with colorful candies to bring a fun holiday spirit to your baking.
Ingredients
Cookies
- 1 (15.25 ounce) box white cake mix
- 2 large eggs
- 1/2 cup canola oil
Buttercream
- 1/2 cup unsalted butter softened
- 2 cups powdered sugar
- 1 teaspoon vanilla extract
- 1/4 teaspoon salt
- 1-2 tablespoons milk or cream
Decoration
- 1/2 cup white sanding sugar
- 18 orange Dot candies for noses
- 36 regular brown M&Ms for eyes
- 90 mini brown M&Ms for mouths
Instructions
- Preheat Oven: Preheat the oven to 350 degrees F and line two baking sheets with parchment paper to prepare for baking the cookies.
- Make Dough: In a large bowl, combine the cake mix, eggs, and canola oil. Mix until a cohesive dough forms, ensuring all ingredients are fully incorporated.
- Portion Cookies: Use a medium cookie scoop to portion the dough onto the prepared baking sheets, spacing cookies about 2 inches apart to allow for spreading.
- Bake Cookies: Bake the cookies for 11 minutes or until the edges are set and slightly golden. Remove from oven and let them cool on the baking sheets for a few minutes before transferring to a wire rack to cool completely.
- Prepare Buttercream: In a large bowl, beat the softened butter with an electric mixer until smooth and creamy. Gradually add powdered sugar, vanilla extract, salt, and 1 tablespoon of milk or cream, beating until smooth. Add more milk as needed to reach a spreadable consistency.
- Frost Cookies: Spread a layer of buttercream onto each cooled cookie evenly using a knife or small offset spatula.
- Decorate: Immediately sprinkle white sanding sugar over the frosted cookies for a sparkling effect. Place one orange Dot candy in the center of each cookie as the nose, two regular brown M&Ms as eyes, and arrange mini brown M&Ms in a curved line to form a mouth on each snowman face.
- Set Frosting and Serve: Allow the buttercream to set before serving and enjoy the festive snowman cookies.
Notes
- Store the decorated cookies in an airtight container at room temperature for 3-4 days to maintain freshness.
- The undecorated cookies freeze well for up to 3 months when stored in an airtight container or freezer bag. Thaw completely at room temperature before frosting and decorating.
- Use parchment paper on baking sheets to prevent sticking and ensure easy cookie removal.
- Adjust milk or cream quantity in buttercream to achieve ideal frosting consistency for spreading.
Nutrition
- Serving Size: 1 cookie
- Calories: 150 kcal
- Sugar: 12 g
- Sodium: 100 mg
- Fat: 7 g
- Saturated Fat: 3 g
- Unsaturated Fat: 3 g
- Trans Fat: 0 g
- Carbohydrates: 20 g
- Fiber: 0.5 g
- Protein: 1 g
- Cholesterol: 15 mg
