Spider Pie for Halloween Recipe
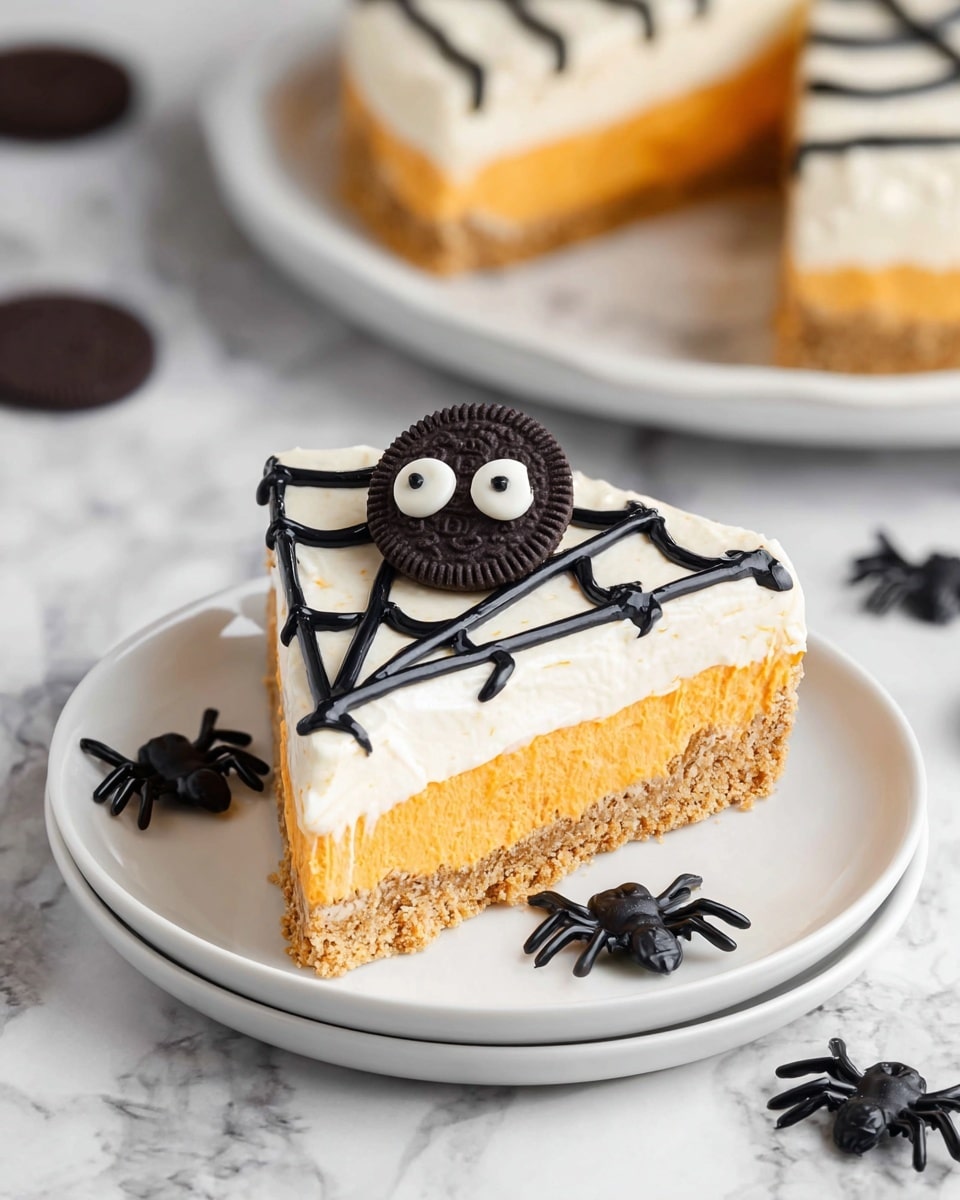
If you’re looking to wow your Halloween guests with something both spooky and downright delicious, you’re in for a treat! This Spider Pie for Halloween Recipe is exactly what you need on your dessert table. It’s creamy, festive, and oh-so-fun to assemble—perfect for celebrating the season with a little creative flair. Stick with me as I walk you through my tried-and-true way to nail this pie that’s both kid-friendly and guaranteed to make you smile.
Why This Recipe Works
- Easy No-Bake Layers: You’ll love how the creamy cheesecake filling and pumpkin layer come together without needing the oven.
- Perfectly Themed Decorations: Making spiders from Oreos and pretzels adds an adorable, spooky touch that’s fun for all ages.
- Balance of Flavors: The subtle pumpkin spice with cream cheese sweetness makes this pie a festive crowd-pleaser.
- Make Ahead Friendly: You can prep most of the pie in advance, great for stress-free holiday entertaining.

Ingredients & Why They Work
The magic of this Spider Pie for Halloween Recipe lies in simple ingredients that bring creamy, spicy, and sweet notes together perfectly. Each one plays a role, so let’s chat about why I love these choices and some quick tips for shopping.
- Graham cracker crumbs: These create the crunchy, buttery base—opt for finely crushed crumbs for an easier press and consistent texture.
- Brown sugar: Adds a subtle molasses depth to the crust that complements the pumpkin spice perfectly.
- Unsalted butter: Melted for the crust and softened for the filling, it blends richness without overwhelming sweetness.
- Cream cheese: Full-fat cream cheese gives the filling its luscious texture—room temp is key to avoid lumps.
- Powdered sugar: Dissolves effortlessly, sweetening the filling gently.
- Vanilla extract: A little vanilla rounds out flavors wonderfully.
- Pumpkin puree: Make sure you use pure pumpkin, not pumpkin pie filling, for best results and control over sweetness.
- Pumpkin pie spice: Brings that warm fall flavor—if you don’t have it, a mix of cinnamon, ginger, nutmeg, and cloves works well.
- Semi-sweet chocolate: Melts nicely for piping the spiderweb and legs, giving depth and contrast.
- Black cocoa powder: Intensifies the frosting’s dark color for a bold spiderweb look.
- Mini Oreos and candy eyes: These delightful tiny details turn everyday treats into creepy-cute spiders.
- Mini pretzels: Perfect for spider legs because they’re thin, crispy, and easy to cut.
Tweak to Your Taste
I love making this Spider Pie for Halloween Recipe my own by adjusting a few things here and there. It’s such a versatile dessert, so don’t be afraid to experiment and make it feel like yours.
- Make it dairy-free: I swapped cream cheese for a vegan alternative once and used coconut butter instead of regular butter—the texture was a little different but still fantastic!
- Add a little espresso powder: Just a pinch in the chocolate frosting makes the spiderweb pop with flavor, a nice grown-up twist.
- Customize spider shapes: Try using different sized cookies or colored candy eyes to make an extra spooky or funny spider colony on top.
- Spice it up: If you want more pumpkin spice kick, I sometimes sprinkle cinnamon on top before serving for that extra aroma.
Step-by-Step: How I Make Spider Pie for Halloween Recipe
Step 1: Press and Freeze the Crust
Start by mixing graham cracker crumbs, brown sugar, and salt in a bowl—make sure it’s all evenly combined. Then stir in the melted butter until the mixture feels like damp sand. Press that into your 9-inch pie pan, pushing it firmly up the sides. This crust is thick and will hold all the filling beautifully, so don’t be shy about packing it in. Pop it into the freezer while you whip up the filling; freezing helps it set fast so you can layer like a pro.
Step 2: Whip Up the Cheesecake Filling
Beat the cream cheese, butter, powdered sugar, vanilla extract, and a pinch of salt with a hand mixer until it’s light and fluffy—don’t rush this part! Then, reserve about a quarter of this creamy mixture into another bowl to mix with the pumpkin and pumpkin pie spice. Mixing in the pumpkin slowly on low speed helps keep the texture silky.
Step 3: Build the Layers
Spread half of the white cheesecake filling over your frozen crust, then freeze for 20-30 minutes until it firms just enough to handle the next layer without mixing. Next, add the pumpkin filling, then chill again for about 20-40 minutes. Finally, top it with the remaining white cheesecake mixture and smooth it out. You’re basically creating a spooky, layered masterpiece here—the chilling steps are key to keep those layers distinct and gorgeous.
Step 4: Create the Spiderweb
Melt the semi-sweet chocolate carefully in the microwave, stirring every 30 seconds until smooth. Stir in the black cocoa powder and coconut oil to get a thick, fudge-like frosting perfect for piping. Don’t pipe the web until it’s just the right thickness—too runny and it’s a mess; too thick and it won’t flow nicely. For the web, I start by piping a plus sign, then an X, and finally connect the ends with curved lines. Trust me, this step is easier than it looks and so satisfying!
Step 5: Assemble Your Spiders
For mama spider, gently cut the legs off mini pretzels with a sharp knife, then split a regular Oreo and tuck the legs between the wafers (aiming for spider-like positioning!). Pipe a little of your chocolate frosting on the candy eyes and stick two on the top Oreo half. Put the Oreo halves together and place your spider right in the middle of your pie. For the babies, attach mini candy eyes to mini Oreos using a touch of frosting, then pipe four small legs on each side with a piping tip. It’s fiddly but totally worth it for the cute factor!
Pro Tips for Making Spider Pie for Halloween Recipe
- Freeze Crust to Avoid Soggy Bottom: Trust me, freezing your crust before filling keeps it crisp and the layers neat.
- Room Temperature Ingredients: Make sure your cream cheese and butter are softened for the filling to blend perfectly smooth without lumps.
- Test Your Frosting Consistency: Let the chocolate-cocoa frosting cool a bit before piping so it won’t run and ruin your perfect spiderweb design.
- Don’t Refrigerate Candy Eyes: Refrigeration can make the pupils bleed; keep them at room temp until right before decorating.
How to Serve Spider Pie for Halloween Recipe
Garnishes
I keep garnishes simple on this Spider Pie for Halloween Recipe because the spiders steal the spotlight. But if you want to add a little extra, a light dusting of cinnamon or a few edible glitter sprinkles around the edge add just the right festive shimmer without overshadowing the spooky critters.
Side Dishes
My favorite sides to serve with this pie are simple—think warm mugs of apple cider or hot chocolate. The cozy drinks balance the cool, creamy pie. For a savory twist on your Halloween menu, pair it with roasted pumpkin seeds or a small cheese board with crackers for guests who want savory bites alongside the sweet.
Creative Ways to Present
Once, I served this Spider Pie on a rustic wooden platter surrounded by faux spiderweb decorations and mini pumpkins, which made for an extra festive presentation. You can even place the baby spiders crawling up the pie’s sides or add gummy worms peeking out for a creepy-crawly surprise. Get creative and have fun with it—your guests will appreciate the spooky touches!
Make Ahead and Storage
Storing Leftovers
I usually cover leftover pie tightly with plastic wrap and keep it in the fridge. Because the filling is cream cheese-based, it holds together well and stays fresh for up to 3 days. Just remember to add the spiders fresh if you want them crisp and eye-catching.
Freezing
This Spider Pie freezes beautifully if you skip the decorations first. I wrap mine well in plastic wrap and foil and freeze for up to 3 months. When ready to serve, defrost it in the fridge for a couple of hours or on the countertop for about 20-30 minutes. Then you can add your spider toppers and web for a fresh, festive look.
Reheating
Since this pie is best enjoyed chilled, there’s no reheating needed. Just give it a few minutes to soften after taking it out of the fridge so those layers and flavors shine. If it’s too firm, a brief 5-minute rest at room temp works wonders.
FAQs
-
Can I make the Spider Pie for Halloween Recipe gluten-free?
Absolutely! Just substitute regular graham cracker crumbs, Oreos, and pretzels with gluten-free versions. The texture and flavor stay just as delicious, and it’s a great option for guests with gluten sensitivities.
-
How long does this pie take to set properly?
Between freezing and chilling after each layer, you’re looking at about 2 hours total. The chilling is important to keep each layer intact when adding the next, so don’t rush it!
-
Can I make the spider decorations ahead of time?
You can prep the spiders in advance, but avoid refrigerating the candy eyes since the pupils can bleed. I like to assemble the pie and add spiders just before serving for the best look.
-
What if I don’t have pumpkin pie spice?
No worries! I usually mix ½ teaspoon cinnamon, ¼ teaspoon ginger, and a pinch of nutmeg and cloves instead. It still gives you that cozy fall vibe without the need for specialty spices.
Final Thoughts
Making this Spider Pie for Halloween Recipe has become one of my favorite traditions—it’s just so fun to assemble and share with family and friends. Plus, having a dessert that looks as good as it tastes can turn any Halloween party into a memorable event. I promise, once you’ve tried it, you’ll want to make it every year. So go ahead, grab those Oreos and pretzels, and enjoy crafting this spooky, sweet delight right in your own kitchen!
Print
Spider Pie for Halloween Recipe
- Prep Time: 30 minutes
- Cook Time: 0 minutes
- Total Time: 2 hours
- Yield: 12 slices
- Category: Dessert
- Method: No-Cook
- Cuisine: American
- Diet: Vegetarian
Description
Celebrate Halloween with this festive Spider Pie, featuring a graham cracker crust, creamy pumpkin cheesecake filling, and adorable Oreo spider decorations. Perfect for a spooky dessert that’s both fun and delicious.
Ingredients
For the crust:
- 1 1/2 cups (180 grams) graham cracker crumbs
- 1/4 cup (50 grams) brown sugar
- 1/8 teaspoon salt
- 6 tablespoons (84 grams) unsalted butter, melted
For the filling:
- 16 ounces (454 grams) full-fat cream cheese, room temperature
- 1/2 cup (113 grams) unsalted butter, room temperature
- 2 cups (240 grams) powdered sugar
- 1 tablespoon vanilla extract
- Pinch salt
- 1 teaspoon pumpkin pie spice
- 7.5 ounces (212 grams) canned pumpkin puree
For spiderweb and baby spider leg frosting:
- 1/3 cup (56 grams) semi-sweet chocolate, chopped or chocolate chips
- 1 tablespoon black cocoa powder
- 3/4 teaspoon refined coconut oil or unsalted butter
For mama spider:
- 1 normal-sized Oreo
- 2 normal-sized candy eyes
- Mini pretzels (5-6 pieces recommended)
For baby spiders:
- 8 mini Oreos
- 16 mini candy eyes (1/4″ or 6 mm in diameter)
- Leftover black frosting from the spiderweb
Instructions
- Prepare the crust: In a medium mixing bowl, stir together the graham cracker crumbs, brown sugar, and salt until well combined. Stir in the melted butter until fully mixed. Press the mixture evenly onto the bottom and up the sides of an ungreased 9” pie pan. The crust will be thick. Place the crust in the freezer while preparing the filling.
- Prepare the filling: In a large mixing bowl, beat the cream cheese, butter, powdered sugar, vanilla extract, and pinch of salt with an electric hand mixer until light and fluffy. Remove 1/4 (about 197 grams) of this cheesecake filling into a separate bowl. To this portion, add the canned pumpkin puree and pumpkin pie spice, and beat on low speed until combined. Set the pumpkin filling aside.
- Layer the pie: Spread half (approximately 294 grams) of the white cheesecake filling over the frozen crust. Freeze for 30 minutes or until firm enough to spread the next layer on top. Then, spread the entire pumpkin filling evenly over the white layer. Freeze again for 40 minutes or until firm. Finally, spread the remaining white filling over the pumpkin layer to finish the pie.
- Make the spiderweb frosting: Melt the chocolate in a microwave-safe bowl at half power in 30-second increments, stirring after each interval. Stir in the black cocoa powder and coconut oil until the mixture becomes glossy and fudge-like. If too runny to pipe, let it cool or refrigerate, stirring occasionally until thickened.
- Pipe the spiderweb: Fit a piping bag with a Wilton #5 tip and fill it with the black chocolate frosting. Pipe a plus sign (+) on the pie surface, then an X over it, and finally connect the lines with curved piping to form a spiderweb.
- Assemble the spiders: Using a sharp paring knife, carefully cut off legs from mini pretzels and gently open the normal-sized Oreo. Place the pretzel legs between the two Oreo wafers so that the legs point downward like a spider’s. Optionally, pipe a bit of chocolate frosting inside to secure the legs after scraping off the Oreo’s white filling. Attach candy eyes to the top Oreo wafer using small dabs of frosting and place it over the bottom Oreo to form the mama spider. For the baby spiders, pipe a small amount of frosting on the bottom of each mini candy eye and affix them to the mini Oreos. Place the mama spider in the center of the pie and arrange the baby spiders around her. Use leftover black frosting with a Wilton #2 tip to pipe four small straight legs on each side of the baby spiders.
- Storage: Freeze the undecorated pie for up to 3 months. Defrost in the refrigerator for 1-2 hours or on the countertop for 20-30 minutes. Candy eyes should not be refrigerated as moisture causes color bleeding. The decorated pie with spiderweb can be refrigerated for up to 3 days but add the spiders just before serving.
Notes
- For a gluten-free version, use gluten-free graham cracker crumbs, gluten-free Oreos, and gluten-free pretzels.
- If pumpkin pie spice is unavailable, substitute with 1/2 teaspoon cinnamon, 1/4 teaspoon ginger, 1/8 teaspoon nutmeg, and 1/8 teaspoon cloves or allspice.
- 1 1/2 cups (180 grams) of graham cracker crumbs equals about 12 full sheets of crackers.
- If you live outside North America and your cream cheese is the spreadable type in plastic tubs rather than the brick style, drain excess liquid by wrapping it in cheesecloth and squeezing until 450 grams remain.
- Use about 5 to 6 mini pretzels for the spider legs; some may break while cutting, so have extras ready.
- This recipe yields 12 slices; nutrition information is based on this serving size and excludes candy eyes.
- Nutrition info is an estimate; consult a professional for precise details.
Nutrition
- Serving Size: 1 slice (1/12 of pie)
- Calories: 420 kcal
- Sugar: 30 g
- Sodium: 210 mg
- Fat: 30 g
- Saturated Fat: 18 g
- Unsaturated Fat: 10 g
- Trans Fat: 0 g
- Carbohydrates: 33 g
- Fiber: 1 g
- Protein: 5 g
- Cholesterol: 85 mg


