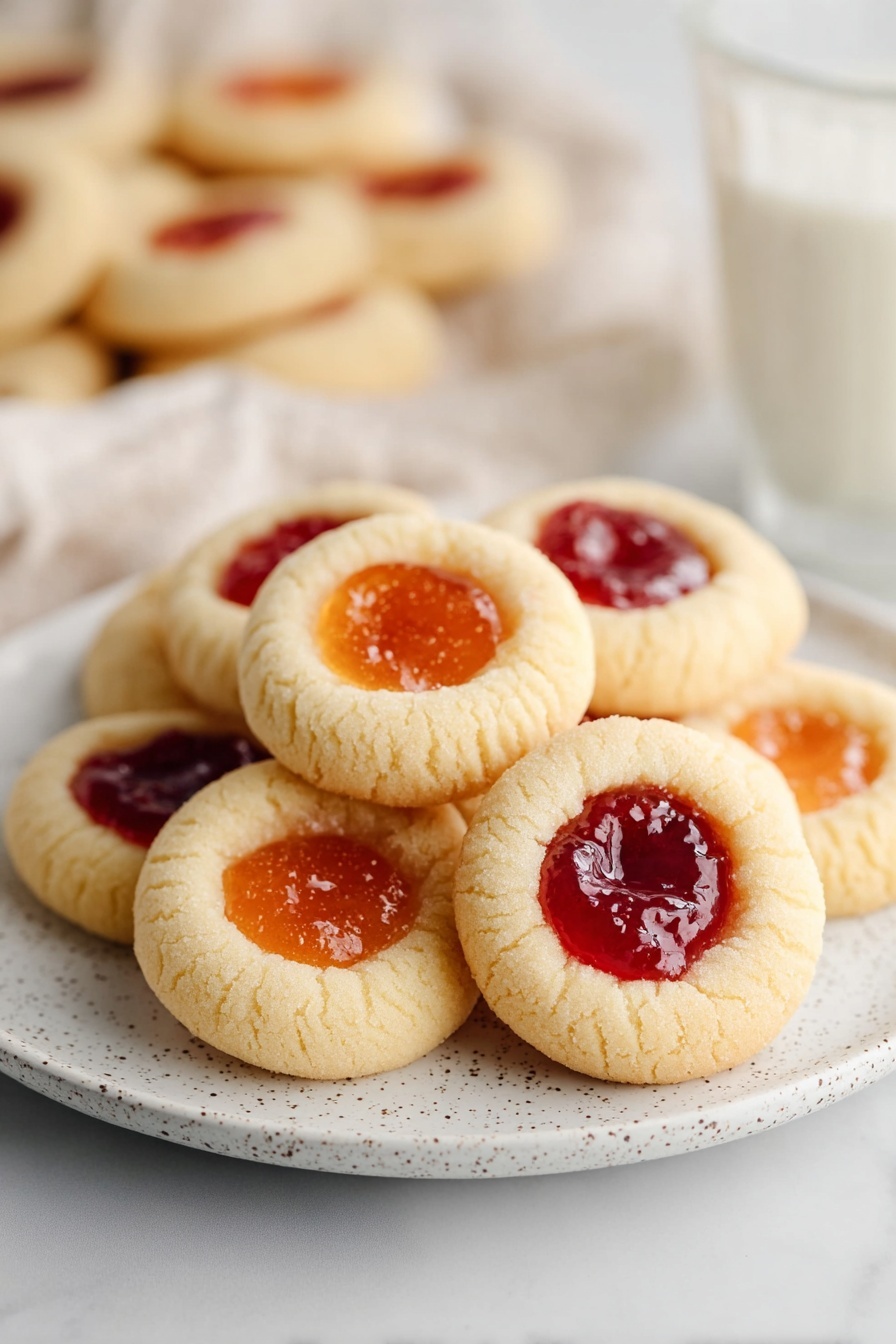
Thumbprint Cookies with Jam Recipe
If you’ve ever craved a cookie that’s both charming and delicious, you’re going to love this one. This Thumbprint Cookies with Jam Recipe is my go-to for when I want that perfect balance of buttery, tender cookie with a sweet dollop of jam in the center. Honestly, these cookies have a way of stealing the spotlight at any gathering, and I promise you’ll find yourself making them more than once. They’re straightforward to whip up and bring a lovely homemade touch to the classic jam cookie you probably remember from childhood.
Why This Recipe Works
- Simple, Quality Ingredients: You only need a handful of pantry staples plus your favorite jam to get that perfect homemade flavor.
- Perfect Texture: The dough comes together easily with a tender crumb that holds the jam without getting soggy.
- Customizable Flavors: By switching up the jam, you can tailor these cookies for any season or occasion.
- Great for Beginners: The straightforward steps and common techniques make this a fantastic recipe to tackle, even if you don’t bake often.

Ingredients & Why They Work
Each ingredient in this Thumbprint Cookies with Jam Recipe plays a key role, either bringing flavor, texture, or structure. I always find it helpful to choose quality butter and jam for the best outcome because these little details shine through with such a simple dough.

- Unsalted Butter: Using unsalted butter lets you control the saltiness and ensures the cookies bake up tender and rich.
- Granulated Sugar: This adds just the right sweetness and the extra sugar used for rolling creates a little crunch on the outside, which I love.
- Egg Yolks: They give the dough richness and help create that soft, slightly chewy texture without being cakey.
- Pure Vanilla Extract: Vanilla amps up all the other flavors and adds a subtle warmth that perfectly complements the jam.
- Salt: Just a pinch balances the sweetness and highlights the buttery flavor.
- All-Purpose Flour: Provides the structure without making the cookies too dense.
- Strawberry or Apricot Jam: The star of the show! Choose your favorite jam for a burst of fruity sweetness.
Tweak to Your Taste
I love how versatile this Thumbprint Cookies with Jam Recipe is. Sometimes I swap in different jam flavors depending on what’s in season or what mood I’m in, and it never disappoints! Feel free to experiment—your personal touch is what makes these cookies truly special.
- Jam Flavors: I’ve tried raspberry, blackberry, and even lemon curd, and each one gives the cookies a different vibe—it’s like a tiny flavor adventure.
- Nutty Twist: Sometimes I sprinkle a bit of finely chopped nuts, like pistachios or almonds, around the jam for an extra textural pop that’s irresistible.
- Gluten-Free Version: If you’re gluten-sensitive, swapping in a 1:1 gluten-free flour blend works great; just adjust the flour quantity as needed for dough consistency.
Step-by-Step: How I Make Thumbprint Cookies with Jam Recipe
Step 1: Cream the Butter and Sugar
Start by preheating your oven to 350°F (177°C) and lining your baking sheets with parchment paper or silicone mats—trust me, it makes cleanup a breeze. Then, I like to beat the softened unsalted butter with granulated sugar for about 1 to 2 minutes until it’s creamy but not too fluffy. This step is key for that lovely buttery base—the sugar also helps create that slight crunch outside when rolling the dough balls later.
Step 2: Add Egg Yolks, Vanilla, Salt, and Flour
Next, mix in your room-temperature egg yolks, vanilla extract, and salt until the mixture is well combined. This step enriches the dough with flavor and texture. Then, gradually add your all-purpose flour, stirring gently. Don’t worry if the dough looks crumbly initially — just keep mixing a bit longer, and it’ll come together. This tells me the balance is just right for soft, tender cookies.
Step 3: Shape, Sugar-Coat, and Make Indentations
This is the fun part! I use a one-tablespoon cookie scoop or a regular tablespoon to scoop out even balls of dough. If you want a slight sparkle and a subtle crunch, roll each ball in granulated sugar before placing it on the baking sheet. Then, press your thumb—or the handle of a wooden spoon—gently in the center to make a neat indentation. Don’t press too hard, or the cookie might crack or spread weirdly.
Step 4: Fill With Jam and Bake
Spoon about half a teaspoon of your favorite jam into each indentation. I find this amount is perfect to add flavor without making the cookies soggy. Pop them into your preheated oven and bake for 12 to 14 minutes until the cookies are just set and the bottoms are turning lightly golden. Then, let them cool right on the baking sheet for 10 minutes before moving them to a wire rack to finish cooling. It helps them firm up without breaking apart.
Pro Tips for Making Thumbprint Cookies with Jam Recipe
- Room Temperature Yolks: Always bring egg yolks to room temp—it helps them mix in smoothly and gives a tender texture. I usually warm them in a bowl of warm water for 5 minutes if I forget to prep ahead.
- Don’t Overfill the Jam: Too much jam can cause the cookies to spread unevenly or get soggy—use a small spoonful for the right balance.
- Scoop for Uniform Cookies: Using a cookie scoop or tablespoon helps all your cookies bake evenly—everyone notices those perfect cookie sizes!
- Cooling on the Sheet: Letting them cool on the baking sheet before transferring prevents breakage, which is perfect when your cookies are still warm and tender.
How to Serve Thumbprint Cookies with Jam Recipe
Garnishes
I usually keep it simple here—just a tiny dusting of powdered sugar if I want to add a touch of elegance. Sometimes I’ll sprinkle finely chopped nuts around the jam before baking for a subtle crunch and beautiful presentation. Those little touches make these cookies feel extra special when serving guests.
Side Dishes
These cookies pair beautifully with a cup of hot tea or coffee for a cozy afternoon break. I’ve also served them alongside mascarpone cheese and fresh berries, turning them into a delightful dessert plate. If it’s a brunch or a casual gathering, throwing a bowl of fresh fruit next to the tray makes for an inviting spread.
Creative Ways to Present
For birthdays or holidays, I’ve arranged these thumbprints in festive shapes—think circles or hearts on a platter—and sometimes I drizzle a little melted chocolate over them for an extra wow factor. I also love packaging them in clear boxes tied with twine as sweet homemade gifts that everyone appreciates.
Make Ahead and Storage
Storing Leftovers
I store leftover cookies in an airtight container at room temperature for up to four days, which keeps them nice and fresh. If I want them a bit firmer, I pop the container in the fridge. Just make sure they’re cooled completely before sealing to avoid condensation and sogginess.
Freezing
I’ve frozen both the baked cookies and the dough for this recipe. For dough, I portion it into balls, freeze on a tray, then transfer to a zip-top bag—so convenient! When you’re ready, thaw overnight in the fridge, roll in sugar, make those thumbprints, and fill with jam just before baking. Baked cookies freeze well too, and they defrost quickly on the counter.
Reheating
To freshen up leftover or thawed cookies, I like to warm them for just 5-7 minutes in a 300°F (150°C) oven. This brings back their soft crumb and slightly toasty edges without drying out the jam center.
FAQs
-
Can I use whole eggs instead of just egg yolks in this Thumbprint Cookies with Jam Recipe?
While you can technically use whole eggs, the yolks lend the dough richness and tenderness that’s key to these cookies’ texture. Using whole eggs might make the cookies slightly cakier and less buttery, so I recommend sticking with yolks if you can.
-
What if I don’t have vanilla extract on hand?
If you’re out of vanilla, you can skip it or substitute with a teaspoon of almond extract for a different but tasty twist. The vanilla adds warmth, but the cookies will still be enjoyable without it.
-
How do I prevent the jam from leaking or burning during baking?
Using just a small amount of jam—about half a teaspoon—helps prevent overflow. Also, choosing a slightly thicker jam or preserves works best. This recipe’s baking time and temperature are balanced to avoid burning.
-
Can I make these cookies vegan or dairy-free?
You can experiment with plant-based butter and an egg substitute, but the texture and flavor will change. For dairy-free, use a good quality vegan butter. For egg replacement, try flax egg or commercial replacements, but results may vary.
-
How should I store these cookies to keep them fresh longer?
Store in an airtight container at room temperature for up to four days. If you need to keep them longer, refrigeration or freezing works well. Make sure the cookies are fully cooled before storing.
Final Thoughts
This Thumbprint Cookies with Jam Recipe is one of those comforting, nostalgic treats that always brings a smile when I bake them. I hope you enjoy making them just as much as eating them! Whether you’re baking for a crowd, gift-giving, or just craving a sweet pick-me-up, these cookies come through every time. Give it a try—it’s like a little jammy hug in every bite.
Print
Thumbprint Cookies with Jam Recipe
- Prep Time: 30 minutes
- Cook Time: 14 minutes
- Total Time: 44 minutes
- Yield: 42 cookies
- Category: Dessert
- Method: Baking
- Cuisine: American
- Diet: Vegetarian
Description
Delicious and classic Thumbprint Cookies featuring a buttery dough filled with sweet strawberry or apricot jam. Perfectly soft with a slight crunch on the edges, these cookies are easy to make and ideal for any occasion.
Ingredients
Cookies
- 1 cup (230 grams) unsalted butter softened
- 2/3 cup (135 grams) granulated sugar plus 3 tablespoons (40 grams) for rolling the cookies
- 2 large egg yolks room temperature
- 1 teaspoon pure vanilla extract
- 1/4 teaspoon salt
- 2 and 1/3 cups (290 grams) all-purpose flour spooned & leveled
- 1/2 cup strawberry or apricot jam
Instructions
- Preheat Oven: Preheat your oven to 350°F (177°C). Line two large baking sheets with parchment paper or silicone baking mats and set aside to prepare for baking.
- Cream Butter and Sugar: In a stand mixer with paddle attachment or using a handheld mixer in a large bowl, cream together the softened butter and 2/3 cup granulated sugar for 1-2 minutes until well combined and fluffy.
- Add Egg Yolks, Vanilla, and Salt: Mix in the room temperature egg yolks, pure vanilla extract, and salt until fully incorporated into the batter.
- Add Flour: Gradually mix in the all-purpose flour. The dough may appear crumbly at first but will come together as you continue mixing.
- Shape Cookies: Use a one-tablespoon cookie scoop or measuring tablespoon to portion out the dough. Roll each portion into a ball, then roll each ball in the extra 3 tablespoons granulated sugar to coat the outside (optional).
- Create Thumbprint Indentations: Place the sugar-coated balls onto the prepared baking sheets, then use your thumb or the handle of a wooden spoon to press an indentation into the center of each ball.
- Fill with Jam: Spoon about 1/2 teaspoon of strawberry or apricot jam into each indentation carefully, making sure not to overfill.
- Bake Cookies: Bake the cookies at 350°F (177°C) for 14 minutes or until the cookies are set and the bottoms are lightly browned.
- Cool: Remove the baking sheets from the oven and allow cookies to cool on the sheets for 10 minutes. Then transfer them to a wire rack to cool completely before serving or storing.
Notes
- Store cookies in an airtight container at room temperature or in the refrigerator for up to 4 days.
- Freeze baked cookies for up to 3 months; thaw to room temperature before serving.
- Cookie dough can also be frozen for up to 3 months; thaw overnight in the refrigerator before rolling in sugar and filling with jam.
- For best results, use room temperature egg yolks. If you forget, warm eggs in a bowl of warm water for 5-10 minutes before separating.
- Use your favorite brand and flavor of jam; strawberry and apricot work best for classic thumbprint cookies.
Nutrition
- Serving Size: 1 cookie
- Calories: 120 kcal
- Sugar: 7 g
- Sodium: 50 mg
- Fat: 7 g
- Saturated Fat: 4 g
- Unsaturated Fat: 3 g
- Trans Fat: 0 g
- Carbohydrates: 14 g
- Fiber: 0.3 g
- Protein: 1 g
- Cholesterol: 30 mg


