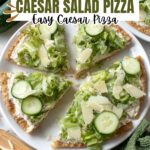
Viral Chicken Crust Caesar Salad Pizza Recipe
If you’ve never tried making pizza with a chicken crust, get ready to have your mind blown! This Viral Chicken Crust Caesar Salad Pizza Recipe is absolutely delicious and surprisingly easy, combining the savory goodness of a crispy chicken base with fresh Caesar salad toppings. It’s low-carb, packed with flavor, and perfect for when you want a pizza night that feels indulgent but is actually pretty healthy. Trust me, once you try this, you’ll be hooked—and your friends will be asking for the recipe too!
Why This Recipe Works
- Innovative Crust: Using canned chicken for the crust gives you a crispy, protein-packed base that’s a total game-changer.
- Perfect Flavor Balance: The combination of garlic, Parmesan, and Italian seasoning blends beautifully to create a savory crust that pairs wonderfully with Caesar salad.
- Quick & Flexible Cooking: You can make this recipe in either the air fryer or oven, fitting your kitchen setup and schedule.
- Fresh & Crisp Toppings: Tossing the romaine and cucumbers in Caesar dressing right before serving keeps the salad crisp and vibrant.

Ingredients & Why They Work
This recipe blends simple, wholesome ingredients that complement each other perfectly to deliver a satisfying meal. Each element has been chosen to maintain low carbs while maximizing flavor—especially if you’re aiming for a light, fresh take on pizza night. I always recommend using good-quality canned chicken and fresh veggies for the best result.
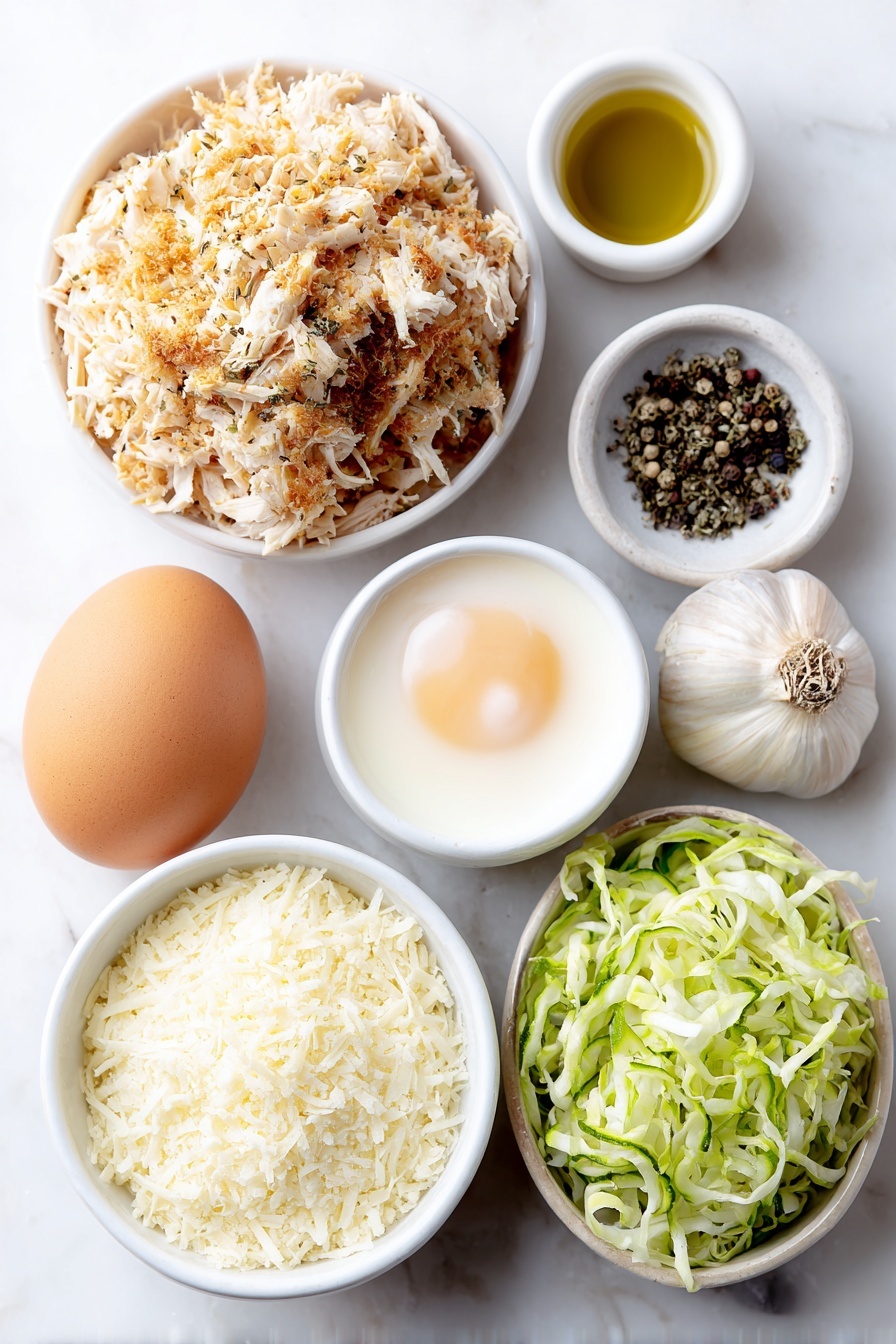
- Canned chicken: Draining it thoroughly is key—excess moisture can make your crust soggy, so take your time here.
- Egg: Acts as the binder, holding the crust together without adding heaviness.
- Parmesan cheese: Helps give the crust a crisp texture and a cheesy, savory flavor boost.
- Light olive oil: Adds moisture and helps the crust crisp up nicely during cooking.
- Garlic cloves: Fresh garlic amps up the flavor profile—don’t skip or use pre-minced powder here!
- Italian seasoning: This blend brings that herby, familiar pizza vibe to the crust.
- Salt and pepper: To taste, but don’t forget these basics—they really bring out the other flavors.
- Romaine lettuce: Crisp, fresh, and airy—it makes the perfect bed for the creamy salad dressing.
- Caesar dressing: Use a good-quality or homemade dressing for that tangy, creamy goodness that ties everything together.
- Mini cucumbers: Adds crunch and freshness, balancing the richness of the crust and dressing.
Tweak to Your Taste
I love how versatile this recipe is—it’s a great canvas for your own flavor ideas! Sometimes, I play around by adding a sprinkle of red pepper flakes to the crust for a little heat or swapping mini cucumbers for cherry tomatoes when they’re in season. The beauty here is that the core flavors work well with a variety of tweaks, so make it your own.
- Spicy Kick: Adding cayenne pepper or red pepper flakes to the chicken crust gives it a nice warming spice—my husband loved this version!
- Vegetarian Option: I’ve experimented with using shredded cauliflower instead of chicken to make a veggie crust—it’s a bit different but still tasty.
- Extra Cheese Love: If you’re a cheese fanatic like me, feel free to pile on some shredded mozzarella on top of the crust before adding the salad—it’s a rich and satisfying twist.
- Seasonal Veggies: Switch the cucumbers for shaved radishes or bell peppers for a vibrant, colorful salad topping.
Step-by-Step: How I Make Viral Chicken Crust Caesar Salad Pizza Recipe
Step 1: Blend Your Chicken Crust Mixture
Start by popping your canned chicken (well-drained!), grated Parmesan, egg, garlic cloves, Italian seasoning, salt, and pepper into a food processor or high-speed blender. I like to pulse until everything is nicely combined but still has a little texture—not too pureed. This mixture is the heart of your crust, so make sure it’s well blended for an even bake.
Step 2: Shape and Cook Your Crust
If you’re using an air fryer like I do most times, it’s super easy: cut a circle of parchment paper to fit in your basket, then drop about half the chicken mixture onto it. Oil your fingers so the mixture won’t stick, and gently spread it out to about 1/4 inch thick, leaving a bit of space from the edges so it cooks evenly. Air fry at 385°F for about 10-12 minutes, flipping halfway to get both sides beautifully golden and crisp.
If you’re going the oven route, preheat to 400°F. Spread the mixture on parchment-lined pizza pan or baking sheet, also about 1/4 inch thick. Bake for 25-30 minutes until it’s crispy on the edges and golden. Let your crust cool just a bit—it helps it crisp up more and holds together better when you add toppings.
Step 3: Toss the Caesar Salad
While your crust cooks, shred your romaine lettuce and slice the mini cucumbers. Throw them into a bowl with your Caesar dressing and Parmesan, giving everything a gentle toss. Be careful not to overdress it—just enough so every bite is creamy but still fresh and crunchy. I always prepare the salad right before serving to keep it vibrant.
Step 4: Assemble and Serve
Once your crust is ready and slightly cooled, spread a little extra Caesar dressing on top to seal it, then pile on your dressed salad. Sprinkle with extra Parmesan for that final savory touch. Slice it up and serve immediately—your Viral Chicken Crust Caesar Salad Pizza Recipe is ready to impress!
Pro Tips for Making Viral Chicken Crust Caesar Salad Pizza Recipe
- Drain Chicken Thoroughly: Trust me, squeezing out extra moisture from your canned chicken means a crispier crust every time.
- Parchment Paper Hack: Using parchment in the air fryer prevents sticking and helps you easily flip the crust for even cooking.
- Don’t Overdress the Salad: Make the salad right before serving and toss lightly to keep the leaves crunchy, avoiding sogginess.
- Adjust Cooking Time: If you want an extra crisp crust, simply add a couple of minutes more but keep a close eye to avoid burning.
How to Serve Viral Chicken Crust Caesar Salad Pizza Recipe
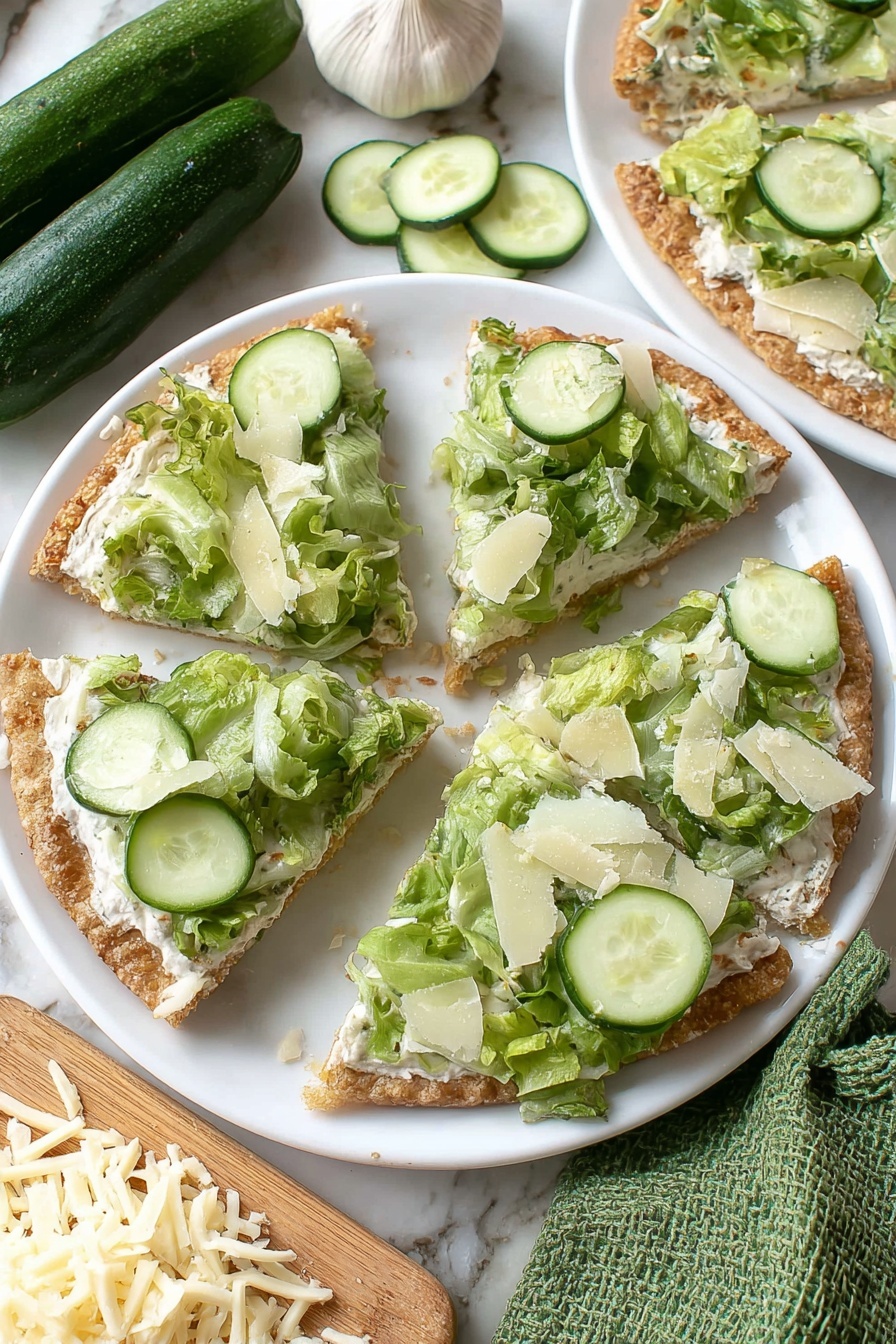
Garnishes
I like to sprinkle shaved or extra Parmesan cheese on top after assembling for added flavor and a little extra texture. Sometimes, I also add a few twists of freshly cracked black pepper and a drizzle of good-quality olive oil to amplify the richness. Freshly chopped parsley or basil brightens things up if you want a pop of green and herbal freshness.
Side Dishes
This recipe is pretty complete on its own, but if you want to round it out, I often serve it with a light tomato basil soup or some roasted veggies on the side for extra color and warmth. A crisp glass of sparkling water with lemon or a light white wine pairs wonderfully here if you’re craving a drink.
Creative Ways to Present
For special occasions, I’ve served this salad pizza open-faced on a large wooden board, letting guests serve themselves. It looks rustic and inviting, especially with colorful garnishes and fresh herbs all around. Another fun twist is to prepare mini-sized versions in muffin tins as party bites. Kids and adults alike love the novelty!
Make Ahead and Storage
Storing Leftovers
If you have leftovers (which can happen if you’re not too hungry!), I store the chicken crust and salad components separately in airtight containers. Keep the crust wrapped in parchment inside the fridge to preserve its crispiness as much as possible.
Freezing
I’ve frozen cooked chicken crust before—just wrap it tightly with foil and place it in a freezer-safe bag. It thaws well overnight in the fridge and reheats nicely in the air fryer or oven without losing too much texture.
Reheating
To bring leftover crust back to life, I pop it back in the air fryer or oven at 375°F for a few minutes to crisp it back up. Add fresh salad and dressing after reheating because the greens don’t hold up well to heat—or soggy fridge salad, trust me, it’s no fun!
FAQs
-
Can I use fresh chicken instead of canned for the crust?
Fresh cooked chicken can work, but you need to shred it finely and make sure it’s very well drained because excess moisture will prevent the crust from crisping properly. Canned chicken is easier because it’s pre-cooked and drained, saving you time and hassle.
-
Is this recipe low-carb or keto-friendly?
Absolutely! The chicken crust replaces traditional dough with protein and cheese, keeping carbs very low. Just watch your dressing ingredients, but most Caesar dressings fit well within keto guidelines.
-
Can I make this recipe gluten-free?
Yes, this entire Viral Chicken Crust Caesar Salad Pizza Recipe is naturally gluten-free since there’s no flour or wheat-based ingredients involved. Just ensure your Caesar dressing and seasonings are gluten-free.
-
How do I prevent the crust from breaking apart?
Binding is key here—make sure you don’t skip the egg and Parmesan, and remember to handle the crust gently when flipping and transferring. Letting it cool slightly before adding toppings also helps it hold its shape better.
-
Can I prepare the crust in advance?
You can prepare the crust ahead and store it in the fridge for up to 24 hours, but it’s best enjoyed fresh. If you need to go further, freezing after cooking is your friend.
Final Thoughts
This Viral Chicken Crust Caesar Salad Pizza Recipe has become one of my go-to meals when I want something easy, flavorful, and crowd-pleasing without the carbs of traditional pizza. It feels like cheating because it’s so delicious and satisfying but also surprisingly healthy. If you love experimenting in the kitchen or just want a fun twist on pizza night, I wholeheartedly recommend giving this one a try—you won’t be disappointed!
Print
Viral Chicken Crust Caesar Salad Pizza Recipe
- Prep Time: 10 minutes
- Cook Time: 15 minutes
- Total Time: 25 minutes
- Yield: 4 servings
- Category: Main Course
- Method: Air Frying
- Cuisine: American
- Diet: Low Carb
Description
This Viral Chicken Crust Caesar Salad Pizza offers a low-carb, protein-packed twist on traditional pizza by using shredded canned chicken as the crust base. Topped with fresh romaine lettuce, mini cucumbers, parmesan cheese, and creamy Caesar dressing, this recipe delivers a crisp, flavorful, and healthy alternative perfect for a quick lunch or dinner.
Ingredients
Chicken Pizza Crust:
- 20 ounces canned chicken
- 1 egg
- 1/2 cup grated parmesan cheese
- 2 tablespoons light olive oil
- 3 cloves garlic
- 2 teaspoons Italian seasoning
- 1/2 teaspoon salt
- dash pepper
Caesar Salad:
- 4 cups romaine lettuce (shredded)
- 1/4 cup Caesar dressing
- 1/4 cup parmesan cheese
- 1/2 cup mini cucumbers (sliced)
Instructions
- Prepare the crust mixture: In an upright blender or food processor, combine the canned chicken (well drained), grated parmesan cheese, egg, garlic cloves, Italian seasoning, salt, and pepper. Blend or process until well combined into a dough-like mixture.
- Air fryer method – shape and cook the crust: Cut a round piece of parchment paper to fit inside the air fryer basket. Place roughly half of the chicken mixture onto the parchment paper. Lightly oil your fingers and spread the mixture evenly about 1/4 inch thick and leave approximately 1/2 inch inside the parchment edge. Carefully transfer the parchment with the crust onto the air fryer basket. Air fry at 385°F for 12 minutes, flipping halfway through, until the crust is golden brown and crispy. Remove and let cool slightly.
- Oven method – shape and bake the crust: Preheat oven to 400°F (200°C). Line a baking sheet or pizza pan with parchment paper. Lightly oil your fingers and spread the chicken mixture about 1/4 inch thick on the parchment. Bake for 30 minutes until golden brown and crispy. Remove and let cool slightly.
- Prepare the Caesar salad: In a medium bowl, combine shredded romaine lettuce, sliced mini cucumbers, Caesar dressing, and parmesan cheese. Gently toss to coat evenly.
- Assemble the pizza: Spread one tablespoon of Caesar dressing evenly over the cooled chicken crust. Top with the tossed lettuce mixture. Sprinkle shaved parmesan cheese on top.
- Serve: Slice the pizza and serve immediately for best crispiness and flavor.
Notes
- Drain canned chicken thoroughly to remove excess moisture for a crispier crust.
- For a crispier crust, extend cooking time by a few minutes as needed.
- Adjust seasoning to taste, adding red pepper flakes or cayenne for a spicy kick.
- Prepare only the amount of salad you plan to eat to avoid sogginess since dressed salad doesn’t keep well.
- Use parchment paper to prevent sticking during air frying or baking.
Nutrition
- Serving Size: 1 serving
- Calories: 320 kcal
- Sugar: 2 g
- Sodium: 600 mg
- Fat: 18 g
- Saturated Fat: 6 g
- Unsaturated Fat: 10 g
- Trans Fat: 0 g
- Carbohydrates: 6 g
- Fiber: 2 g
- Protein: 35 g
- Cholesterol: 125 mg

